
Wemos D1 Mini Pushbutton-Controlled LED with Serial Monitoring
View and Edit Project In Cirkit Designer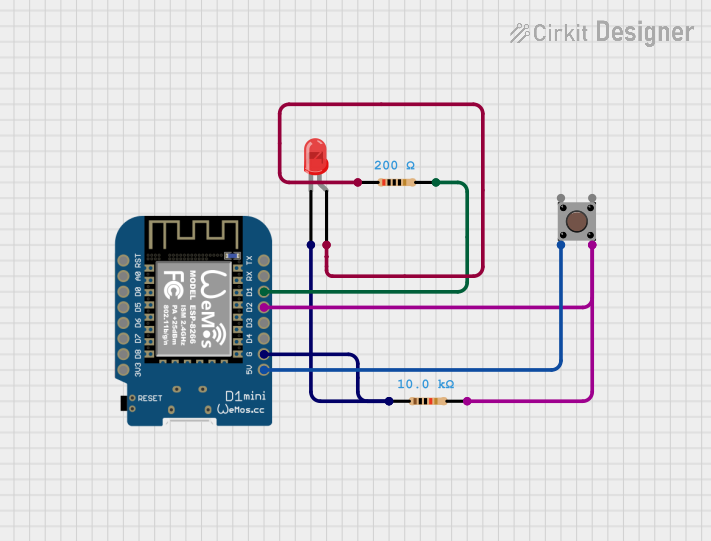
Circuit Documentation
Summary
This circuit involves a Wemos D1 Mini microcontroller, a pushbutton, a red LED, and two resistors. The pushbutton is used to control the state of the LED. When the button is pressed, the LED turns on, and when the button is released, the LED turns off. The Wemos D1 Mini reads the state of the pushbutton and controls the LED accordingly.
Component List
Wemos D1 Mini
- Description: A microcontroller board based on the ESP8266.
- Pins: RST, A0, D0, D5, D6, D7, D8, 3V3, 5V, G, D4, D3, D2, D1, RX, TX
Pushbutton
- Description: A simple pushbutton switch.
- Pins: Pin 3 (out), Pin 4 (out), Pin 1 (in), Pin 2 (in)
Resistor (10k Ohms)
- Description: A resistor with a resistance of 10k Ohms.
- Pins: pin1, pin2
LED: Two Pin (red)
- Description: A red LED with two pins.
- Pins: cathode, anode
Resistor (200 Ohms)
- Description: A resistor with a resistance of 200 Ohms.
- Pins: pin1, pin2
Wiring Details
Wemos D1 Mini
- 5V is connected to Pin 2 (in) of the Pushbutton.
- G is connected to cathode of the LED and pin1 of the 10k Ohm Resistor.
- D2 is connected to Pin 4 (out) of the Pushbutton and pin2 of the 10k Ohm Resistor.
- D1 is connected to pin2 of the 200 Ohm Resistor.
Pushbutton
- Pin 2 (in) is connected to 5V of the Wemos D1 Mini.
- Pin 4 (out) is connected to D2 of the Wemos D1 Mini and pin2 of the 10k Ohm Resistor.
Resistor (10k Ohms)
- pin1 is connected to G of the Wemos D1 Mini and cathode of the LED.
- pin2 is connected to D2 of the Wemos D1 Mini and Pin 4 (out) of the Pushbutton.
LED: Two Pin (red)
- cathode is connected to G of the Wemos D1 Mini and pin1 of the 10k Ohm Resistor.
- anode is connected to pin1 of the 200 Ohm Resistor.
Resistor (200 Ohms)
- pin1 is connected to anode of the LED.
- pin2 is connected to D1 of the Wemos D1 Mini.
Code Documentation
/*
 * This Arduino sketch reads the state of a pushbutton connected to pin D2
 * of a Wemos D1 Mini and controls a red LED connected to pin D1. When the
 * button is pressed, the LED will turn on. When the button is released,
 * the LED will turn off.
 */

void setup() {
  pinMode(D2, INPUT); // Set D2 as an input for the pushbutton
  pinMode(D1, OUTPUT); // Set D1 as an output for the LED
  Serial.begin(9600); // Initialize serial communication
}

void loop() {
  int buttonState = digitalRead(D2); // Read the state of the pushbutton
  digitalWrite(D1, buttonState); // Set the LED state to match the button
  Serial.println(buttonState); // Print the state to the serial monitor
  delay(100); // Small delay to avoid flooding the serial monitor
}
This code initializes the Wemos D1 Mini to read the state of the pushbutton connected to pin D2 and control the LED connected to pin D1. The state of the pushbutton is printed to the serial monitor for debugging purposes.