
Arduino UNO Controlled Servo Motors with HC-SR04 Ultrasonic Sensor
View and Edit Project In Cirkit Designer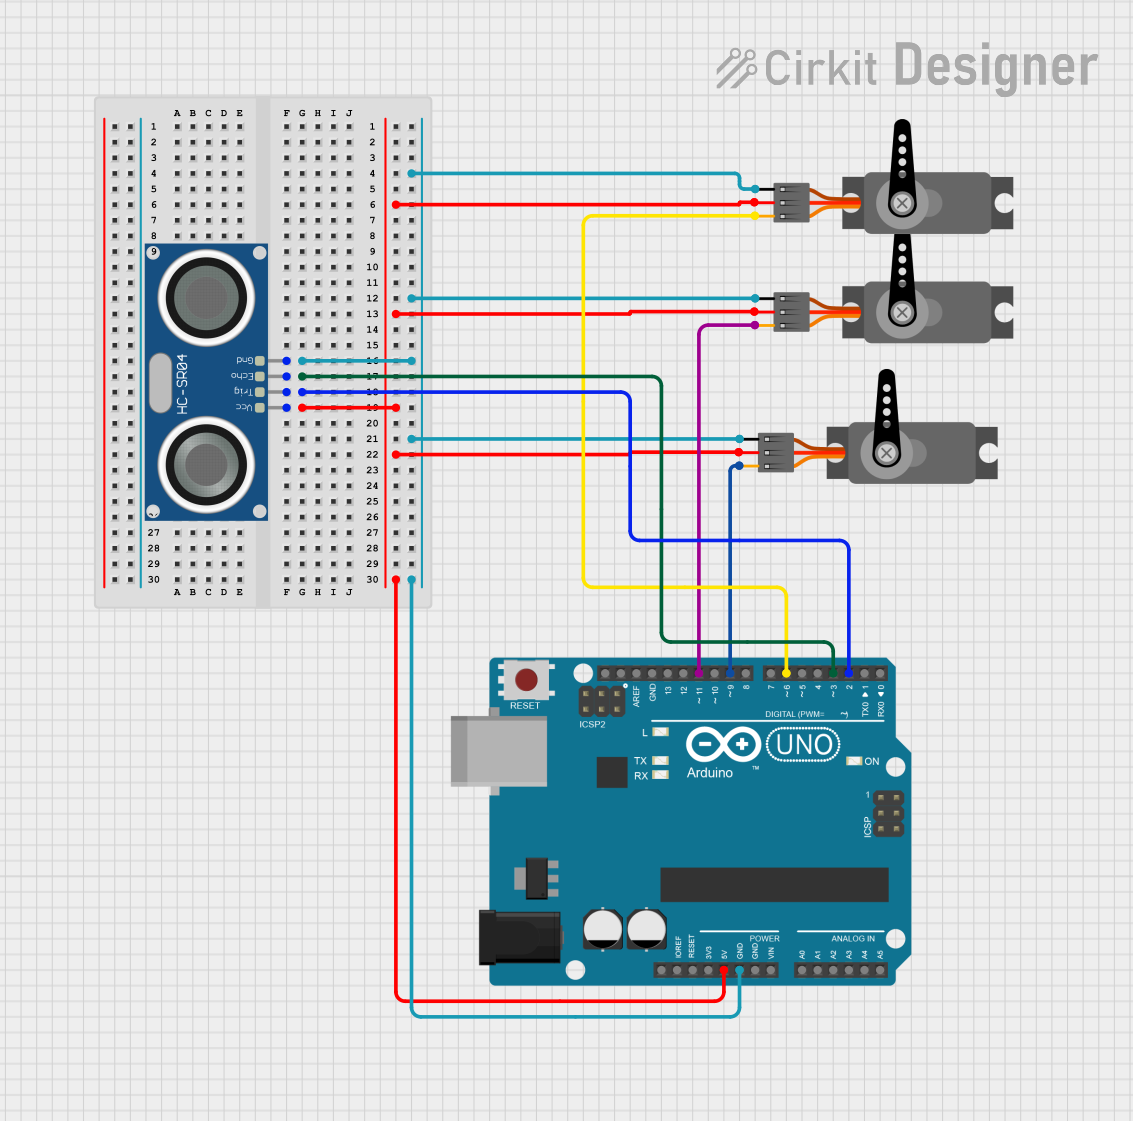
Circuit Documentation
Summary of the Circuit
This circuit is designed to interface an Arduino UNO with three servo motors and an HC-SR04 ultrasonic sensor. The Arduino UNO acts as the central controller, providing power and control signals to the servos and the ultrasonic sensor. The servos are controlled via PWM signals, allowing for precise positioning. The ultrasonic sensor is used for distance measurement and is interfaced with the Arduino using two digital pins for triggering and echo signal reception.
Component List
Arduino UNO
- Description: A microcontroller board based on the ATmega328P.
- Pins: UNUSED, IOREF, Reset, 3.3V, 5V, GND, Vin, A0-A5, SCL, SDA, AREF, D0-D13.
Servo (3 units)
- Description: A rotary actuator or linear actuator that allows for precise control of angular or linear position.
- Pins: GND, VCC, PWM.
HC-SR04 Ultrasonic Sensor
- Description: An ultrasonic ranging module that provides 2cm to 400cm non-contact measurement functionality.
- Pins: VCC, TRIG, ECHO, GND.
Wiring Details
Arduino UNO
- 5V connected to VCC of all servos and the VCC of the HC-SR04 ultrasonic sensor.
- GND connected to GND of all servos and the GND of the HC-SR04 ultrasonic sensor.
- D2 connected to TRIG of the HC-SR04 ultrasonic sensor.
- D3 connected to ECHO of the HC-SR04 ultrasonic sensor.
- D6 connected to PWM of one servo.
- D9 connected to PWM of another servo.
- D11 connected to PWM of the third servo.
Servo Motors
- GND connected to GND on the Arduino UNO.
- VCC connected to 5V on the Arduino UNO.
- PWM connected to D6, D9, and D11 on the Arduino UNO (one servo per pin).
HC-SR04 Ultrasonic Sensor
- GND connected to GND on the Arduino UNO.
- VCC connected to 5V on the Arduino UNO.
- TRIG connected to D2 on the Arduino UNO.
- ECHO connected to D3 on the Arduino UNO.
Documented Code
Arduino UNO Code (sketch.ino)
void setup() {
  // put your setup code here, to run once:

}

void loop() {
  // put your main code here, to run repeatedly:

}
Note: The provided code is a template and does not contain any functional code to control the servos or read from the ultrasonic sensor. The user is expected to fill in the setup and loop functions with the appropriate initialization and control logic.