
Circuit Documentation
Summary
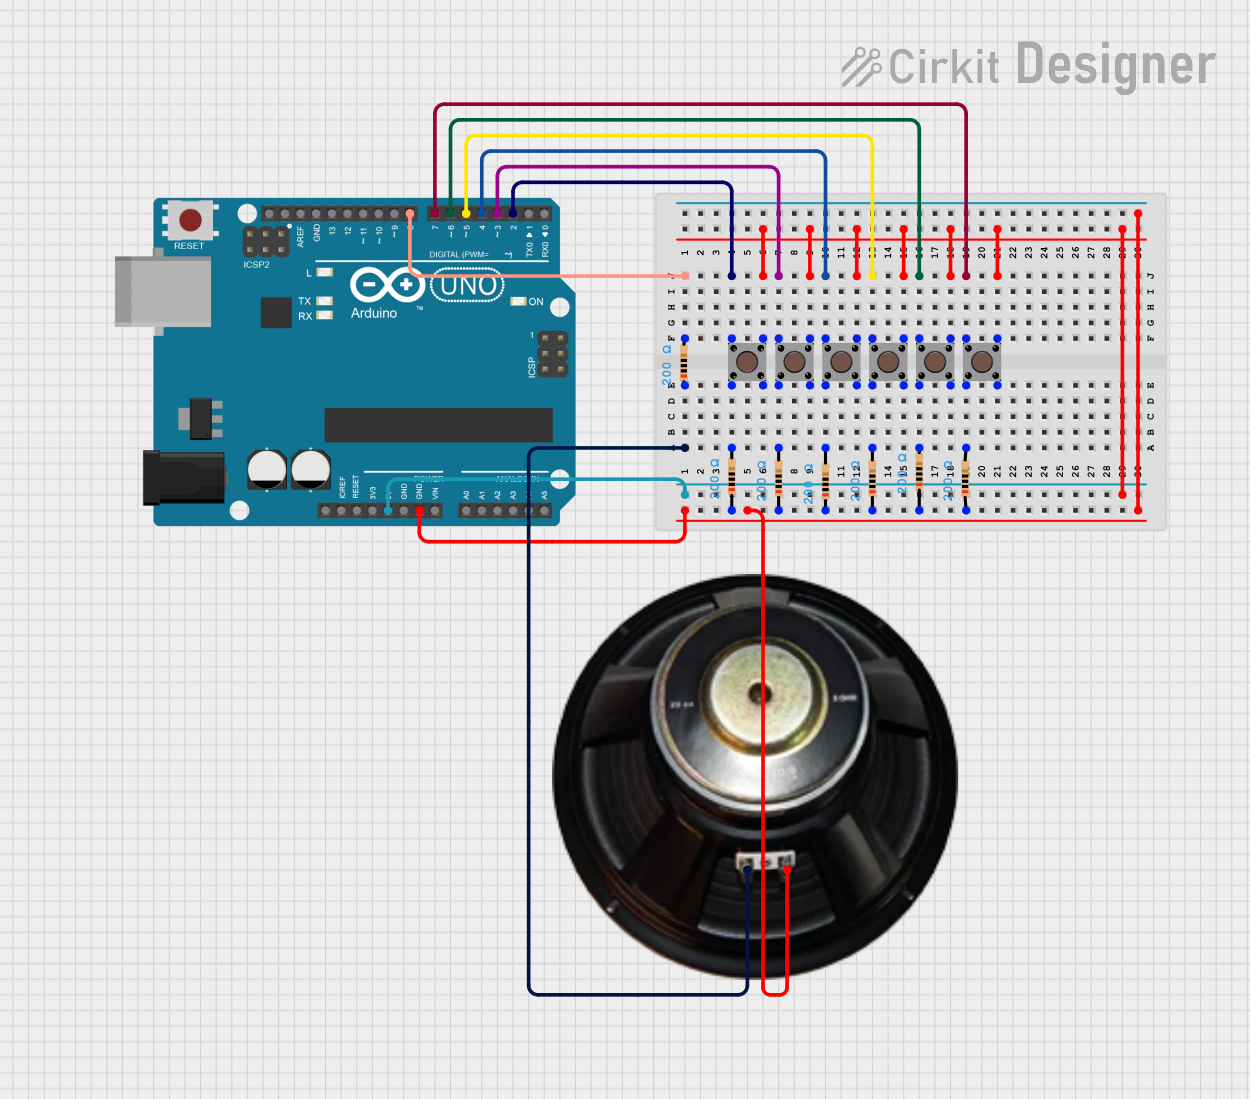
The circuit in question is designed to function as a simple electronic music keyboard using an Arduino UNO microcontroller. The circuit includes multiple pushbuttons that, when pressed, trigger the Arduino to output a tone to a speaker. Each pushbutton corresponds to a different musical note. The circuit also incorporates resistors, likely for pull-down purposes to ensure a stable low state when the buttons are not pressed.
Component List
Microcontroller
- Arduino UNO: A microcontroller board based on the ATmega328P, equipped with digital input/output pins, analog inputs, a USB connection, a power jack, an ICSP header, and a reset button.
Input Components
- Pushbuttons (6 units): Momentary pushbuttons used as input devices to trigger different musical notes when pressed.
Output Components
- Speaker: An electroacoustic transducer that converts electrical audio signals into corresponding sounds.
Passive Components
- Resistors (7 units): Each resistor has a resistance value of 200 Ohms, likely used for pull-down configurations for the pushbuttons.
Wiring Details
Arduino UNO
- Digital Pins D2-D8: Connected to the output pins of the pushbuttons.
- Digital Pin D10: Connected to the positive terminal of the speaker.
- 5V Pin: Supplies power to the common output pins of the pushbuttons.
- GND Pin: Connected to the common ground net, which includes the negative terminal of the speaker and one terminal of each resistor.
Pushbuttons
- Output Pins: Connected to the Arduino's digital input pins (D2-D8) and to the 5V supply through a common net.
- Input Pins: Connected to one terminal of the resistors, with the other terminal of each resistor connected to ground.
Speaker
- Positive Terminal: Connected to the Arduino's digital pin D10.
- Negative Terminal: Connected to the common ground net.
Resistors
- One Terminal: Connected to the input pins of the pushbuttons.
- Other Terminal: Connected to the common ground net.
Documented Code
/*
// Simple DIY Electronic Music Projects
//    diyelectromusic.wordpress.com
//
//  Arduino Music Keyboard
//  https://diyelectromusic.wordpress.com/2020/06/01/simple-arduino-music-keyboard/
//
    MIT License

    Copyright (c) 2020 diyelectromusic (Kevin)

    Permission is hereby granted, free of charge, to any person obtaining a copy of
    this software and associated documentation files (the "Software"), to deal in
    the Software without restriction, including without limitation the rights to
    use, copy, modify, merge, publish, distribute, sublicense, and/or sell copies of
    the Software, and to permit persons to whom the Software is furnished to do so,
    subject to the following conditions:

    The above copyright notice and this permission notice shall be included in all
    copies or substantial portions of the Software.

    THE SOFTWARE IS PROVIDED "AS IS", WITHOUT WARRANTY OF ANY KIND, EXPRESS OR
    IMPLIED, INCLUDING BUT NOT LIMITED TO THE WARRANTIES OF MERCHANTABILITY, FITNESS
    FOR A PARTICULAR PURPOSE AND NONINFRINGEMENT. IN NO EVENT SHALL THE AUTHORS OR
    COPYRIGHT HOLDERS BE LIABLE FOR ANY CLAIM, DAMAGES OR OTHER LIABILITY, WHETHERIN
    AN ACTION OF CONTRACT, TORT OR OTHERWISE, ARISING FROM, OUT OF OR IN CONNECTION
    WITH THE SOFTWARE OR THE USE OR OTHER DEALINGS IN THE SOFTWARE.
*/
/*
  Using principles from the following Arduino tutorials:
    toneMelody - http://www.arduino.cc/en/Tutorial/Tone
    Button     - http://www.arduino.cc/en/Tutorial/Button

*/

// Pitches taken from definitions in toneMelody
#define NOTE_C4  262
#define NOTE_D4  294
#define NOTE_E4  330
#define NOTE_F4  349
#define NOTE_G4  392
#define NOTE_A4  440

// Set up the input and output pins to be used for the speaker and keys
#define SPEAKER  10
int keys[] = {
  2, 3, 4, 5, 6, 7,
};

// Set the notes to be played by each key
int notes[] = {
  NOTE_C4, NOTE_D4, NOTE_E4, NOTE_F4, NOTE_G4, NOTE_A4,
};


void setup() {
  int numkeys = sizeof(keys)/sizeof(keys[0]);     // Programming trick to get the number of keys
  // Initialise the input buttons as piano "keys"
  for (int k = 0; k < numkeys; k++) {
    pinMode (keys[k], INPUT);
  }
}

void loop() {
  // Check each button and if pressed play the note.
  // If no buttons are pressed, turn off all notes.
  // Note - the last button to be checked will be
  // the note that ends up being played.
  int numkeys = sizeof(keys)/sizeof(keys[0]);
  int playing = -1;
  for (int k = 0; k < numkeys; k++) {
    int buttonState = digitalRead (keys[k]);
    if (buttonState == HIGH) {
      playing = k;
    }
  }

  if (playing != -1) {
    tone (SPEAKER, notes[playing]);
  } else {
    // If we didn't find a button pressed, make sure everything is off
    noTone(SPEAKER);
  }
}
This code is designed to run on the Arduino UNO microcontroller. It initializes the digital pins connected to the pushbuttons as inputs and the pin connected to the speaker as an output. In the main loop, it checks the state of each pushbutton and plays the corresponding note on the speaker when a button is pressed. If no buttons are pressed, it ensures that no tone is output to the speaker.