
Arduino Nano Controlled Ultrasonic Sensor with DC Motor Driver
View and Edit Project In Cirkit Designer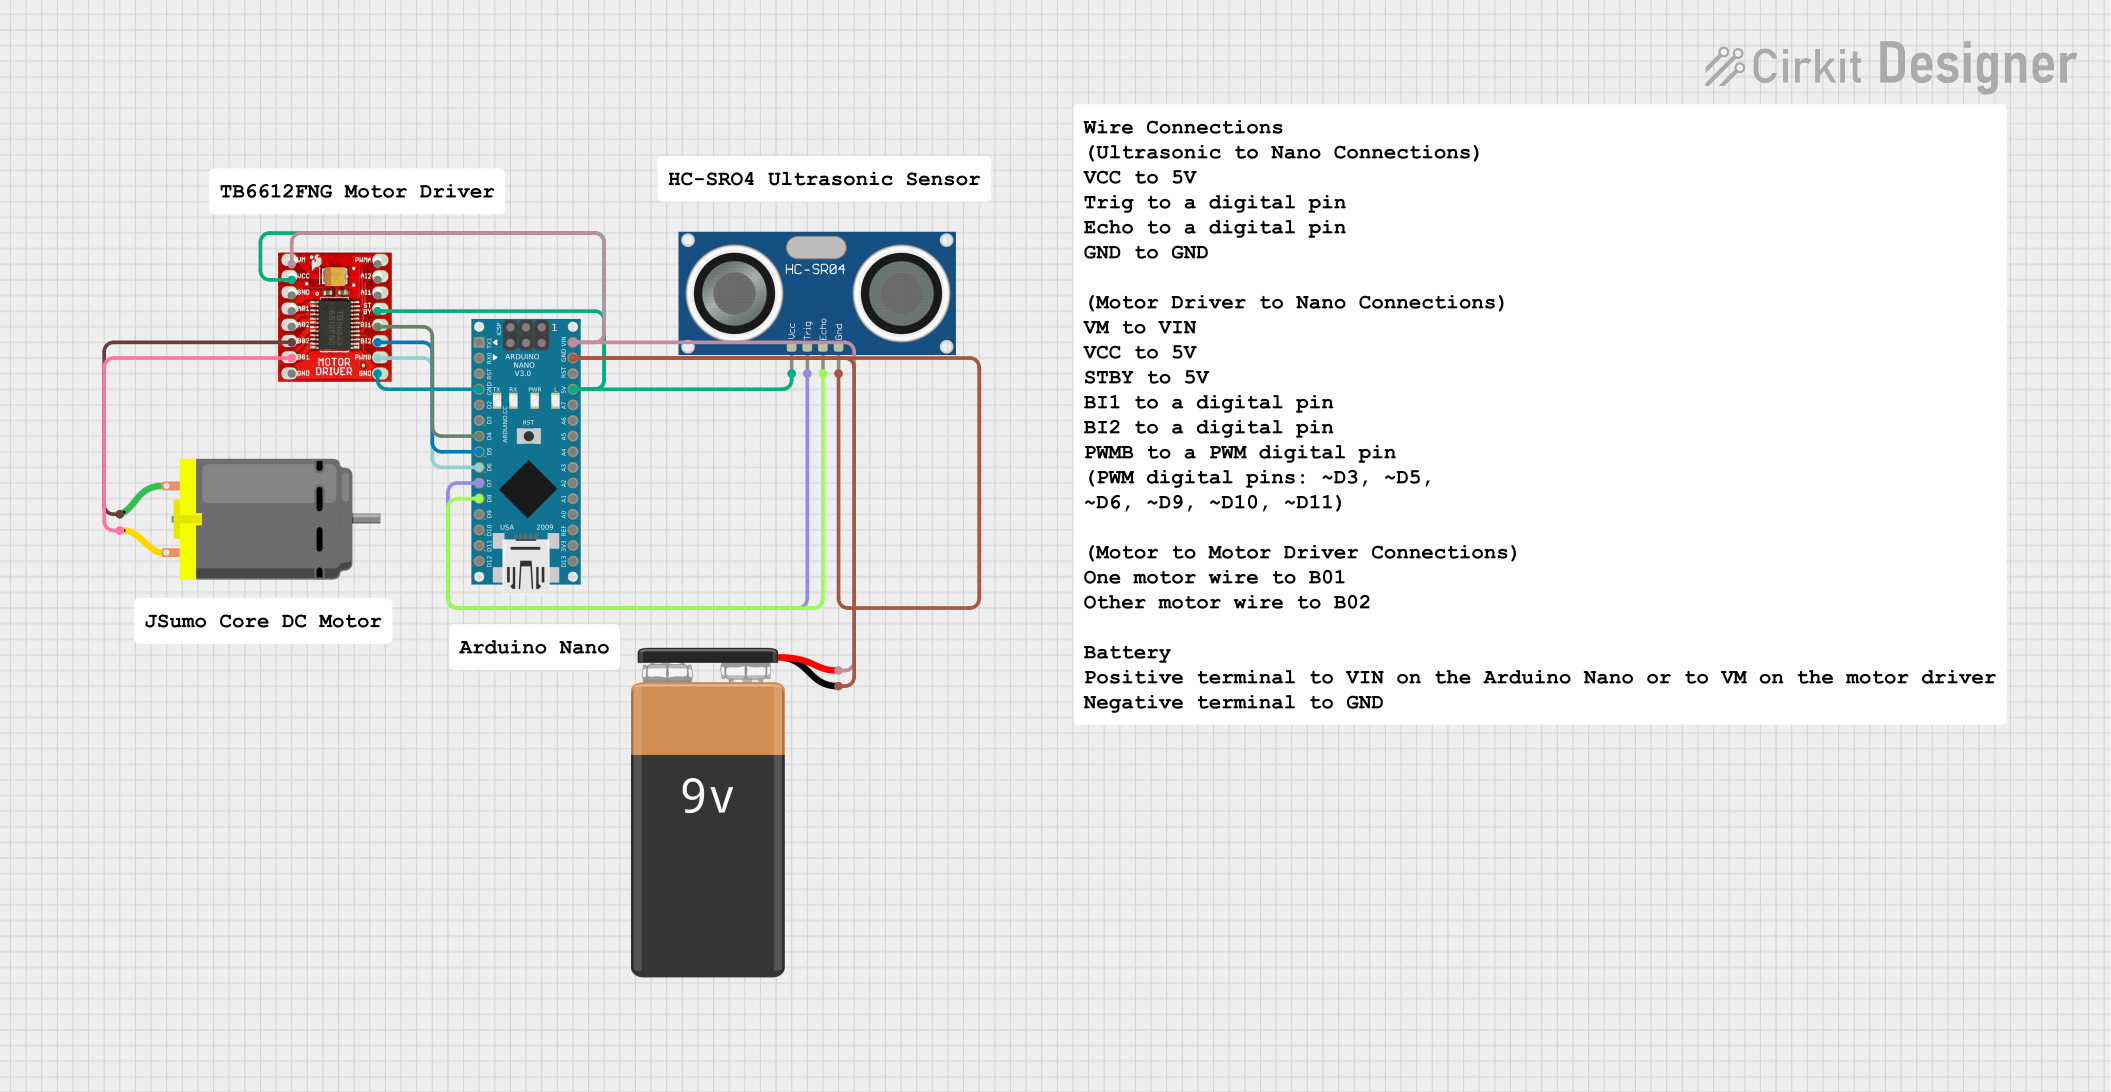
Circuit Documentation
Summary
This document provides a detailed overview of a circuit that includes an Arduino Nano microcontroller, a DC motor, a TB6612FNG motor driver, an HC-SR04 ultrasonic sensor, and a 9V battery. The circuit is designed to control the DC motor using the motor driver, which is interfaced with the Arduino Nano. The ultrasonic sensor is used for distance measurement and is also connected to the Arduino Nano. The 9V battery provides power to the circuit.
Component List
Arduino Nano
- Microcontroller board based on the ATmega328P
- It has a variety of digital and analog I/O pins
- Used as the main controller for the circuit
DC Motor
- An electric motor that runs on direct current (DC) electricity
- It is the actuator in the circuit
TB6612FNG Motor Driver
- A motor driver IC that can control up to two DC motors
- It receives control signals from the Arduino Nano to drive the DC motor
HC-SR04 Ultrasonic Sensor
- An ultrasonic distance sensor
- It can measure distances by emitting ultrasonic waves and measuring the time taken for the echo to return
9V Battery
- A standard 9V battery
- Provides power to the circuit
Wiring Details
Arduino Nano
- GND connected to the ground of the motor driver and the ultrasonic sensor
- D4 connected to the BI1 pin of the motor driver
- D5 connected to the BI2 pin of the motor driver
- D6 connected to the PWMB pin of the motor driver
- D7 connected to the TRIG pin of the ultrasonic sensor
- D8 connected to the ECHO pin of the ultrasonic sensor
- VIN connected to the positive terminal of the 9V battery and VM of the motor driver
- 5V connected to the VCC of the ultrasonic sensor and STBY and VCC of the motor driver
DC Motor
- Pin 1 connected to the B02 pin of the motor driver
- Pin 2 connected to the B01 pin of the motor driver
TB6612FNG Motor Driver
- GND connected to the ground of the Arduino Nano
- B01 connected to pin 2 of the DC motor
- B02 connected to pin 1 of the DC motor
- VCC connected to the 5V output of the Arduino Nano
- VM connected to the VIN of the Arduino Nano and the positive terminal of the 9V battery
- PWMB connected to D6 of the Arduino Nano
- BI1 connected to D4 of the Arduino Nano
- BI2 connected to D5 of the Arduino Nano
- STBY connected to the 5V output of the Arduino Nano
HC-SR04 Ultrasonic Sensor
- VCC connected to the 5V output of the Arduino Nano
- TRIG connected to D7 of the Arduino Nano
- ECHO connected to D8 of the Arduino Nano
- GND connected to the ground of the Arduino Nano
9V Battery
- + connected to the VIN of the Arduino Nano and VM of the motor driver
- - connected to the ground of the Arduino Nano
Documented Code
Arduino Nano Code (sketch.ino)
void setup() {
  // put your setup code here, to run once:

}

void loop() {
  // put your main code here, to run repeatedly:

}
Note: The code provided for the Arduino Nano is a template and does not contain any functional code to control the motor or read the ultrasonic sensor. The user is expected to fill in the setup and loop functions with the appropriate code to implement the desired functionality.