Cirkit Designer
Your all-in-one circuit design IDE
Home /
Project Documentation
Arduino Nano Fuel Level and Temperature Monitoring System with OLED Display
Circuit Documentation
Summary
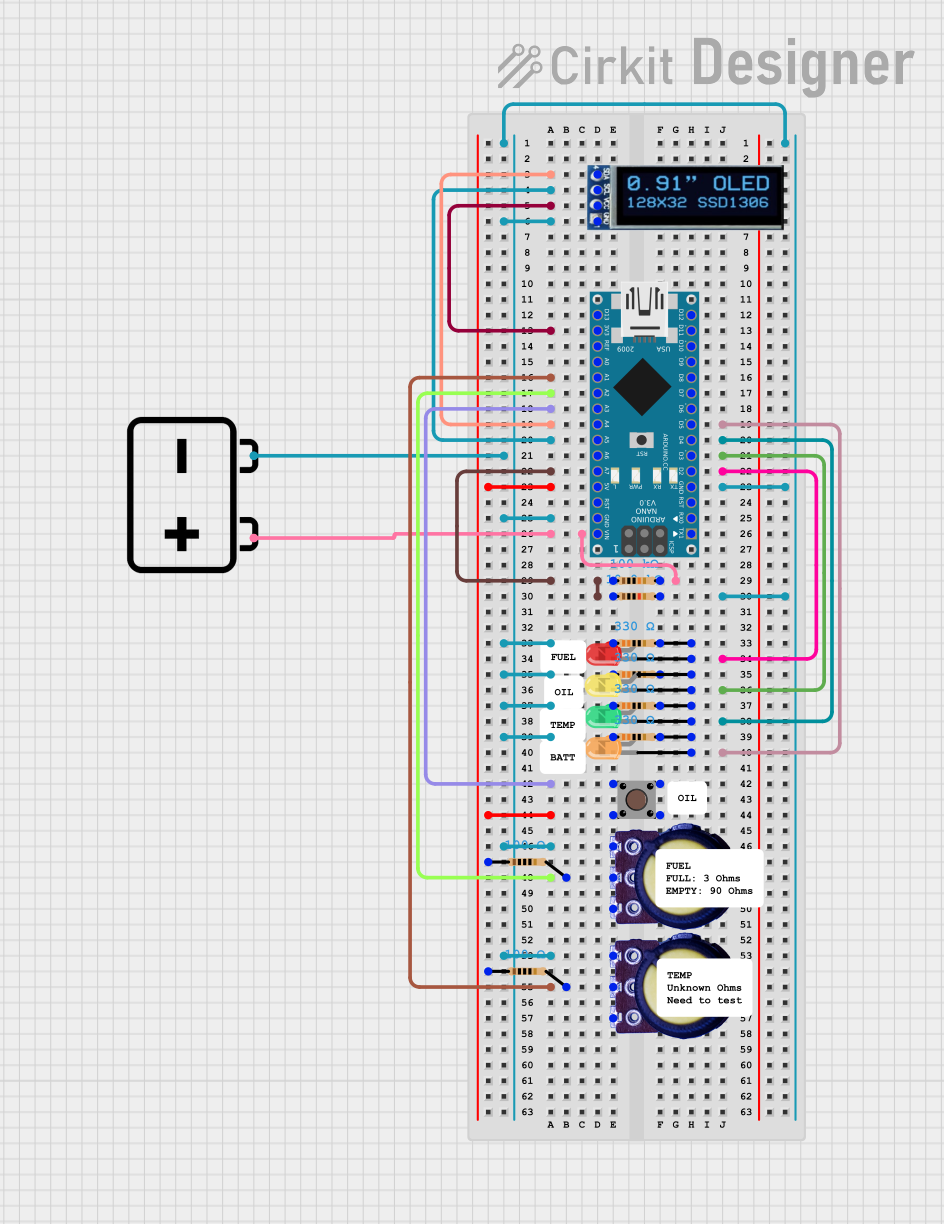
This circuit is designed for monitoring fuel level and temperature using an Arduino Nano. It includes an OLED display for visual feedback and several LEDs to indicate different statuses. The circuit also incorporates a pushbutton and potentiometers for user input and sensor readings.
Component List
Arduino Nano
- Description: Microcontroller board based on the ATmega328P.
- Pins: D1/TX, D0/RX, RESET, GND, D2, D3, D4, D5, D6, D7, D8, D9, D10, D11/MOSI, D12/MISO, VIN, 5V, A7, A6, A5, A4, A3, A2, A1, A0, AREF, 3V3, D13/SCK
LED: Two Pin (red)
- Description: Red LED.
- Pins: cathode, anode
LED: Two Pin (green)
- Description: Green LED.
- Pins: cathode, anode
LED: Two Pin (yellow)
- Description: Yellow LED.
- Pins: cathode, anode
LED: Two Pin (orange)
- Description: Orange LED.
- Pins: cathode, anode
Pushbutton
- Description: Pushbutton switch.
- Pins: Pin 3 (out), Pin 4 (out), Pin 1 (in), Pin 2 (in)
Resistor (330 Ohms)
- Description: Resistor with 330 Ohms resistance.
- Pins: pin1, pin2
Resistor (10k Ohms)
- Description: Resistor with 10k Ohms resistance.
- Pins: pin1, pin2
Resistor (100k Ohms)
- Description: Resistor with 100k Ohms resistance.
- Pins: pin1, pin2
Resistor (100 Ohms)
- Description: Resistor with 100 Ohms resistance.
- Pins: pin1, pin2
Potentiometer
- Description: Variable resistor.
- Pins: GND, Output, VCC
OLED Display (128x32)
- Description: OLED display module.
- Pins: SDA, SCL, VCC, GND
12V Battery
- Description: Power source.
- Pins: -, +
Wiring Details
Arduino Nano
- A4: Connected to SDA of OLED Display
- A5: Connected to SCL of OLED Display
- 3V3: Connected to VCC of OLED Display
- GND: Connected to GND of OLED Display, pin1 of multiple resistors, GND of potentiometers, and - of 12V Battery
- A1: Connected to Output of Potentiometer and pin2 of a resistor
- A2: Connected to Output of another Potentiometer and pin2 of another resistor
- A3: Connected to Pin 2 (in) of Pushbutton
- D5: Connected to cathode of Orange LED
- D4: Connected to cathode of Green LED
- D3: Connected to cathode of Yellow LED
- A7: Connected to pin1 of multiple resistors
- D2: Connected to cathode of Red LED
- 5V: Connected to pin1 of multiple resistors and Pin 4 (out) of Pushbutton
- VIN: Connected to pin2 of a resistor and + of 12V Battery
LED: Two Pin (red)
- cathode: Connected to D2 of Arduino Nano
- anode: Connected to pin2 of a resistor
LED: Two Pin (green)
- cathode: Connected to D4 of Arduino Nano
- anode: Connected to pin2 of a resistor
LED: Two Pin (yellow)
- cathode: Connected to D3 of Arduino Nano
- anode: Connected to pin2 of a resistor
LED: Two Pin (orange)
- cathode: Connected to D5 of Arduino Nano
- anode: Connected to pin2 of a resistor
Pushbutton
- Pin 2 (in): Connected to A3 of Arduino Nano
- Pin 4 (out): Connected to 5V of Arduino Nano
Resistor (330 Ohms)
- pin1: Connected to GND of Arduino Nano
- pin2: Connected to anode of LEDs
Resistor (10k Ohms)
- pin1: Connected to GND of Arduino Nano
- pin2: Connected to A7 of Arduino Nano
Resistor (100k Ohms)
- pin1: Connected to GND of Arduino Nano
- pin2: Connected to A7 of Arduino Nano
Resistor (100 Ohms)
- pin1: Connected to 5V of Arduino Nano
- pin2: Connected to Output of Potentiometer
Potentiometer
- GND: Connected to GND of Arduino Nano
- Output: Connected to A1 or A2 of Arduino Nano
- VCC: Connected to 5V of Arduino Nano
OLED Display (128x32)
- SDA: Connected to A4 of Arduino Nano
- SCL: Connected to A5 of Arduino Nano
- VCC: Connected to 3V3 of Arduino Nano
- GND: Connected to GND of Arduino Nano
12V Battery
- -: Connected to GND of Arduino Nano
- +: Connected to VIN of Arduino Nano
Code Documentation
/*
 * Arduino Sketch for Fuel Level and Temperature Monitoring
 *
 * This code senses the fuel level and temperature using potentiometers.
 * It turns on a red LED when the fuel level is less than 5%.
 * It turns on a yellow LED when the temperature is greater than 200°F.
 */

#include <Wire.h>
#include <Adafruit_GFX.h>
#include <Adafruit_SSD1306.h>

// Pin definitions
const int FuelSensorPin = A0;
const int OilSensorPin  = 7; // D7
const int TempSensorPin = A1;
const int BattSensorPin = A7;
const int FuelLEDPin = 2; // D2: FUEL
const int OilLEDPin  = 3; // D3: OIL
const int TempLEDPin = 4; // D4: TEMP
const int BattLEDPin = 5; // D5:  BATT

const int DISP_FUEL_MODE = 1;
const int DISP_OIL_MODE = 2;
const int DISP_TEMP_MODE = 3;
const int DISP_BATT_MODE = 4;
int DispMode = DISP_FUEL_MODE;
int DispCount = 0;

// Thresholds
const float FuelThreshold = 0.05; // 5%
const float OilThreshold  = 0.10; // 10%
const float TempMinThreshold = 100.0; // 100°F
const float TempMaxThreshold = 200.0; // 200°F
const float VoltageMinThreshold = 12.0;
const float VoltageMaxThreshold = 14.0;

// Global Values
float fuelLevelValue   = 50.0;
float oilLevelValue    = 50.0;
float temperatureValue = 150.0;
float voltageValue     = 12.0;

#define OLED_WIDTH 128 // OLED display width,  in pixels
#define OLED_HEIGHT 32 // OLED display height, in pixels
Adafruit_SSD1306 oled(OLED_WIDTH, OLED_HEIGHT, &Wire, -1); // // create SSD1306 display object connected to I2C

void setup() {
  // Initialize serial communication
  Serial.begin(9600);

  // Initialize LED pins as outputs
  pinMode(FuelLEDPin, OUTPUT);
  pinMode(OilLEDPin,  OUTPUT);
  pinMode(TempLEDPin, OUTPUT);
  pinMode(BattLEDPin, OUTPUT);

  // Initialize sensor pins as inputs
  pinMode(FuelSensorPin, INPUT);
  pinMode(OilSensorPin,  INPUT);
  pinMode(TempSensorPin, INPUT);

  // initialize OLED display with address 0x3C for 128x64
  if (!oled.begin(SSD1306_SWITCHCAPVCC, 0x3C)) {
    Serial.println(F("SSD1306 allocation failed"));
    while (true);
  }

  delay(2000);         // wait for initializing
  oled.clearDisplay(); // clear display