
Arduino UNO Controlled Servo with Joystick and LED Indicator
View and Edit Project In Cirkit Designer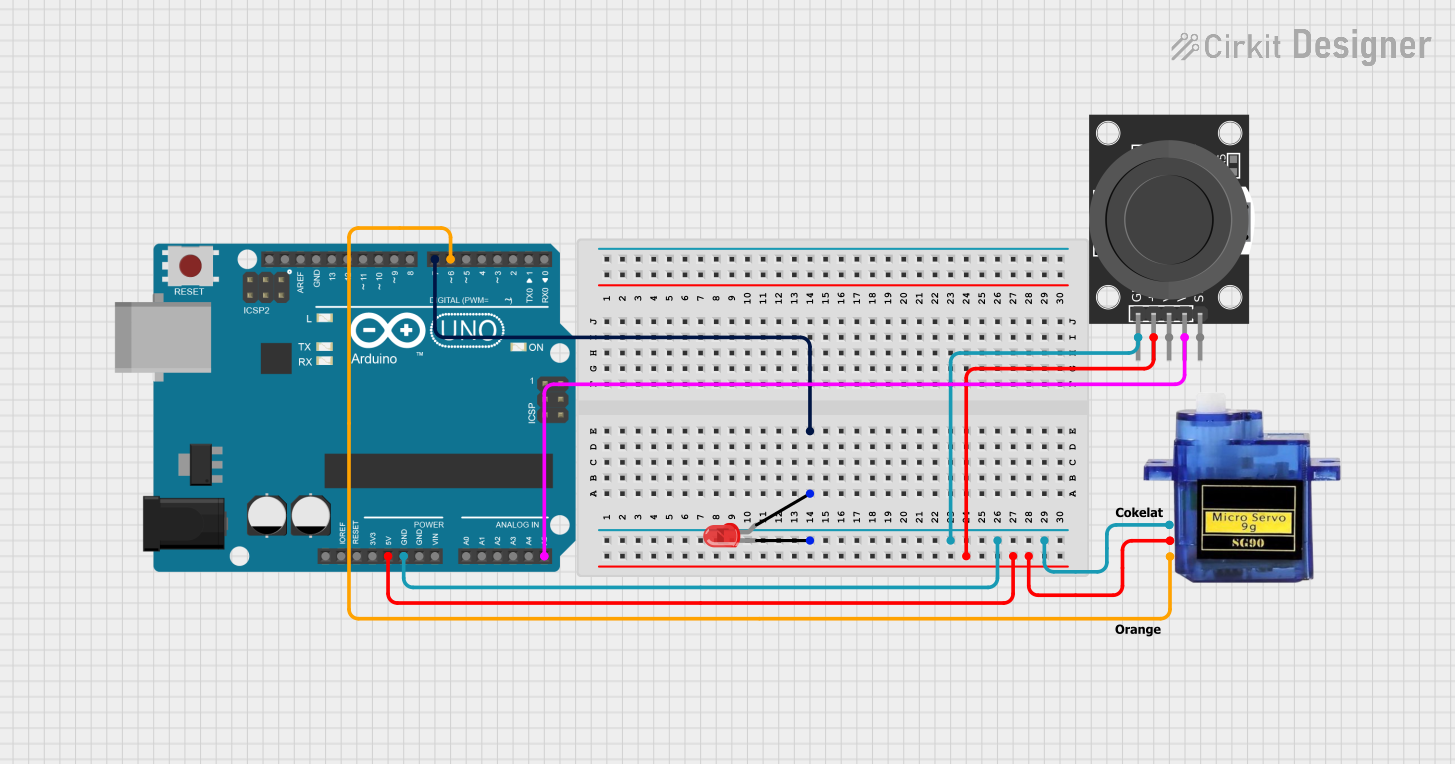
Circuit Documentation
Summary
The circuit consists of an Arduino UNO microcontroller, a micro servo 9G, a two-pin red LED, and a KY-023 Dual Axis Joystick Module. The Arduino UNO is used as the central processing unit, controlling the servo based on the input from the joystick and driving the LED. The servo is controlled via PWM signal, and the joystick provides analog input to the Arduino. The LED serves as an indicator and is connected to one of the digital pins on the Arduino. All components share a common ground, and the servo and joystick are powered by the 5V output from the Arduino.
Component List
Arduino UNO
- Microcontroller board based on the ATmega328P
- It has 14 digital input/output pins, 6 analog inputs, a 16 MHz quartz crystal, a USB connection, a power jack, an ICSP header, and a reset button.
Micro servo 9G
- A small and lightweight servo motor suitable for RC vehicles and small robotics projects.
- It operates on 5V and can be controlled via PWM signal.
LED: Two Pin (red)
- A basic red LED with an anode and cathode for indicating power, status, or other functions in a circuit.
KY-023 Dual Axis Joystick Module
- A joystick module that provides two analog outputs corresponding to the X and Y axes of the joystick movement, and a digital output for the joystick switch.
Wiring Details
Arduino UNO
- D7: Connected to the anode of the red LED.
- GND: Common ground shared with the LED, servo, and joystick module.
- 5V: Provides power to the servo and joystick module.
- A5: Receives analog input from the VRy pin of the joystick module.
- D6: Outputs PWM signal to control the micro servo 9G.
Micro servo 9G
- GND: Connected to the common ground.
- +5V: Powered by the 5V output from the Arduino UNO.
- PWM: Receives PWM control signal from D6 of the Arduino UNO.
LED: Two Pin (red)
- Cathode: Connected to the common ground.
- Anode: Connected to D7 of the Arduino UNO.
KY-023 Dual Axis Joystick Module
- GND: Connected to the common ground.
- +5V: Powered by the 5V output from the Arduino UNO.
- VRx: Not connected in this circuit.
- VRy: Connected to A5 of the Arduino UNO.
- SW: Not connected in this circuit.
Documented Code
#include <Servo.h>
Servo servo;

int js = A0; // Joystick input connected to A0

void setup() {
  Serial.begin(9600);
  servo.attach(8); // Servo control attached to pin 8
  servo.write(90); // Center the servo
}

void loop()
{
  int gerak = analogRead(js); // Read the joystick value
  Serial.println(gerak); // Print the joystick value to the serial monitor
  if(gerak > 800)
  {
    servo.write(0); // Move servo to 0 degrees
  }
  else if(gerak < 400)
  {
    servo.write(180); // Move servo to 180 degrees
  }
  else
  {
    servo.write(90); // Center the servo
  }
}
The code is written for the Arduino UNO and is responsible for reading the analog input from the joystick connected to pin A0. Depending on the input value, the servo motor is controlled to move to specific positions (0, 90, or 180 degrees). The servo is attached to pin 8, which is not explicitly mentioned in the wiring details but can be inferred from the code. The serial communication is initialized for debugging purposes, allowing the user to monitor the joystick's analog values.