Cirkit Designer
Your all-in-one circuit design IDE
Home /
Project Documentation
Arduino UNO-Based RFID and Keypad Access Control System with LCD Display
Circuit Documentation
Summary
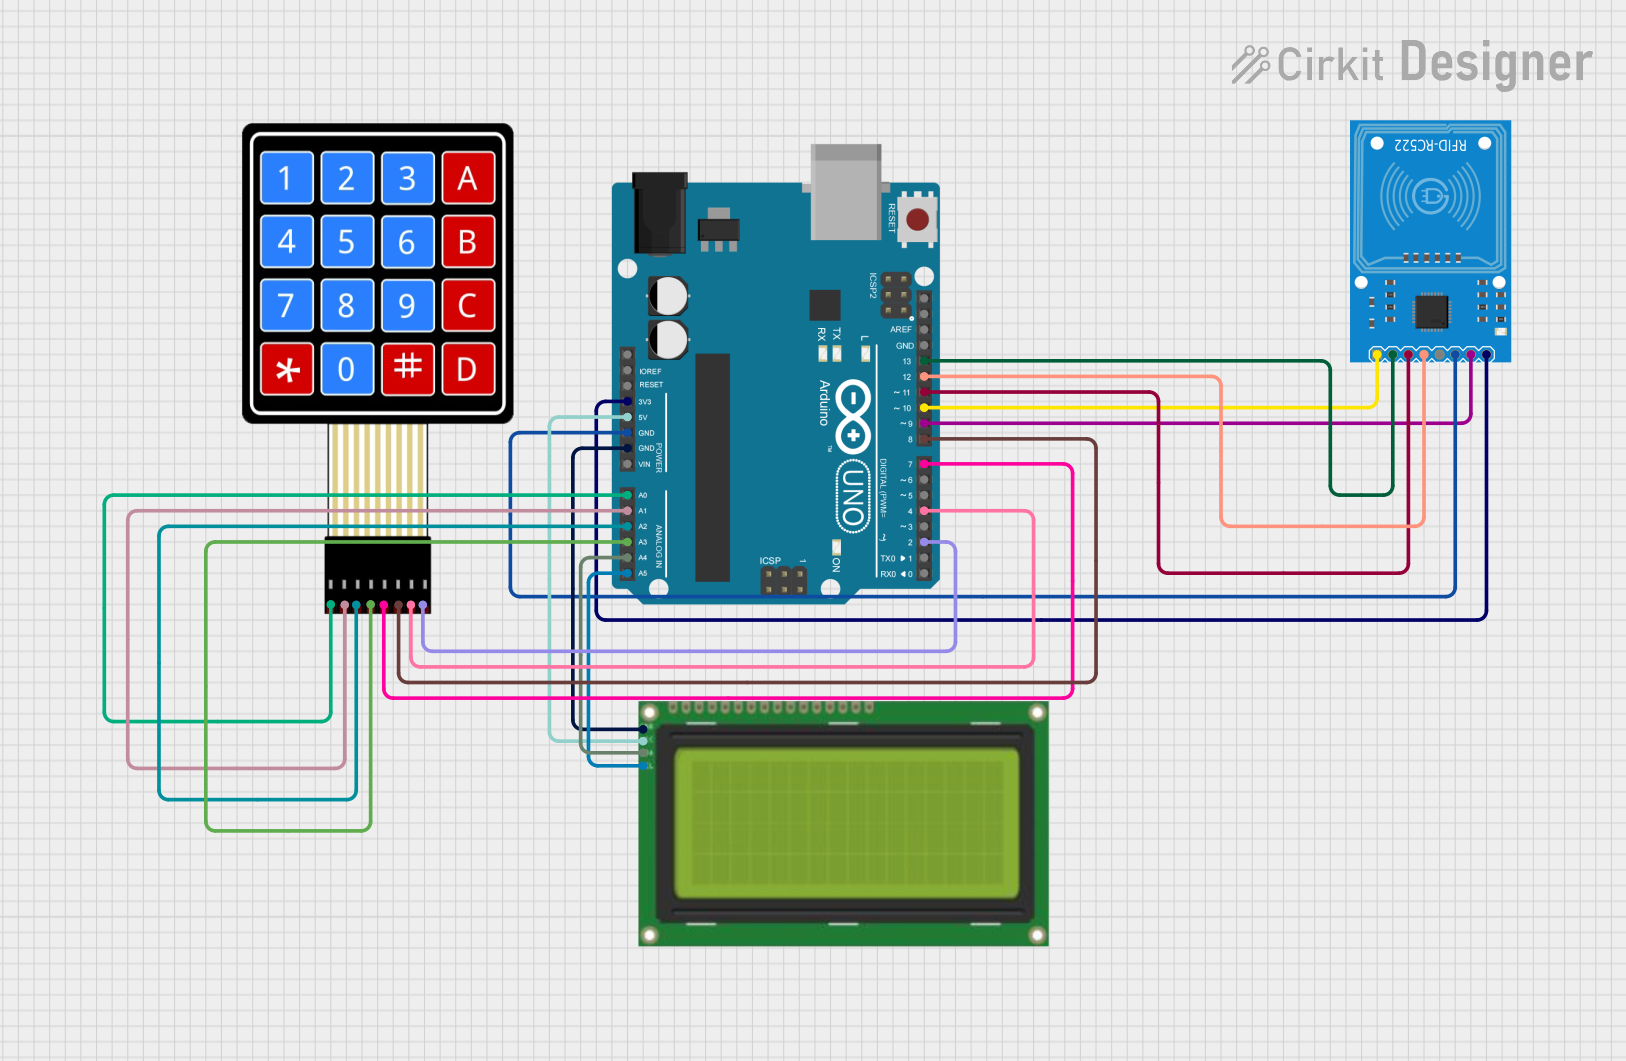
This document provides a detailed overview of a circuit that integrates an RFID reader, a 4x4 membrane matrix keypad, an Arduino UNO microcontroller, and a 20x4 I2C LCD display. The Arduino UNO serves as the central controller, interfacing with the RFID reader, keypad, and LCD to create a functional system for reading RFID tags, accepting keypad input, and displaying information on the LCD.
Component List
RFID-RC522
- Description: RFID reader module
- Pins: SDA, SCK, MOSI, MISO, IRQ, GND, RST, 3.3V
- Purpose: Used for reading RFID tags
4X4 Membrane Matrix Keypad
- Description: 4x4 matrix keypad
- Pins: R1, R2, R3, R4, C1, C2, C3, C4
- Purpose: Used for user input via keypad
Arduino UNO
- Description: Microcontroller board
- Pins: UNUSED, IOREF, Reset, 3.3V, 5V, GND, Vin, A0, A1, A2, A3, A4, A5, SCL, SDA, AREF, D13, D12, D11, D10, D9, D8, D7, D6, D5, D4, D3, D2, D1, D0
- Purpose: Central controller for the circuit
Lcd 20x4 i2c
- Description: 20x4 character LCD with I2C interface
- Pins: GND, 5V, SCA, SCL
- Purpose: Used for displaying information
Wiring Details
RFID-RC522
- SDA connected to Arduino UNO D10
- SCK connected to Arduino UNO D13
- MOSI connected to Arduino UNO D11
- MISO connected to Arduino UNO D12
- GND connected to Arduino UNO GND
- RST connected to Arduino UNO D9
- 3.3V connected to Arduino UNO 3.3V
4X4 Membrane Matrix Keypad
- R1 connected to Arduino UNO A0
- R2 connected to Arduino UNO A1
- R3 connected to Arduino UNO A2
- R4 connected to Arduino UNO A3
- C1 connected to Arduino UNO D7
- C2 connected to Arduino UNO D8
- C3 connected to Arduino UNO D4
- C4 connected to Arduino UNO D2
Lcd 20x4 i2c
- 5V connected to Arduino UNO 5V
- GND connected to Arduino UNO GND
- SCA connected to Arduino UNO A4
- SCL connected to Arduino UNO A5
Documented Code
Arduino UNO Code (sketch.ino)
void setup() {
  // put your setup code here, to run once:

}

void loop() {
  // put your main code here, to run repeatedly:

}
Additional Documentation (documentation.txt)
This document provides a comprehensive overview of the circuit, including a summary, detailed component list, wiring details, and documented code. This should serve as a useful reference for understanding and replicating the circuit.