
Arduino Nano-Based Wireless Controller with Joystick and Potentiometers
View and Edit Project In Cirkit Designer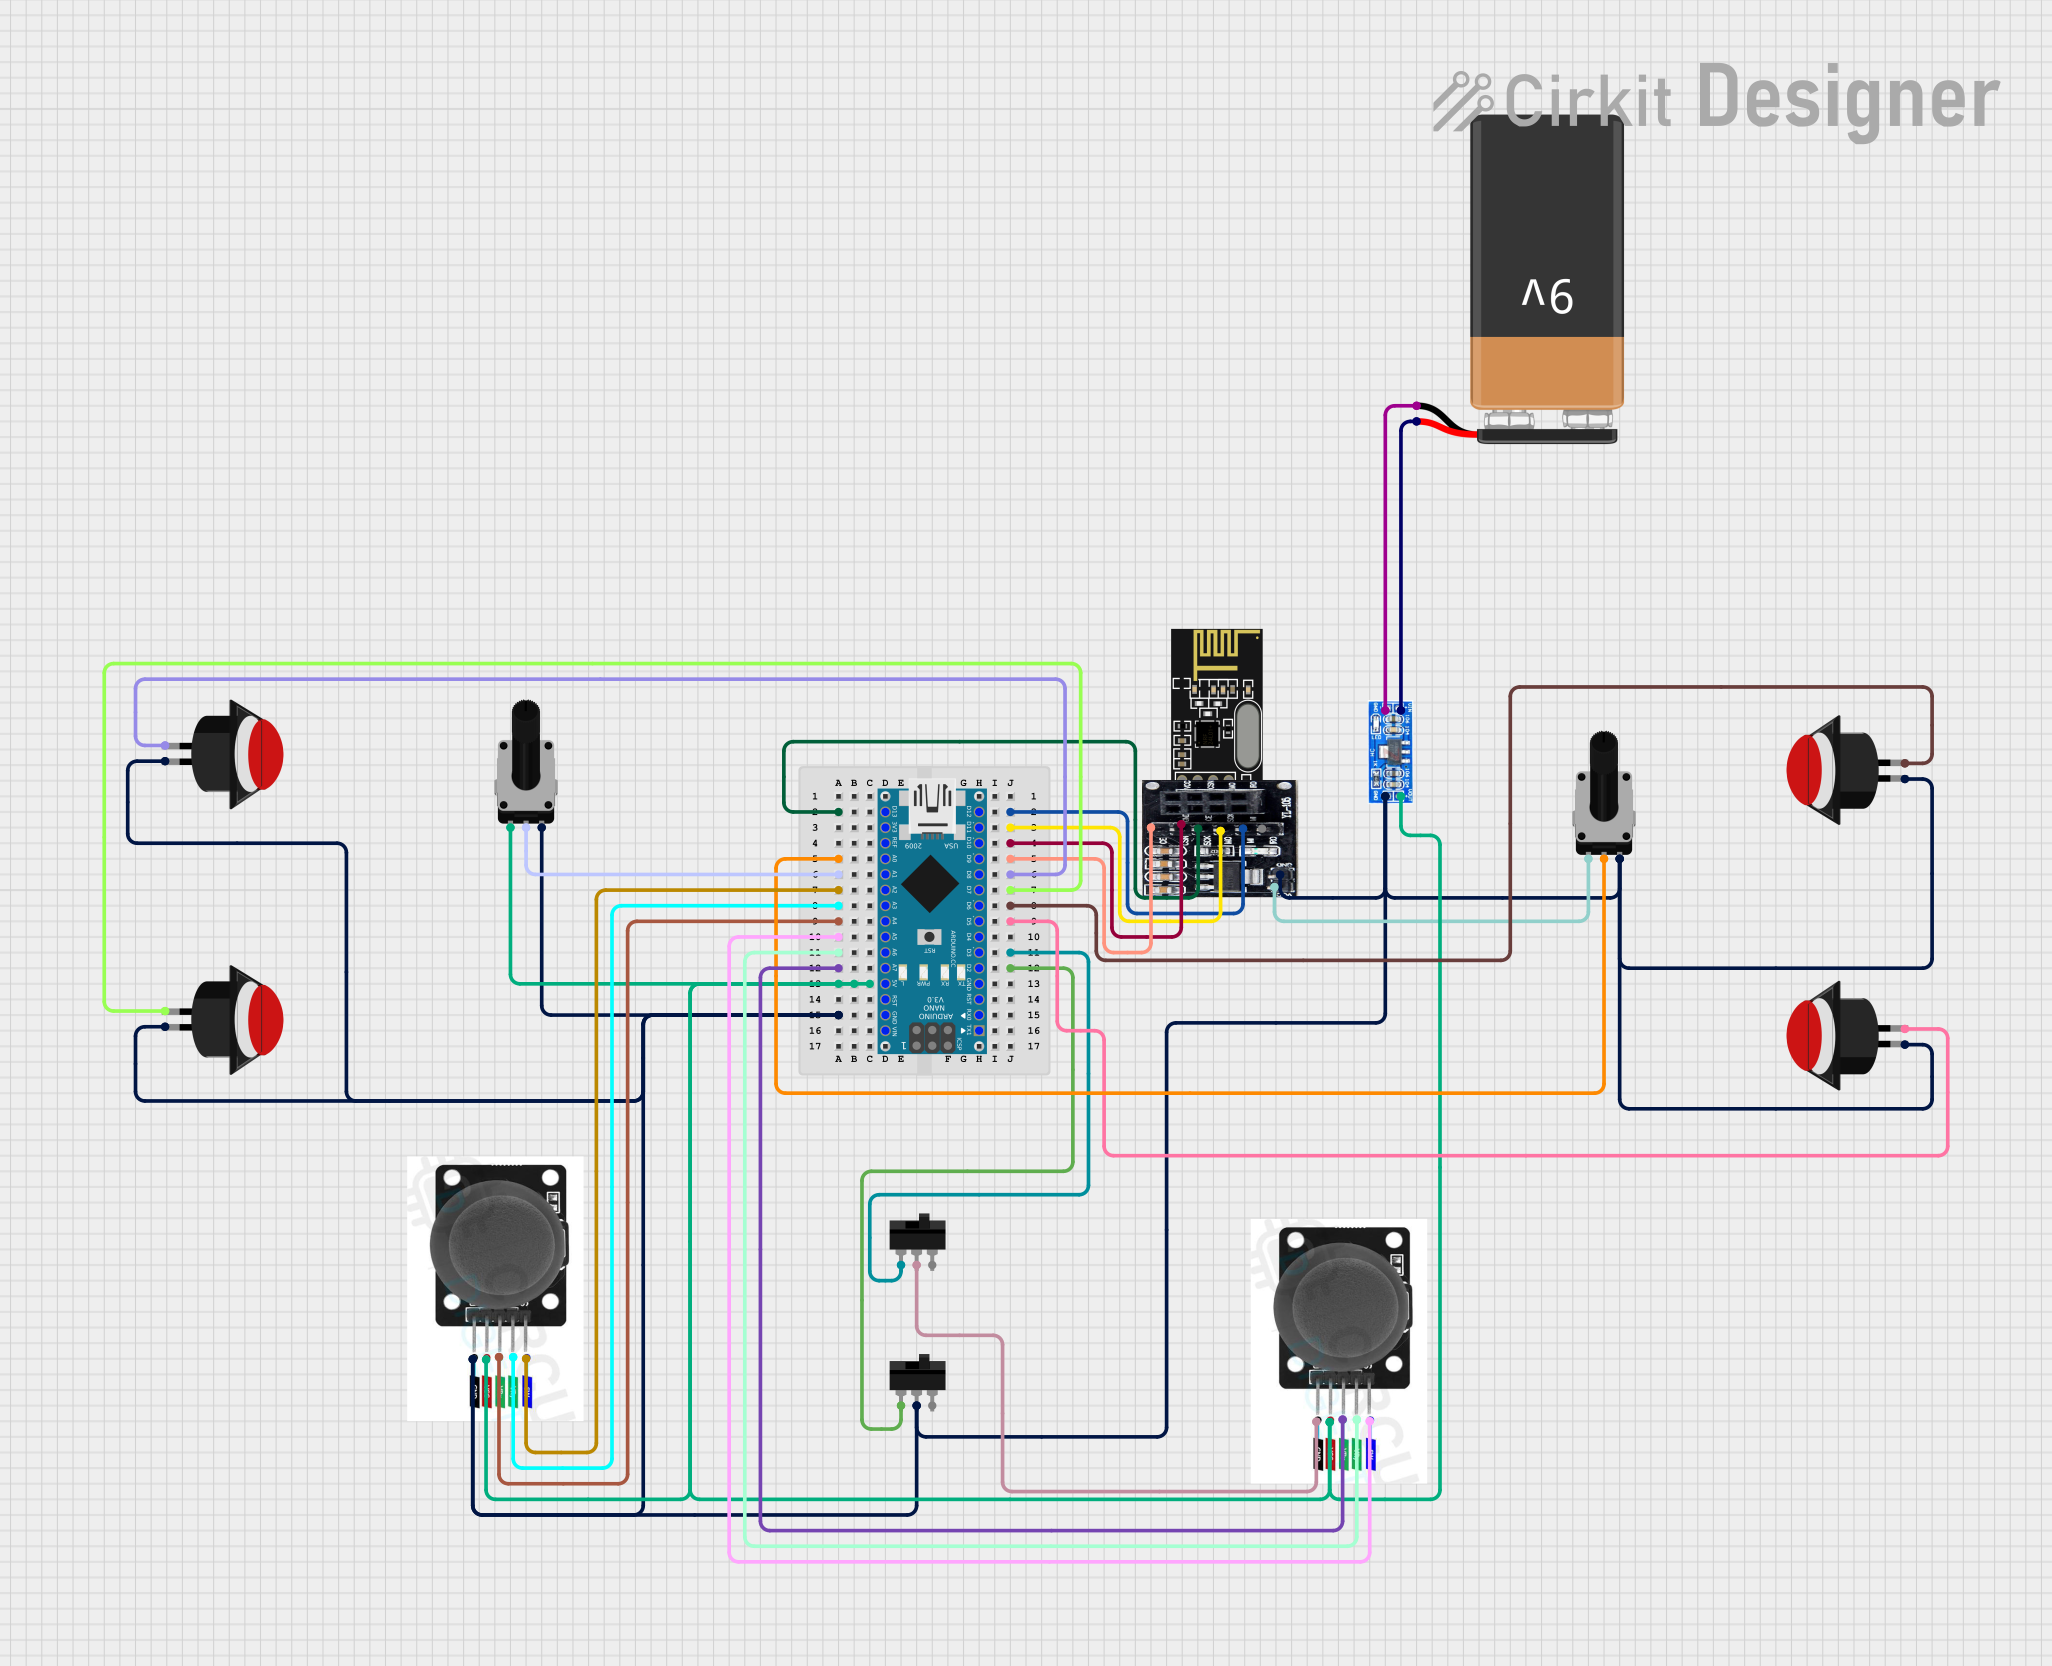
Circuit Documentation
Summary
This document provides a detailed overview of a circuit that includes an Arduino Nano, various input devices (potentiometers, push buttons, joystick modules), an NRF24L01 wireless module with an adapter, a 9V battery, and a voltage regulator (AMS1117). The circuit is designed to interface these components with the Arduino Nano for various input and control functionalities.
Component List
Arduino Nano
- Description: A small, complete, and breadboard-friendly board based on the ATmega328P.
- Pins: D1/TX, D0/RX, RESET, GND, D2, D3, D4, D5, D6, D7, D8, D9, D10, D11/MOSI, D12/MISO, VIN, 5V, A7, A6, A5, A4, A3, A2, A1, A0, AREF, 3V3, D13/SCK
Rotary Potentiometer
- Description: A variable resistor with a resistance of 10k Ohms.
- Pins: leg1, wiper, leg2
Push Button Round
- Description: A simple push button switch.
- Pins: leg0, leg1
Joystick Module
- Description: A joystick module with two potentiometers and a switch.
- Pins: SW, VRY, VRX, VCC, GND
NRF24L01
- Description: A wireless transceiver module.
- Pins: IRQ (not used), MOSI, CSN, VCC (3V), GND, CE, SCK, MISO
NRF24L01 Adapter
- Description: An adapter for the NRF24L01 module.
- Pins: CE, CSN, SCK, MOSI, MISO, IRQ, VCC, GND
9V Battery
- Description: A standard 9V battery.
- Pins: -, +
Toggle Switch
- Description: A simple toggle switch.
- Pins: L1, COM, L2
AMS1117
- Description: A voltage regulator.
- Pins: Volt Out, GND, Volt In
Wiring Details
Arduino Nano
- D13/SCK connected to NRF24L01 Adapter SCK
- D12/MISO connected to NRF24L01 Adapter MISO
- D11/MOSI connected to NRF24L01 Adapter MOSI
- D10 connected to NRF24L01 Adapter CSN
- A0 connected to Rotary Potentiometer wiper
- D9 connected to NRF24L01 Adapter CE
- A1 connected to Rotary Potentiometer wiper
- D8 connected to Push Button Round leg0
- A2 connected to Joystick Module SW
- D7 connected to Push Button Round leg0
- A3 connected to Joystick Module VRY
- D6 connected to Push Button Round leg1
- A4 connected to Joystick Module VRX
- D5 connected to Push Button Round leg1
- A5 connected to Joystick Module SW
- A6 connected to Joystick Module VRY
- D3 connected to Toggle Switch L1
- A7 connected to Joystick Module VRX
- D2 connected to Toggle Switch L1
- 5V connected to Rotary Potentiometer leg1, AMS1117 Volt Out, Joystick Module VCC
- GND connected to Toggle Switch COM, Rotary Potentiometer leg2, NRF24L01 Adapter GND, AMS1117 GND, Joystick Module GND, Push Button Round leg1, Push Button Round leg0
Rotary Potentiometer
- leg1 connected to Arduino Nano 5V
- wiper connected to Arduino Nano A0, Arduino Nano A1
- leg2 connected to Arduino Nano GND
Push Button Round
- leg0 connected to Arduino Nano D8, Arduino Nano D7
- leg1 connected to Arduino Nano D6, Arduino Nano D5, Arduino Nano GND
Joystick Module
- SW connected to Arduino Nano A2, Arduino Nano A5
- VRY connected to Arduino Nano A3, Arduino Nano A6
- VRX connected to Arduino Nano A4, Arduino Nano A7
- VCC connected to Arduino Nano 5V
- GND connected to Arduino Nano GND
NRF24L01 Adapter
- SCK connected to Arduino Nano D13/SCK
- MISO connected to Arduino Nano D12/MISO
- MOSI connected to Arduino Nano D11/MOSI
- CSN connected to Arduino Nano D10
- CE connected to Arduino Nano D9
- VCC connected to Rotary Potentiometer leg1
- GND connected to Arduino Nano GND
9V Battery
- - connected to AMS1117 GND
- + connected to AMS1117 Volt In
Toggle Switch
- L1 connected to Arduino Nano D3, Arduino Nano D2
- COM connected to Arduino Nano GND
AMS1117
- Volt Out connected to Arduino Nano 5V
- GND connected to 9V Battery -
- Volt In connected to 9V Battery +
Documented Code
Arduino Nano Code (sketch.ino)
void setup() {
  // put your setup code here, to run once:

}

void loop() {
  // put your main code here, to run repeatedly:

}
Documentation (documentation.txt)
This document provides a comprehensive overview of the circuit, including a summary, component list, wiring details, and documented code.