
Circuit Documentation
Summary
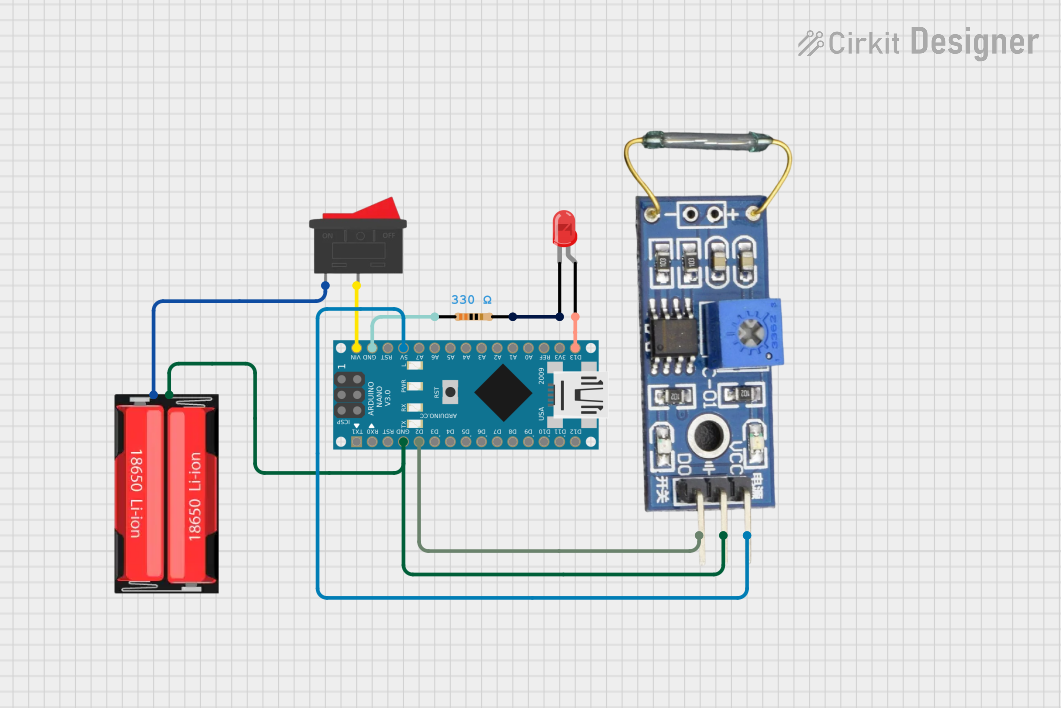
This circuit consists of an Arduino Nano microcontroller, a Reed Switch, a red LED, a 18650 Li-Ion battery, a Rocker Switch, and a 330 Ohm resistor. The circuit is designed to control the LED based on the state of the Reed Switch, powered by the 18650 Li-Ion battery, and controlled via the Rocker Switch.
Component List
Arduino Nano
- Description: A small, complete, and breadboard-friendly board based on the ATmega328P.
- Pins: D1/TX, D0/RX, RESET, GND, D2, D3, D4, D5, D6, D7, D8, D9, D10, D11/MOSI, D12/MISO, VIN, 5V, A7, A6, A5, A4, A3, A2, A1, A0, AREF, 3V3, D13/SCK
Reed Switch
- Description: A magnetic switch that opens or closes a circuit in the presence of a magnetic field.
- Pins: VCC, GND, DO
LED: Two Pin (red)
- Description: A red light-emitting diode.
- Pins: cathode, anode
18650 Li-Ion
- Description: A rechargeable lithium-ion battery.
- Pins: Positive, Negative
Rocker Switch
- Description: A switch that can be toggled between two positions.
- Pins: 1, 2
Resistor
- Description: A 330 Ohm resistor used to limit current.
- Pins: pin1, pin2
- Properties: Resistance: 330 Ohms
Wiring Details
Arduino Nano
GND is connected to:
- Negative pin of the 18650 Li-Ion battery
- GND pin of the Reed Switch
- pin1 of the Resistor
D2 is connected to:
- DO pin of the Reed Switch
VIN is connected to:
- 2 pin of the Rocker Switch
5V is connected to:
- VCC pin of the Reed Switch
D13/SCK is connected to:
- anode pin of the LED
Reed Switch
VCC is connected to:
- 5V pin of the Arduino Nano
GND is connected to:
- GND pin of the Arduino Nano
- Negative pin of the 18650 Li-Ion battery
DO is connected to:
- D2 pin of the Arduino Nano
LED: Two Pin (red)
anode is connected to:
- D13/SCK pin of the Arduino Nano
cathode is connected to:
- pin2 of the Resistor
18650 Li-Ion
Positive is connected to:
- 1 pin of the Rocker Switch
Negative is connected to:
- GND pin of the Arduino Nano
- GND pin of the Reed Switch
Rocker Switch
1 is connected to:
- Positive pin of the 18650 Li-Ion battery
2 is connected to:
- VIN pin of the Arduino Nano
Resistor
pin1 is connected to:
- GND pin of the Arduino Nano
pin2 is connected to:
- cathode pin of the LED
Code Documentation
Arduino Nano Code
void setup() {
  // put your setup code here, to run once:

}

void loop() {
  // put your main code here, to run repeatedly:

}
This code is a basic template for the Arduino Nano. The setup() function is where you initialize your components and settings, and the loop() function is where the main logic of your program runs repeatedly.