
RFID-Controlled Solenoid Door Lock with Arduino and Buzzer Alert
View and Edit Project In Cirkit Designer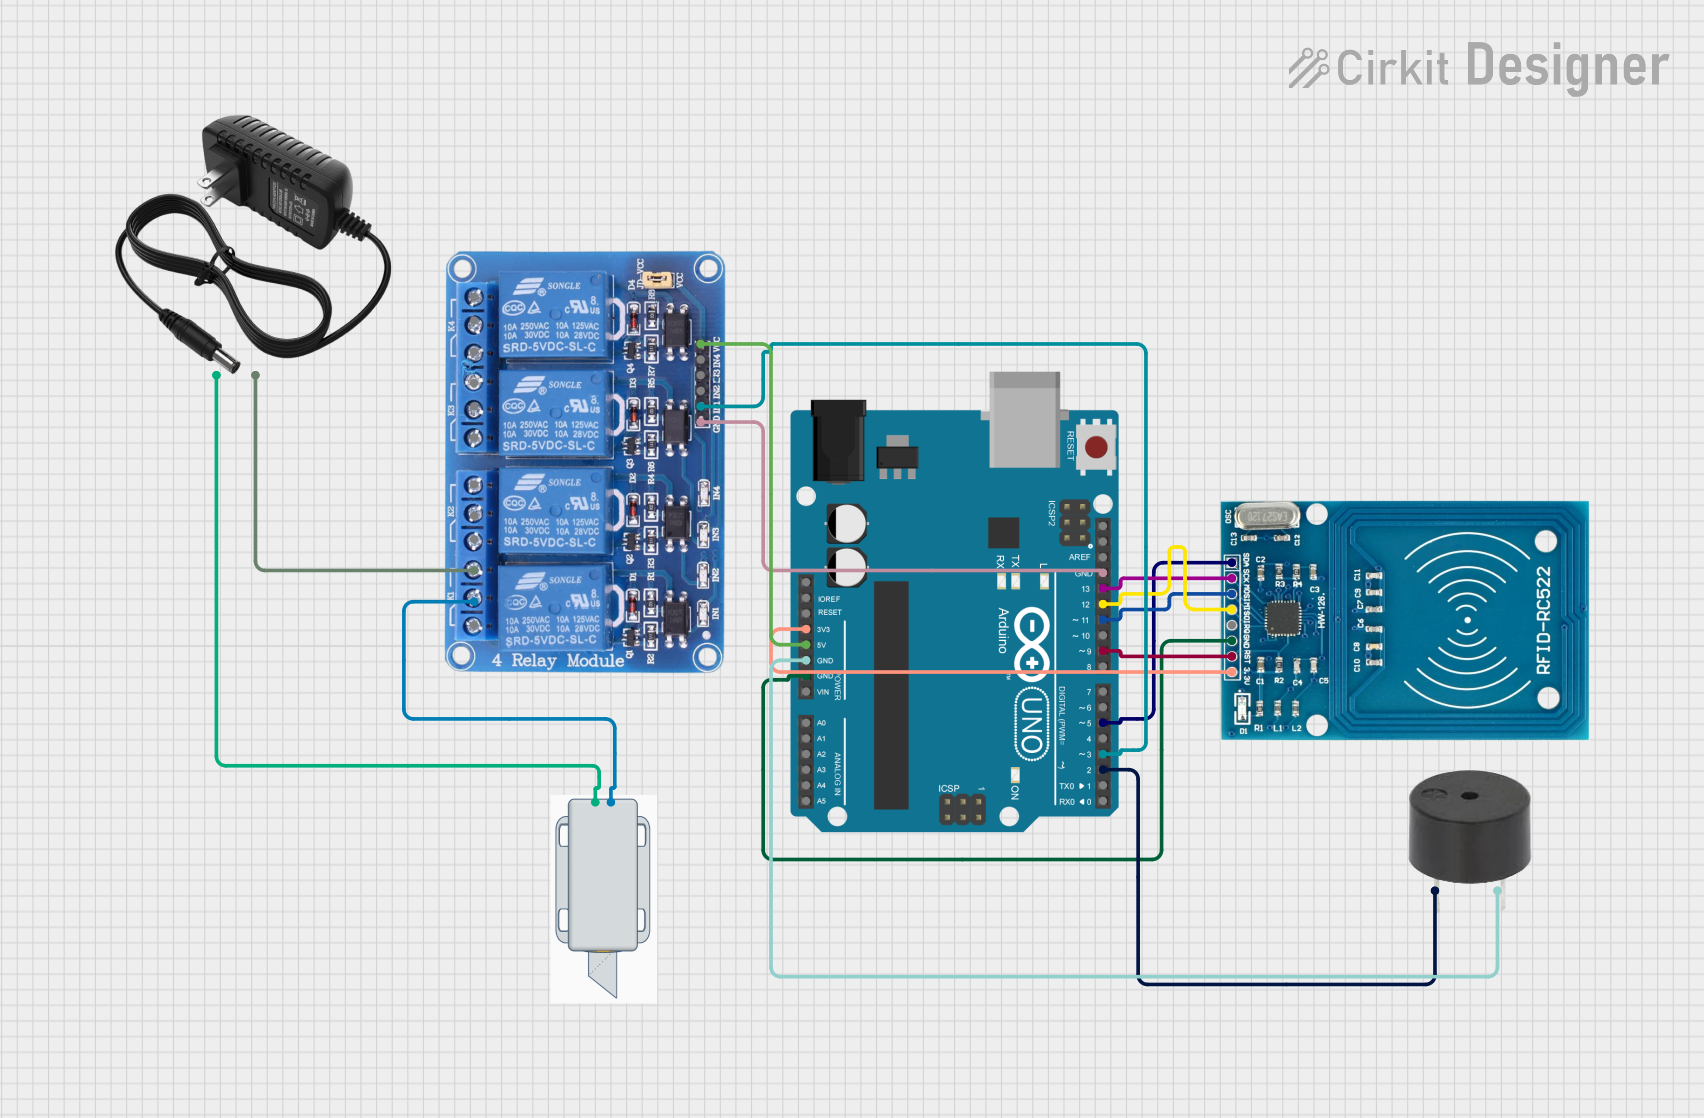
Circuit Documentation
Summary
This circuit is designed to control a 12V Solenoid Lock using an RFID system for authentication. The core of the system is an Arduino UNO microcontroller, which interfaces with an RFID-RC522 module to read RFID tags. Upon successful authentication, the Arduino activates a relay, which in turn controls the power to the solenoid lock. Additionally, there is a buzzer in the circuit that sounds when an unauthorized RFID tag is detected.
Component List
12V Solenoid Lock
- Description: A solenoid lock that operates at 12V.
- Pins:
-(Ground),+(Power)
RFID-RC522
- Description: An RFID module for reading RFID tags.
- Pins:
VCC (3.3V),RST,GND,IRQ,MISO,MOSI,SCK,SDA
Arduino UNO
- Description: A microcontroller board based on the ATmega328P.
- Pins:
IOREF,Reset,3.3V,5V,GND,Vin,A0toA5,SCL,SDA,AREF,D0toD13
Relay 4 Channel 5V
- Description: A 4-channel relay module that operates at 5V.
- Pins:
GND,IN1toIN4,VCC,COM1toCOM4,NO1toNO4,NC1toNC4
Buzzer
- Description: An electronic buzzer for audible alerts.
- Pins:
PIN(Signal),GND
12V Power Supply
- Description: A power supply unit that provides 12V.
- Pins:
+(Power),-(Ground)
Wiring Details
12V Solenoid Lock
-connected to Relay 4 Channel 5VCOM1+connected to 12V Power Supply+
RFID-RC522
VCC (3.3V)connected to Arduino UNO3.3VRSTconnected to Arduino UNOD9GNDconnected to Arduino UNOGNDMISOconnected to Arduino UNOD12MOSIconnected to Arduino UNOD11SCKconnected to Arduino UNOD13SDAconnected to Arduino UNOD10
Arduino UNO
3.3Vconnected to RFID-RC522VCC (3.3V)5Vconnected to Relay 4 Channel 5VVCCGNDconnected to RFID-RC522GND, BuzzerGND, and Relay 4 Channel 5VGNDD2connected to BuzzerPIND3connected to Relay 4 Channel 5VIN1D9connected to RFID-RC522RSTD10connected to RFID-RC522SDAD11connected to RFID-RC522MOSID12connected to RFID-RC522MISOD13connected to RFID-RC522SCK
Relay 4 Channel 5V
GNDconnected to Arduino UNOGNDIN1connected to Arduino UNOD3VCCconnected to Arduino UNO5VCOM1connected to 12V Solenoid Lock-NO1connected to 12V Power Supply-
Buzzer
PINconnected to Arduino UNOD2GNDconnected to Arduino UNOGND
12V Power Supply
+connected to 12V Solenoid Lock+-connected to Relay 4 Channel 5VNO1
Documented Code
#include <SPI.h>
#include <MFRC522.h>

#define SS_PIN 10     // Slave Select pin for RFID
#define RST_PIN 9     // Reset pin for RFID
#define RELAY_PIN 7   // Relay control pin for the lock
#define BUZZER_PIN 6  // Buzzer pin

MFRC522 rfid(SS_PIN, RST_PIN); // Create an instance of the RFID module

// Predefined authorized card ID (replace this with your actual RFID card UID)
byte authorizedUID[] = {0xDE, 0xAD, 0xBE, 0xEF}; // Update with actual UID of your card

void setup() {
  Serial.begin(9600);        // Initialize serial communication
  SPI.begin();               // Start SPI bus
  rfid.PCD_Init();           // Initialize RFID reader

  pinMode(RELAY_PIN, OUTPUT);  // Set relay pin as output
  pinMode(BUZZER_PIN, OUTPUT); // Set buzzer pin as output

  digitalWrite(RELAY_PIN, LOW);  // Start with the lock closed (relay off)
  digitalWrite(BUZZER_PIN, LOW); // Buzzer off initially

  Serial.println("Place your card on the reader...");
}

void loop() {
  // Look for new RFID cards
  if (!rfid.PICC_IsNewCardPresent()) {
    return;
  }

  // Select the RFID card
  if (!rfid.PICC_ReadCardSerial()) {
    return;
  }

  // Show the UID of the card
  Serial.print("UID: ");
  for (byte i = 0; i < rfid.uid.size; i++) {
    Serial.print(rfid.uid.uidByte[i], HEX);
    Serial.print(" ");
  }
  Serial.println();

  // Compare the read UID with the authorized UID
  if (checkUID()) {
    // Authorized card
    Serial.println("Authorized card. Unlocking the door...");
    digitalWrite(RELAY_PIN, HIGH);  // Unlock (relay on)
    delay(5000);                    // Keep the door unlocked for 5 seconds
    digitalWrite(RELAY_PIN, LOW);   // Lock the door (relay off)
  } else {
    // Unauthorized card
    Serial.println("Unauthorized card. Buzzing...");
    digitalWrite(BUZZER_PIN, HIGH); // Buzz (buzzer on)
    delay(3000);                    // Buzz for 3 seconds
    digitalWrite(BUZZER_PIN, LOW);  // Turn off the buzzer
  }

  rfid.PICC_HaltA(); // Halt RFID reader
}

// Function to check if the scanned UID matches the authorized UID
bool checkUID() {
  if (rfid.uid.size != sizeof(authorizedUID)) {
    return false;  // UID sizes don't match
  }

  for (byte i = 0; i < rfid.uid.size; i++) {
    if (rfid.uid.uidByte[i] != authorizedUID[i]) {
      return false;  // UID bytes don't match
    }
  }

  return true;  // All bytes match, card is authorized
}
This code is responsible for initializing the RFID reader and the output pins for the relay and buzzer. It continuously checks for new RFID cards, reads their UIDs, and compares them to a predefined authorized UID. If the UID matches, it activates the relay to unlock the solenoid lock for a set period. If the UID does not match, it activates the buzzer to alert of an unauthorized attempt.