
Circuit Documentation
Summary
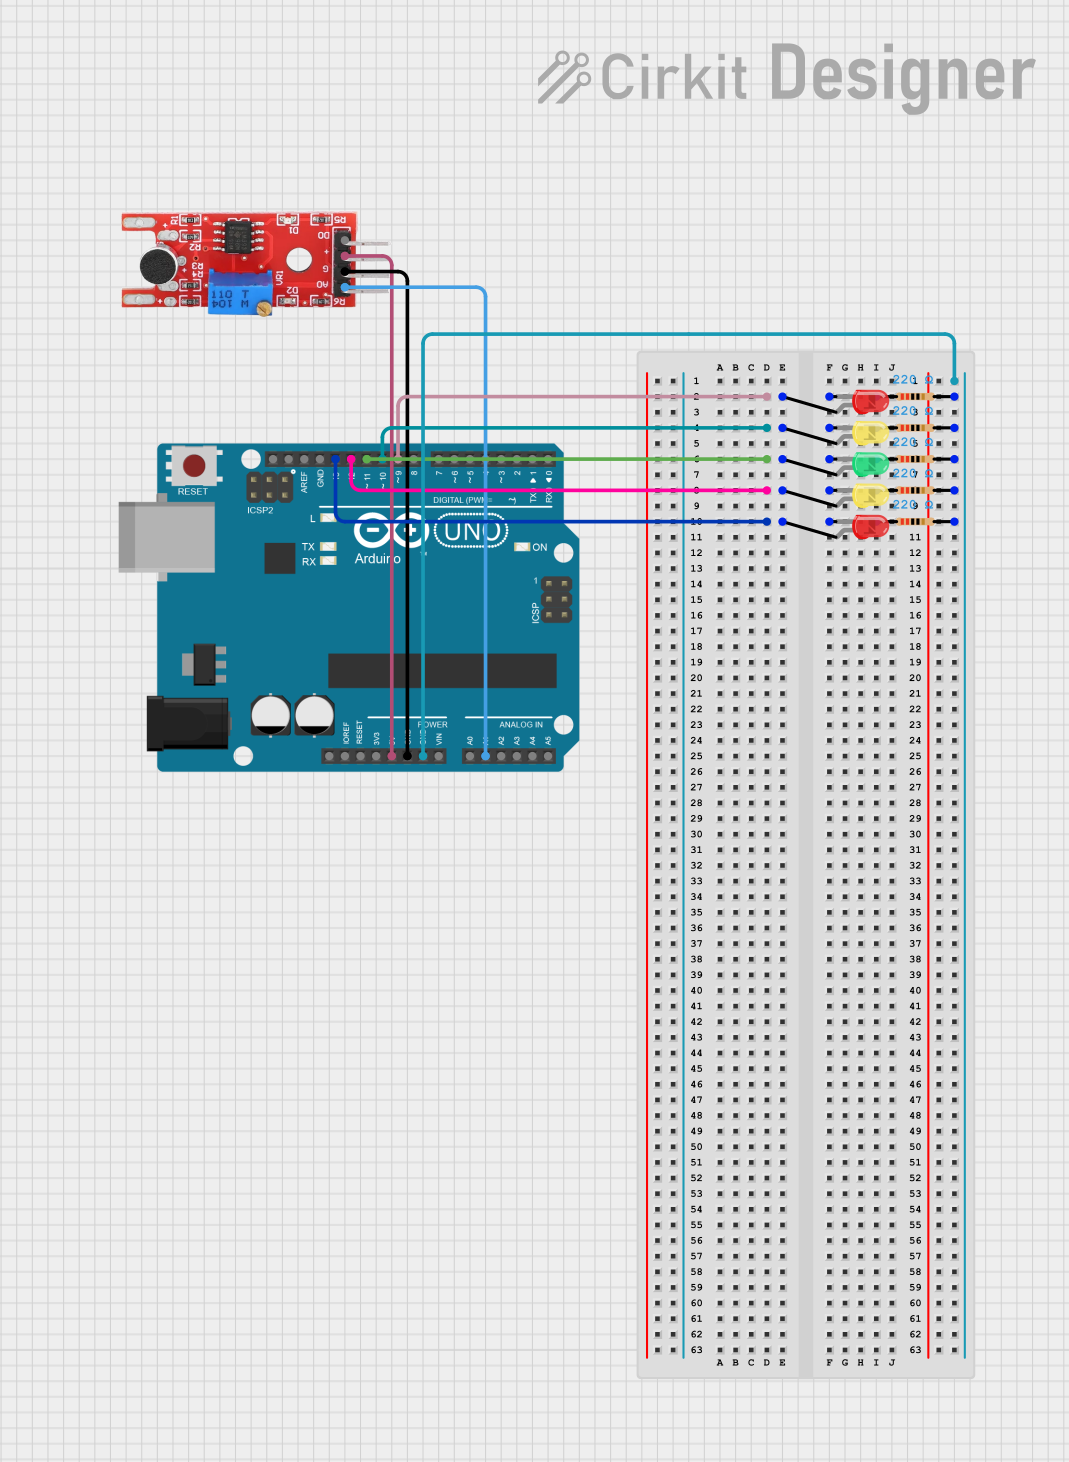
This circuit involves an Arduino UNO microcontroller interfacing with various LEDs and a KY 038 sound sensor. The LEDs are connected through current-limiting resistors, and the KY 038 sound sensor is connected to the Arduino for power and signal input.
Component List
KY 038 Sound Sensor
- Pins: +, G, A0, D0
- Description: Sound sensor module used to detect sound levels.
- Purpose: To detect sound and provide an analog signal to the Arduino.
Arduino UNO
- Pins: UNUSED, IOREF, Reset, 3.3V, 5V, GND, Vin, A0, A1, A2, A3, A4, A5, SCL, SDA, AREF, D13, D12, D11, D10, D9, D8, D7, D6, D5, D4, D3, D2, D1, D0
- Description: Microcontroller board based on the ATmega328P.
- Purpose: To control the LEDs and read the sound sensor input.
Resistors (220 Ohms)
- Pins: pin1, pin2
- Description: Resistors used to limit the current through the LEDs.
- Purpose: To protect the LEDs from excessive current.
LED: Two Pin (red)
- Pins: cathode, anode
- Description: Red LED.
- Purpose: To provide visual indication.
LED: Two Pin (green)
- Pins: cathode, anode
- Description: Green LED.
- Purpose: To provide visual indication.
LED: Two Pin (yellow)
- Pins: cathode, anode
- Description: Yellow LED.
- Purpose: To provide visual indication.
Wiring Details
KY 038 Sound Sensor
- + connected to 5V on Arduino UNO
- G connected to GND on Arduino UNO
- A0 connected to A1 on Arduino UNO
Arduino UNO
- D9 connected to anode of red LED
- D10 connected to anode of yellow LED
- D11 connected to anode of green LED
- D12 connected to anode of yellow LED
- D13 connected to anode of red LED
- GND connected to pin2 of all resistors
Resistors
- pin1 of resistor 1 connected to cathode of red LED
- pin1 of resistor 2 connected to cathode of yellow LED
- pin1 of resistor 3 connected to cathode of green LED
- pin1 of resistor 4 connected to cathode of yellow LED
- pin1 of resistor 5 connected to cathode of red LED
LEDs
anode of red LED connected to D9 on Arduino UNO
cathode of red LED connected to pin1 of resistor 1
anode of yellow LED connected to D10 on Arduino UNO
cathode of yellow LED connected to pin1 of resistor 2
anode of green LED connected to D11 on Arduino UNO
cathode of green LED connected to pin1 of resistor 3
anode of yellow LED connected to D12 on Arduino UNO
cathode of yellow LED connected to pin1 of resistor 4
anode of red LED connected to D13 on Arduino UNO
cathode of red LED connected to pin1 of resistor 5
Code Documentation
Arduino UNO Code
void setup() {
  // put your setup code here, to run once:

}

void loop() {
  // put your main code here, to run repeatedly:

}
This code is a basic template for the Arduino UNO. The setup() function is where you initialize your components, and the loop() function is where you place the main logic that runs repeatedly.