Cirkit Designer
Your all-in-one circuit design IDE
Home /
Project Documentation
Arduino UNO and ADXXL335 Accelerometer-Based Motion Detection System
Circuit Documentation
Summary
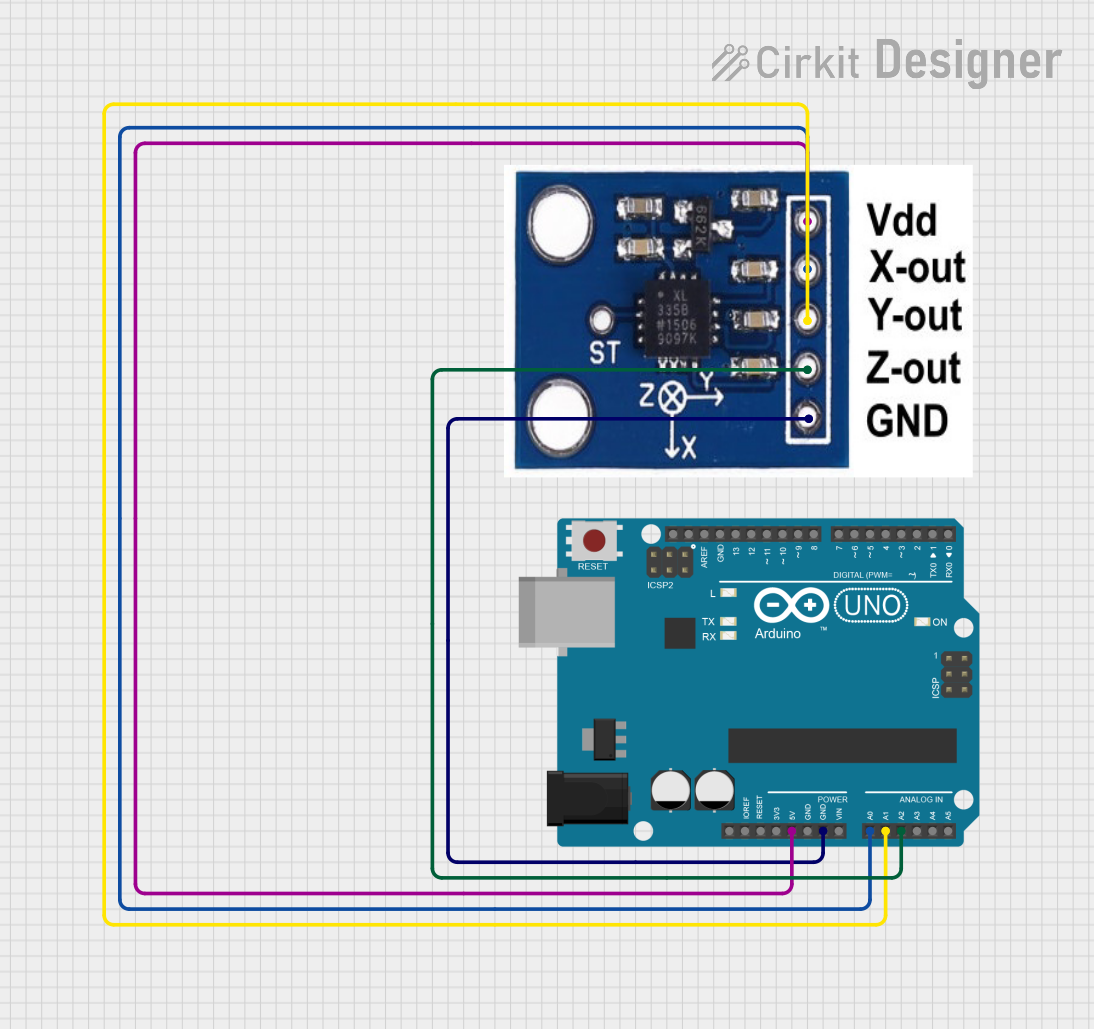
This document provides a detailed overview of a circuit that includes an Arduino UNO microcontroller and an ADXXL335 accelerometer. The Arduino UNO is used to read the X, Y, and Z outputs from the ADXXL335 accelerometer. The connections between the components and the code running on the Arduino UNO are also documented.
Component List
Arduino UNO
- Description: A microcontroller board based on the ATmega328P.
- Pins: UNUSED, IOREF, Reset, 3.3V, 5V, GND, Vin, A0, A1, A2, A3, A4, A5, SCL, SDA, AREF, D13, D12, D11, D10, D9, D8, D7, D6, D5, D4, D3, D2, D1, D0
ADXXL335
- Description: A 3-axis accelerometer.
- Pins: VCC, X-OUT, Y-OUT, Z-OUT, GND
Wiring Details
Arduino UNO
- 5V: Connected to VCC of ADXXL335
- GND: Connected to GND of ADXXL335
- A0: Connected to X-OUT of ADXXL335
- A1: Connected to Y-OUT of ADXXL335
- A2: Connected to Z-OUT of ADXXL335
ADXXL335
- VCC: Connected to 5V of Arduino UNO
- GND: Connected to GND of Arduino UNO
- X-OUT: Connected to A0 of Arduino UNO
- Y-OUT: Connected to A1 of Arduino UNO
- Z-OUT: Connected to A2 of Arduino UNO
Code Documentation
Arduino UNO Code
void setup() {
  // put your setup code here, to run once:

}

void loop() {
  // put your main code here, to run repeatedly:

}
This code is a basic template for the Arduino UNO. The setup() function is where you initialize any settings or configurations, and the loop() function is where the main code runs repeatedly. In this case, the code is currently empty and can be filled in with the logic to read the accelerometer data and process it as needed.