
Circuit Documentation
Summary of the Circuit
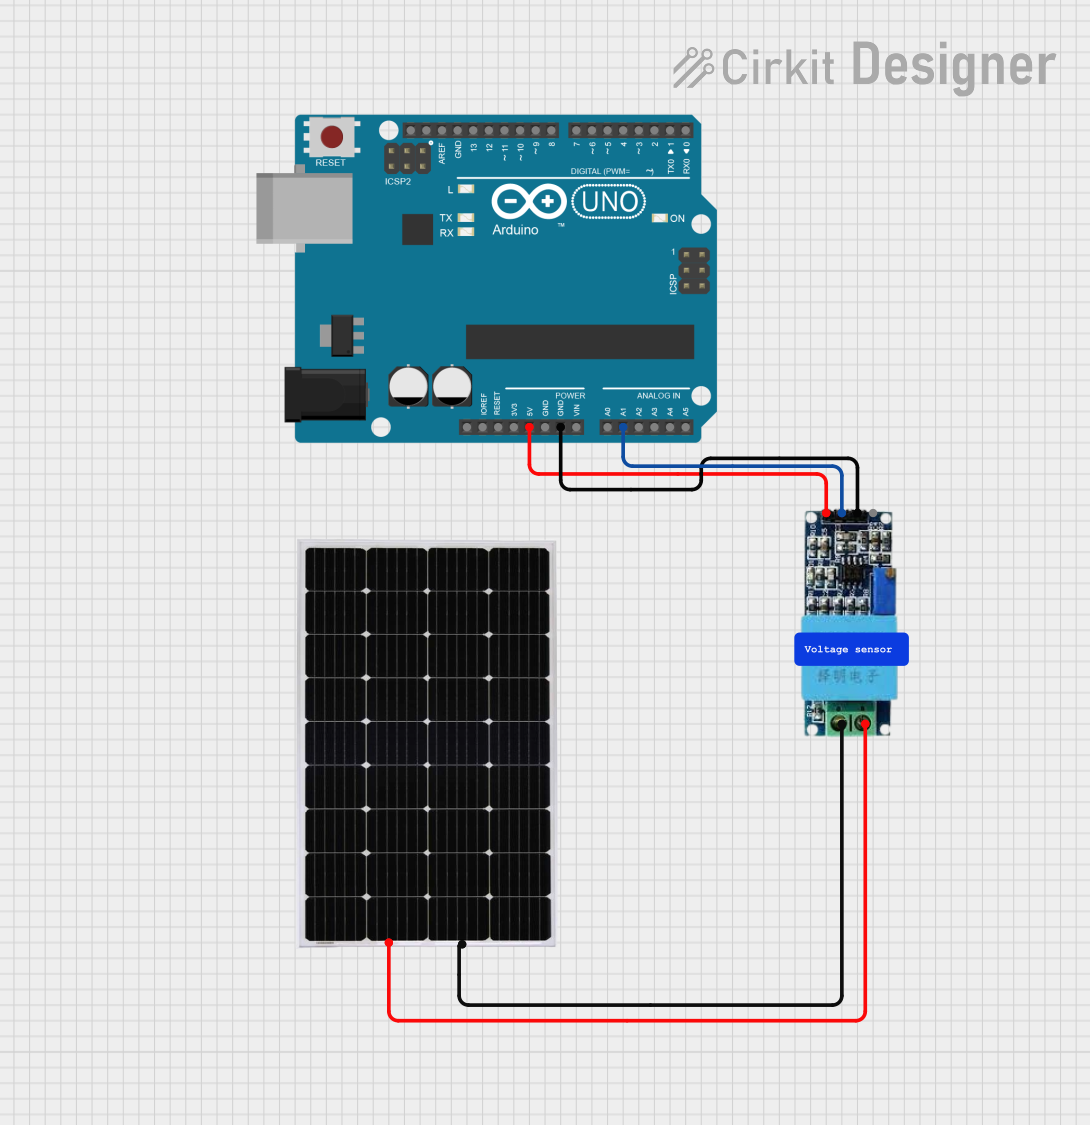
This circuit is designed to measure the voltage output from a solar panel using a voltage sensor and an Arduino UNO microcontroller. The voltage sensor is connected to the solar panel to monitor its output voltage, and the sensor's output is then fed into the Arduino for processing. The Arduino is programmed to read the voltage level and could be further programmed to perform actions such as data logging or system control based on the voltage readings.
Component List
Voltage Sensor
- Description: A device that measures the voltage between two points in an electric circuit.
- Pins: Ground, Phase, Vcc, Out, Gnd
Arduino UNO
- Description: A microcontroller board based on the ATmega328P, widely used for building digital devices and interactive objects that can sense and control objects in the physical and digital world.
- Pins: UNUSED, IOREF, Reset, 3.3V, 5V, GND, Vin, A0-A5, SCL, SDA, AREF, D0-D13
Solar Panel
- Description: A panel designed to absorb the sun's rays as a source of energy for generating electricity.
- Pins: + (Positive), - (Negative)
Comment
- Description: This component is likely used for annotation purposes within the circuit design and does not have a physical representation in the actual circuit.
Wiring Details
Voltage Sensor
- Ground: Connected to the negative terminal (-) of the Solar Panel.
- Phase: Connected to the positive terminal (+) of the Solar Panel.
- Vcc: Connected to the 5V pin of the Arduino UNO.
- Out: Connected to the A1 pin of the Arduino UNO.
- Gnd: Connected to the GND pin of the Arduino UNO.
Arduino UNO
- 5V: Provides power to the Voltage Sensor.
- A1: Receives the voltage signal from the Voltage Sensor.
- GND: Common ground with the Voltage Sensor.
Solar Panel
- + (Positive): Connected to the Phase pin of the Voltage Sensor.
- - (Negative): Connected to the Ground pin of the Voltage Sensor.
Documented Code
Arduino UNO Code (sketch.ino)
void setup() {
  // put your setup code here, to run once:

}

void loop() {
  // put your main code here, to run repeatedly:

}
Additional Notes
- The provided code for the Arduino UNO is a template with empty setup and loop functions. To complete the circuit's functionality, the user must implement the code to read the voltage from the A1 pin and perform the desired actions based on the readings.
- There is an additional text file named "documentation.txt" mentioned, but it contains no code or information. It may be intended for further documentation or notes by the user.