
Arduino UNO PID-Controlled Smart Light with LCD Display and Potentiometer Tuning
View and Edit Project In Cirkit Designer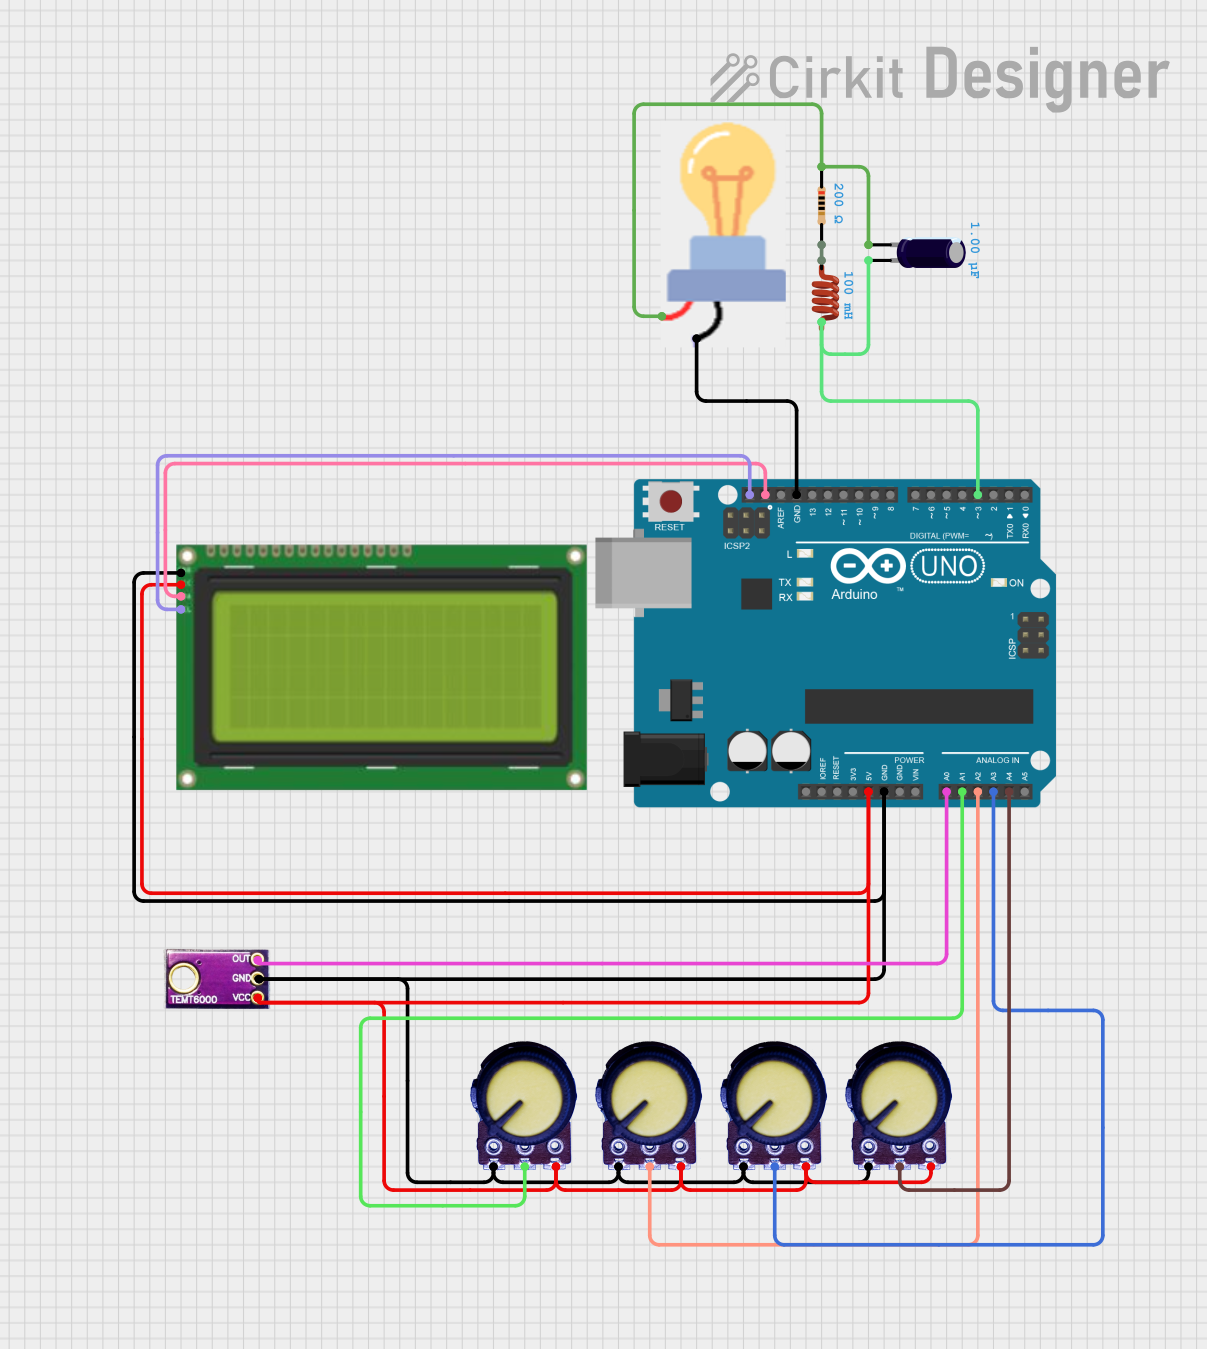
Circuit Documentation
Summary
This circuit is designed to control the brightness of a light bulb using a PID controller implemented on an Arduino UNO. The system uses a TEMT6000 ambient light sensor to measure the light intensity and several potentiometers to tune the PID parameters. The light intensity and PID parameters are displayed on an LCD screen. The circuit also includes an inductor, a capacitor, and a resistor to form a filter network.
Component List
Arduino UNO
- Description: Microcontroller board based on the ATmega328P.
- Pins: UNUSED, IOREF, Reset, 3.3V, 5V, GND, Vin, A0, A1, A2, A3, A4, A5, SCL, SDA, AREF, D13, D12, D11, D10, D9, D8, D7, D6, D5, D4, D3, D2, D1, D0
Potentiometer
- Description: Variable resistor used for tuning PID parameters and setting the setpoint.
- Pins: GND, Output, VCC
Ambient Light Sensor
- Description: TEMT6000 sensor used to measure ambient light intensity.
- Pins: GND, OUT, VCC
Lcd 20x4 i2c
- Description: 20x4 character LCD with I2C interface.
- Pins: GND, 5v, SCA, SCL
Electrolytic Capacitor
- Description: Capacitor used in the filter network.
- Pins: -, +
- Properties:
- Capacitance: 0.000001 Farads
Inductor
- Description: Inductor used in the filter network.
- Pins: pin 0, pin 1
- Properties:
- Inductance: 0.1 Henrys
Resistor
- Description: Resistor used in the filter network.
- Pins: pin1, pin2
- Properties:
- Resistance: 200 Ohms
Bulb
- Description: Light bulb controlled by the PID system.
- Pins: GND, power
Wiring Details
Arduino UNO
5V connected to:
- Lcd 20x4 i2c (5v)
- Potentiometer (VCC) x4
- Ambient Light Sensor (VCC)
GND connected to:
- Lcd 20x4 i2c (GND)
- Potentiometer (GND) x4
- Ambient Light Sensor (GND)
- Bulb (GND)
A0 connected to:
- Ambient Light Sensor (OUT)
A1 connected to:
- Potentiometer (Output)
A2 connected to:
- Potentiometer (Output)
A3 connected to:
- Potentiometer (Output)
A4 connected to:
- Potentiometer (Output)
SCL connected to:
- Lcd 20x4 i2c (SCL)
SDA connected to:
- Lcd 20x4 i2c (SCA)
D3 connected to:
- Inductor (pin 1)
- Electrolytic Capacitor (+)
Potentiometer
VCC connected to:
- Arduino UNO (5V)
GND connected to:
- Arduino UNO (GND)
Output connected to:
- Arduino UNO (A1, A2, A3, A4)
Ambient Light Sensor
VCC connected to:
- Arduino UNO (5V)
GND connected to:
- Arduino UNO (GND)
OUT connected to:
- Arduino UNO (A0)
Lcd 20x4 i2c
5v connected to:
- Arduino UNO (5V)
GND connected to:
- Arduino UNO (GND)
SCA connected to:
- Arduino UNO (SDA)
SCL connected to:
- Arduino UNO (SCL)
Electrolytic Capacitor
+ connected to:
- Inductor (pin 1)
- Arduino UNO (D3)
- connected to:
- Resistor (pin1)
- Bulb (power)
Inductor
pin 0 connected to:
- Resistor (pin2)
pin 1 connected to:
- Electrolytic Capacitor (+)
- Arduino UNO (D3)
Resistor
pin1 connected to:
- Electrolytic Capacitor (-)
- Bulb (power)
pin2 connected to:
- Inductor (pin 0)
Bulb
GND connected to:
- Arduino UNO (GND)
power connected to:
- Resistor (pin1)
- Electrolytic Capacitor (-)
Code Documentation
/******************************************************************
 * PID Simple Example (Augmented with Processing.org Communication)
 * Version 0.2
 * by Marcelo Moraes
 * License: Free
 * April 2013
 * Sorocaba - São Paulo - Brazil
 ******************************************************************/

/***Reference from
https://www.instructables.com/Arduino-PID-Library-Luminosity-Control/
Arduino PID Library - Brightness Control
By BIGDOG1971
*****/

/****
Patches added By Ramonjaun Reyes Based from Dimmable light FInal
+added potentiometer PID tuning Callibration
+Replace Light dependedent resistor with TEMT6000
+Implemented the Setpoint to be scaled with TEMT6000 (Crude way)

Problems
-cannot make the setpoint potentiometer lesser to its true value
Address issued: https://forum.arduino.cc/t/lowest-pot-value-not-0/499250/12
***/

// Library definition
#include <PID_v1.h>
#include <Wire.h>
#include <LiquidCrystal_I2C.h>

// Initialize the LCD with I2C address 0x27 and size 20x4
LiquidCrystal_I2C lcd(0x27, 20, 4);

//Define Variables we'll be connecting to
const int temt6000Pin = A0; // Analog pin for TEMT6000 sensor
int outputPin = 3; // LED output
const int pot = A4; // Potentiometer input For setpoint

// Tuning parameters
const int kpPin = A1;       // Analog pin for potentiometer to adjust Kp
const int kiPin = A2;       // Analog pin for potentiometer to adjust Ki
const int kdPin = A3;       // Analog pin for potentiometer to adjust Kd

// Specify the links and initial tuning parameters
double Setpoint, Input, Output; // these are just variables for storing values
double kp, ki, kd;
PID myPID(&Input, &Output, &Setpoint, kp, ki, kd, DIRECT);

// Timestamp
unsigned long serialTime; //this will help us know when to talk with processing
const int sampleRate = 1; // Variable that determines how fast our PID loop runs
const long serialPing = 500; //This determines how often we ping our loop
unsigned long now = 0; //This variable is used to keep track of time
unsigned long lastMessage = 0; //This keeps track of when our loop last spoke to serial

void setup()
{
  Input = analogRead(temt6000Pin); // Read in light level
  Input = analogRead(pot); // Read the SetPoint value from the potentiometer

  Serial.begin(9600); //Start a serial session
  myPID.SetMode(AUTOMATIC); // Turn on the PID loop as automatic control
  myPID.SetSampleTime(sampleRate); // Sets the sample rate
  lastMessage = millis(); // timestamp

  // Initialize the LCD
  lcd.init();
  lcd.backlight();
}

void loop(){
  // Read the light intensity from the TEMT6000 sensor
  int light_value = analogRead(temt6000Pin);
  float volts = light_value * 3.3 / 1023.0; // Arduino has 10-bit ADC resolution and 3.3V reference voltage
  float amps = volts / 10000.0; // across 10,000 Ohms
  float microamps = amps * 1000000;
  float lux = microamps * 2.0;
  Input = lux;

  // Read the Setpoint Value from the Pot with scaling of TEMT6000 sensor - Still did not fix the issue at lowest value setpoint cannot be set.
  int sp = analogRead(pot);
  float Volts = light_value * 3.3 / 1023.0; // Arduino has 10-bit ADC resolution and 3.3V reference voltage
  float Amps = Volts / 10000.0; // across 10,000 Ohms