Arduino UNO Based Object-Following Robot with Ultrasonic and IR Sensors
Circuit Documentation
Summary
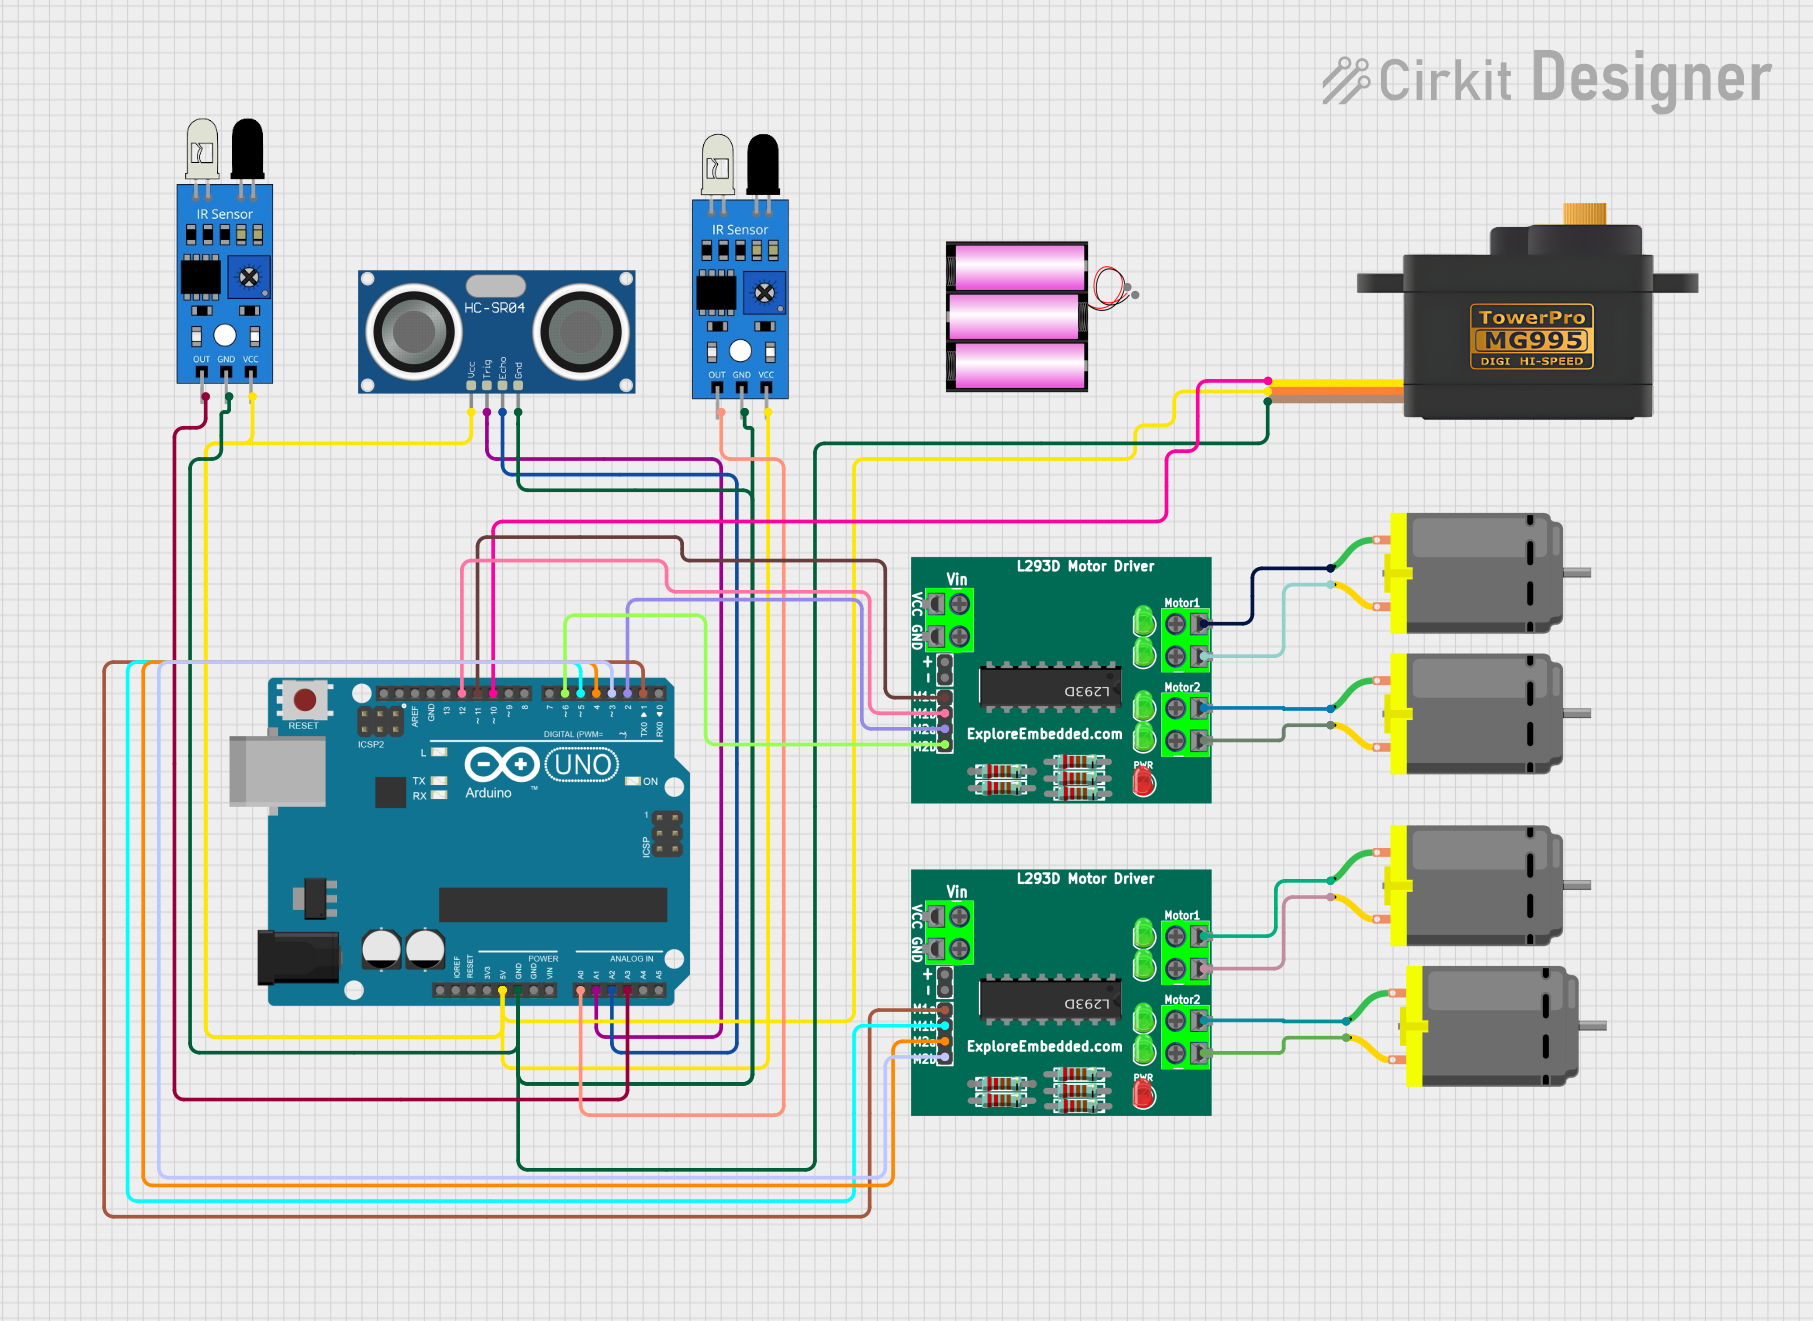
This circuit is designed to control an object-following robot using an Arduino UNO as the main microcontroller. The robot is equipped with an ultrasonic sensor (HC-SR04) for distance measurement and two IR sensors for obstacle detection. It uses two L293D motor drivers to control four DC motors, providing the necessary movement and direction control. Additionally, a servo motor (MG995) is included for extra maneuverability.
Component List
Microcontrollers
- Arduino UNO: The primary controller for the robot, interfacing with sensors and controlling the motors and servo.
- Servomotor MG995: A servo motor used for precise control of mechanical movement.
Sensors
- HC-SR04 Ultrasonic Sensor: Measures the distance to objects in front of the robot.
- IR Sensors: Two sensors used to detect obstacles and assist in navigation.
Motor Drivers
- L293D Motor Driver: Two of these drivers are used to control the four DC motors.
Motors
- DC Motors: Four motors that provide movement to the robot's wheels.
Power
- Battery 12V: Supplies power to the circuit.
Wiring Details
Arduino UNO
- 5V: Powers the IR sensors, the servo motor, and the ultrasonic sensor.
- GND: Common ground for the IR sensors, servo motor, and ultrasonic sensor.
- A0: Connected to the left IR sensor output.
- A1: Connected to the ultrasonic sensor TRIG pin.
- A2: Connected to the ultrasonic sensor ECHO pin.
- A3: Connected to the right IR sensor output.
- D10: Connected to the servo motor signal pin.
- D11: Connected to L293D motor driver (Motor1) pin 5.
- D12: Connected to L293D motor driver (Motor1) pin 6.
- D2: Connected to L293D motor driver (Motor1) pin 7.
- D3: Connected to L293D motor driver (Motor2) pin 8.
- D4: Connected to L293D motor driver (Motor2) pin 7.
- D5: Connected to L293D motor driver (Motor2) pin 6.
- D6: Connected to L293D motor driver (Motor1) pin 8.
L293D Motor Driver (Motor1)
- Pin 5 & Pin 6: Control signals from Arduino (D11 & D12).
- Pin 7 & Pin 8: Control signals from Arduino (D2 & D6).
- Pin 9 & Pin 10: Connected to DC Motor1.
- Pin 11 & Pin 12: Connected to DC Motor2.
L293D Motor Driver (Motor2)
- Pin 5 & Pin 6: Control signals from Arduino (D1 & D5).
- Pin 7 & Pin 8: Control signals from Arduino (D4 & D3).
- Pin 9 & Pin 10: Connected to DC Motor3.
- Pin 11 & Pin 12: Connected to DC Motor4.
DC Motors
- Motor1: Controlled by L293D Motor Driver (Motor1) pins 9 & 10.
- Motor2: Controlled by L293D Motor Driver (Motor1) pins 11 & 12.
- Motor3: Controlled by L293D Motor Driver (Motor2) pins 9 & 10.
- Motor4: Controlled by L293D Motor Driver (Motor2) pins 11 & 12.
HC-SR04 Ultrasonic Sensor
- VCC: Powered by Arduino 5V.
- GND: Connected to Arduino GND.
- TRIG: Connected to Arduino A1.
- ECHO: Connected to Arduino A2.
IR Sensors
- Left IR Sensor: VCC powered by Arduino 5V, GND to Arduino GND, and OUT to Arduino A0.
- Right IR Sensor: VCC powered by Arduino 5V, GND to Arduino GND, and OUT to Arduino A3.
Servomotor MG995
- SIG: Signal connected to Arduino D10.
- VCC: Powered by Arduino 5V.
- GND: Connected to Arduino GND.
Battery 12V
- +: Powers the L293D motor drivers and DC motors.
- -: Common ground for the motor drivers and DC motors.
Documented Code
Arduino UNO Code (sketch.ino)
/*
 * Object Following Robot
 * This code controls an object-following robot using an Arduino UNO.
 * The robot uses an ultrasonic sensor (HC-SR04) to measure distance to an object
 * and IR sensors to detect obstacles. It controls four DC motors via two L293D
 * motor drivers and a servo motor for additional movement.
 */

#include <NewPing.h>
#include <Servo.h>
#include <AFMotor.h>

#define TRIGGER_PIN A1
#define ECHO_PIN A2
#define MAX_DISTANCE 200
#define RIGHT_IR A3
#define LEFT_IR A0

NewPing sonar(TRIGGER_PIN, ECHO_PIN, MAX_DISTANCE);
AF_DCMotor Motor1(1, MOTOR12_1KHZ);
AF_DCMotor Motor2(2, MOTOR12_1KHZ);
AF_DCMotor Motor3(3, MOTOR34_1KHZ);
AF_DCMotor Motor4(4, MOTOR34_1KHZ);
Servo myservo;

void setup() {
  Serial.begin(9600);
  myservo.attach(10);
  for (int pos = 90; pos <= 180; pos++) {
    myservo.write(pos);
    delay(15);
  }
  for (int pos = 180; pos >= 0; pos--) {
    myservo.write(pos);
    delay(15);
  }
  for (int pos = 0; pos <= 90; pos++) {
    myservo.write(pos);
    delay(15);
  }
  pinMode(RIGHT_IR, INPUT);
  pinMode(LEFT_IR, INPUT);
}

void loop() {
  delay(50);
  unsigned int distance = sonar.ping_cm();
  unsigned int rightValue = digitalRead(RIGHT_IR);
  unsigned int leftValue = digitalRead(LEFT_IR);
  Serial.print("Distance: ");
  Serial.println(distance);
  Serial.print("Right IR: ");
  Serial.println(rightValue);
  Serial.print("Left IR: ");
  Serial.println(leftValue);

  if (distance > 1 && distance < 15) {
    moveForward();
  } else if (rightValue == 0 && leftValue == 1) {
    turnLeft();
  } else if (rightValue == 1 && leftValue == 0) {
    turnRight();
  } else if (distance > 15) {
    stopMotors();
  }
}

void moveForward() {
  Motor1.setSpeed(130);
  Motor1.run(FORWARD);
  Motor2.setSpeed(130);
  Motor2.run(FORWARD);
  Motor3.setSpeed(130);
  Motor3.run(FORWARD);
  Motor4.setSpeed(130);
  Motor4.run(FORWARD);
}

void turnLeft() {
  Motor1.setSpeed(150);
  Motor1.run(FORWARD);
  Motor2.setSpeed(150);
  Motor2.run(FORWARD);
  Motor3.setSpeed(150);
  Motor3.run(BACKWARD);
  Motor4.setSpeed(150);
  Motor4.run(BACKWARD);
  delay(150);
}

void turnRight() {
  Motor1.setSpeed(150);
  Motor1.run(BACKWARD);
  Motor2.setSpeed(150);
  Motor2.run(BACKWARD);
  Motor3.setSpeed(150);
  Motor3.run(FORWARD);
  Motor4.setSpeed(150);
  Motor4.run(FORWARD);
  delay(150);
}

void stopMotors() {
  Motor1.setSpeed(0);
  Motor1.run(RELEASE);
  Motor2.setSpeed(0);
  Motor2.run(RELEASE);
  Motor3.setSpeed(0);
  Motor3.run(RELEASE);
  Motor4.setSpeed(0);
  Motor4.run(RELEASE);
}
Servomotor MG995 Code (sketch.ino)
void setup() {
  // put your setup code here, to run once:

}

void loop() {
  // put your main code here, to run repeatedly:

}
(Note: The code for the servomotor MG995 is not provided with specific functionality and appears to be a template. Additional code would be required to control the servomotor.)
Battery 12V Code (sketch.ino)
void setup() {
  // put your setup code here, to run once:

}

void loop() {
  // put your main code here, to run repeatedly:

}
(Note: The code for the battery is not applicable as batteries do not have embedded code. This appears to be a placeholder or error in the input data.)