
Arduino UNO Based Alcohol Detection System with Bluetooth Notification
View and Edit Project In Cirkit Designer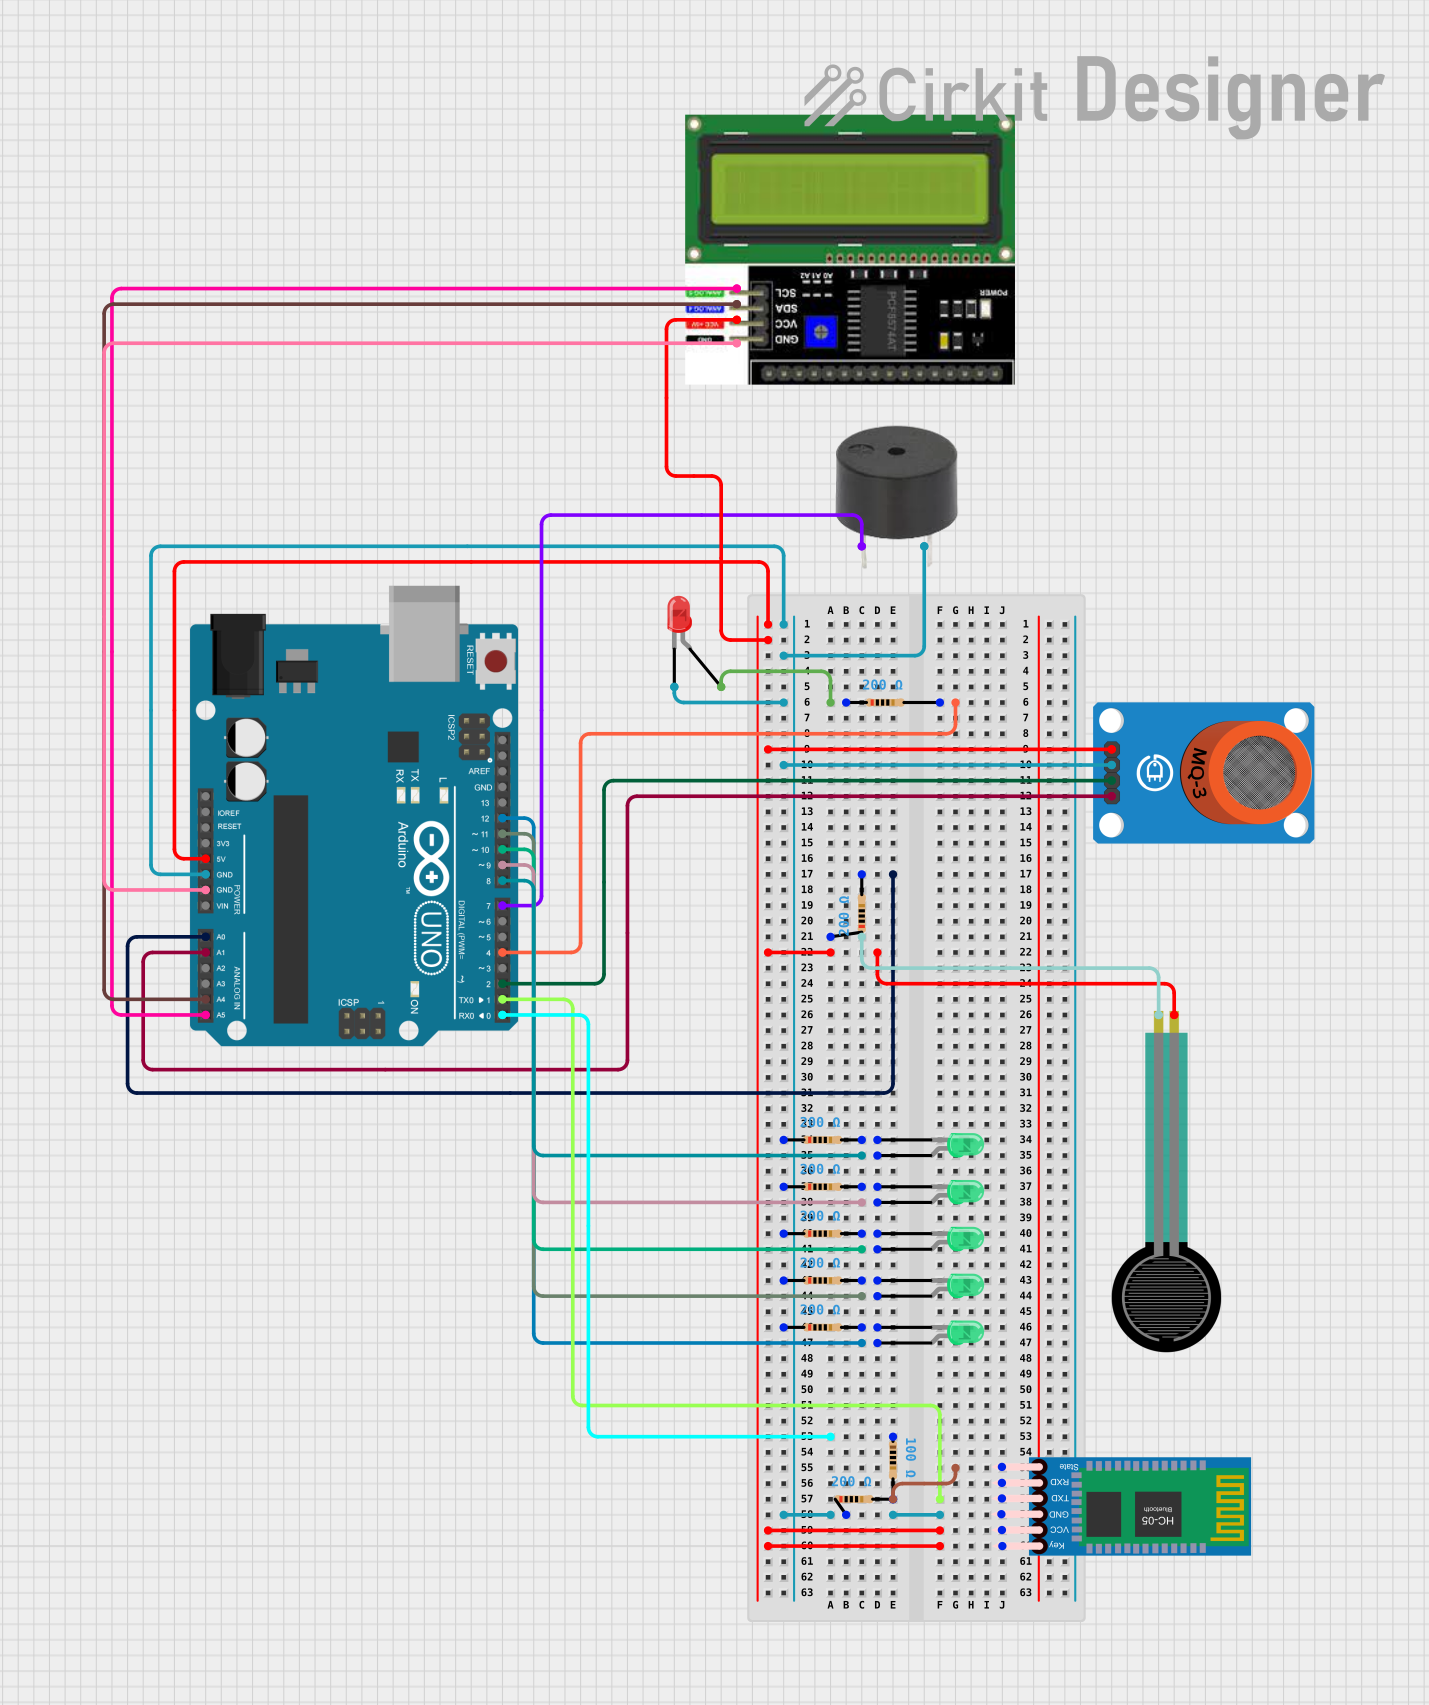
Circuit Documentation
Summary
This document provides a detailed overview of a circuit that includes an Arduino UNO as the central microcontroller, interfaced with various components such as an LCD I2C display, a buzzer, LEDs, a force sensing resistor, an MQ-3 alcohol sensor, and an HC-05 Bluetooth module. The circuit is designed to perform multiple functions which could include sensing, actuation, and communication, as indicated by the variety of components used.
Component List
Arduino UNO
- Microcontroller board based on the ATmega328P
- It has 14 digital input/output pins, 6 analog inputs, a USB connection, a power jack, an ICSP header, and a reset button.
Buzzer
- An electromechanical component that produces sound when energized.
LEDs (Red and Green)
- Light Emitting Diodes that emit red and green light when forward-biased.
LCD I2C Display
- A liquid crystal display that communicates via the I2C protocol, used for displaying data.
Force Sensing Resistor
- A sensor that changes its resistance based on the force applied to its surface.
MQ-3 Alcohol Sensor
- A gas sensor used for alcohol detection.
HC-05 Bluetooth Module
- A wireless communication module that enables Bluetooth connectivity.
Resistors
- Passive components used to limit current or divide voltages in a circuit. In this circuit, resistors with values of 200 Ohms and 100 Ohms are used.
Wiring Details
Arduino UNO
- Digital Pin D4 connected to Red LED through a 200 Ohm resistor.
- Analog Pin A0 connected to one end of the Force Sensing Resistor.
- 5V Pin connected to VCC of HC-05 Bluetooth Module, LCD I2C Display, and MQ-3 Alcohol Sensor.
- GND Pin connected to the common ground network.
- Digital Pins D8, D9, D10, D11, and D12 connected to the anodes of Green LEDs.
- Digital Pin D0 connected to a 100 Ohm resistor.
- Digital Pin D1 connected to TXD of HC-05 Bluetooth Module.
- Digital Pin D2 connected to DO of MQ-3 Alcohol Sensor.
- Digital Pin D7 connected to the Buzzer.
- Analog Pin A1 connected to AO of MQ-3 Alcohol Sensor.
- Analog Pins A4 and A5 connected to SDA and SCL of LCD I2C Display, respectively.
Buzzer
- One pin connected to Digital Pin D7 of Arduino UNO.
- Other pin connected to the common ground network.
Red LED
- Anode connected to Digital Pin D4 of Arduino UNO through a 200 Ohm resistor.
- Cathode connected to the common ground network.
Green LEDs
- Anodes connected to Digital Pins D8, D9, D10, D11, and D12 of Arduino UNO.
- Cathodes connected to the common ground network through 200 Ohm resistors.
LCD I2C Display
- VCC connected to 5V of Arduino UNO.
- GND connected to the common ground network.
- SDA connected to Analog Pin A4 of Arduino UNO.
- SCL connected to Analog Pin A5 of Arduino UNO.
Force Sensing Resistor
- One pin connected to Analog Pin A0 of Arduino UNO.
- Other pin connected to the common ground network through a 200 Ohm resistor.
MQ-3 Alcohol Sensor
- VCC connected to 5V of Arduino UNO.
- GND connected to the common ground network.
- DO connected to Digital Pin D2 of Arduino UNO.
- AO connected to Analog Pin A1 of Arduino UNO.
HC-05 Bluetooth Module
- VCC connected to 5V of Arduino UNO.
- GND connected to the common ground network.
- TXD connected to Digital Pin D1 of Arduino UNO.
- State connected to the common ground network through a 100 Ohm resistor.
Resistors
- 200 Ohm resistors used for current limiting with LEDs and for the Force Sensing Resistor.
- 100 Ohm resistor used for the State pin of the HC-05 Bluetooth Module.
Documented Code
Arduino UNO Code (sketch.ino)
void setup() {
  // put your setup code here, to run once:

}

void loop() {
  // put your main code here, to run repeatedly:

}
Additional Notes
- The provided code is a template and does not contain any functional code. It needs to be populated with the logic required to control and interact with the connected components based on the desired application.
- The
setup()function is used to initialize variables, pin modes, start using libraries, etc. The code inside thesetup()function will only run once, after each powerup or reset of the Arduino board. - The
loop()function runs over and over again, as long as the Arduino has power. It is the core of most sketches, and it is here that you'll put the code to interact with the components based on the inputs and perform actions accordingly.