
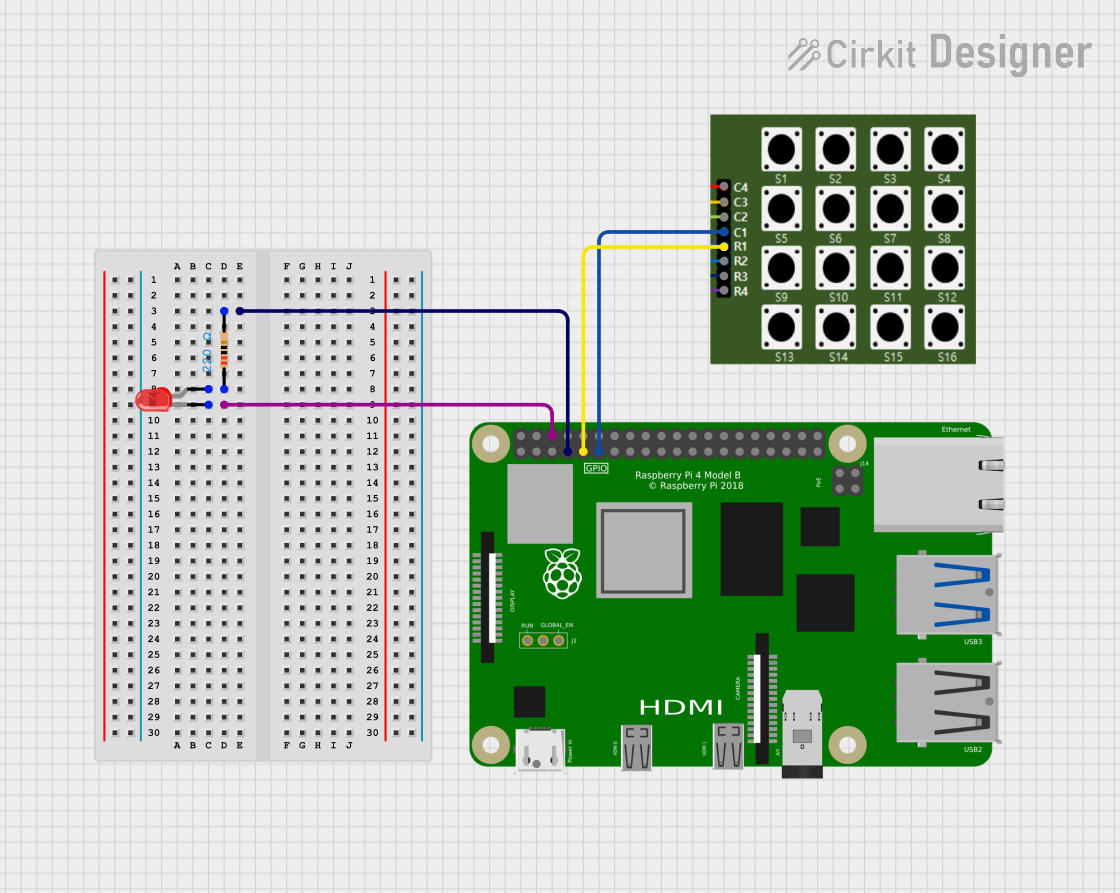
Circuit Documentation
Summary
This circuit involves a Raspberry Pi 4B, a red LED, a 220 Ohm resistor, and a 4×4 Keypad. The Raspberry Pi controls the LED and reads input from the keypad. The LED is connected to the Raspberry Pi through a resistor to limit the current. The keypad is used to provide input to the Raspberry Pi.
Component List
Raspberry Pi 4B
- Description: A powerful single-board computer used for various applications.
- Pins: 3V3, 5V, GPIO2, GPIO3, GND, GPIO4, GPIO14, GPIO15, GPIO17, GPIO18, GPIO27, GPIO22, GPIO23, GPIO24, GPIO10, GPIO9, GPIO25, GPIO11, GPIO8, GPIO7, ID_SD, GPIO5, GPIO6, GPIO12, GPIO13, GPIO19, GPIO16, GPIO26, GPIO20, GPIO21, ID_SC, TR01_TAP, TR00_TAP, TR03_TAP, TR02_TAP, RUN, GLOBAL_EN
LED: Two Pin (red)
- Description: A red LED used for visual indication.
- Pins: cathode, anode
Resistor
- Description: A 220 Ohm resistor used to limit the current through the LED.
- Pins: pin1, pin2
- Properties:
- Resistance: 220 Ohms
4×4 Keypad
- Description: A keypad with 4 rows and 4 columns used for user input.
- Pins: C3, C2, C4, C1, R1, R2, R3, R4
Wiring Details
Raspberry Pi 4B
- GND is connected to the cathode of the LED.
- GPIO4 is connected to pin2 of the resistor.
- GND is connected to R1 of the keypad.
- GPIO17 is connected to C1 of the keypad.
LED: Two Pin (red)
- cathode is connected to GND of the Raspberry Pi.
- anode is connected to pin1 of the resistor.
Resistor
- pin1 is connected to the anode of the LED.
- pin2 is connected to GPIO4 of the Raspberry Pi.
4×4 Keypad
- R1 is connected to GND of the Raspberry Pi.
- C1 is connected to GPIO17 of the Raspberry Pi.
Code Documentation
Raspberry Pi 4B Code
from gpiozero import LED
from gpiozero import Button

led = LED(4)
button = Button(17)

while True:
    button.wait_for_press()
    led.on()
    button.wait_for_release()
    led.off()
- Description: This code initializes an LED on GPIO4 and a button on GPIO17. When the button is pressed, the LED turns on. When the button is released, the LED turns off.
4×4 Keypad Code
void setup() {
  // put your setup code here, to run once:
}

void loop() {
  // put your main code here, to run repeatedly:
}
- Description: This is a placeholder code for the 4×4 Keypad. The setup function runs once when the program starts, and the loop function runs repeatedly.