Cirkit Designer
Your all-in-one circuit design IDE
Home /
Project Documentation
Arduino UNO Controlled Soil Moisture Monitoring and Water Pump System
Circuit Documentation
Summary
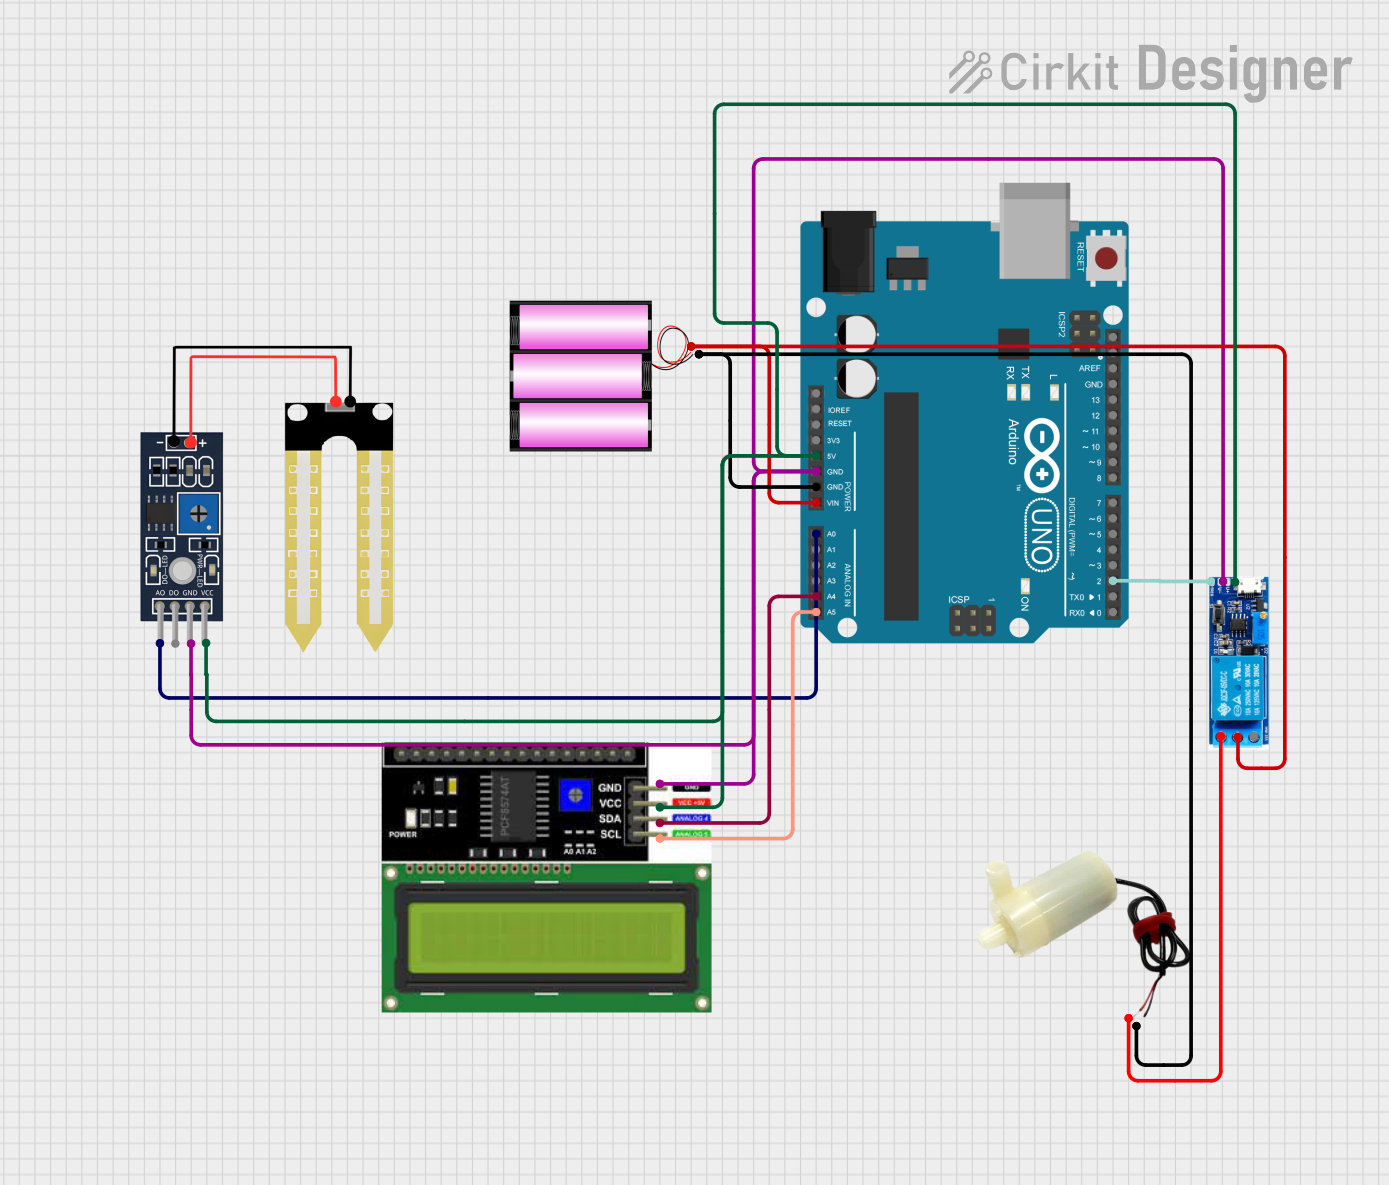
The circuit in question is designed to monitor soil moisture using a Humidity YL-69 sensor and control a 5V mini water pump based on the moisture level. An Arduino UNO serves as the central microcontroller, interfacing with the sensor and an LCD I2C display to provide real-time feedback on the system status and soil moisture level. A relay module is used to control the power to the water pump, and a 12V battery provides the power supply for the system.
Component List
Arduino UNO
- Microcontroller board based on the ATmega328P
- Used for reading sensor data, controlling the relay, and updating the display
Humidity YL-69
- Soil moisture sensor
- Provides analog output corresponding to the moisture level in the soil
LCD I2C Display
- Alphanumeric liquid crystal display with I2C communication interface
- Displays system status and soil moisture readings
Battery 12V
- Power source for the circuit
- Provides 12V to power the Arduino UNO through its Vin pin
Relay Module 5V-30V
- Electromechanical switch controlled by the Arduino
- Used to turn the water pump on and off
5V Mini Water Pump
- Small pump for water circulation
- Activated by the relay when the soil moisture is below a certain threshold
Wiring Details
Arduino UNO
5Vconnected to Humidity YL-69 VCC, Relay Module V+, and LCD I2C Display VCCGNDconnected to Humidity YL-69 GND, Relay Module V-, and LCD I2C Display GNDVinconnected to the positive terminal of the 12V batteryA0connected to Humidity YL-69 A0 for analog moisture readingsA4(SDA) connected to LCD I2C Display SDA for I2C dataA5(SCL) connected to LCD I2C Display SCL for I2C clockD2connected to Relay Module trigger for controlling the relay
Humidity YL-69
VCCconnected to Arduino UNO 5VGNDconnected to Arduino UNO GNDA0connected to Arduino UNO A0
LCD I2C Display
VCCconnected to Arduino UNO 5VGNDconnected to Arduino UNO GNDSDAconnected to Arduino UNO A4 (SDA)SCLconnected to Arduino UNO A5 (SCL)
Battery 12V
+connected to Arduino UNO Vin-connected to Arduino UNO GND
Relay Module 5V-30V
V+connected to Arduino UNO 5VV-connected to Arduino UNO GNDcommon contactconnected to the positive terminal of the 12V batterynormally openconnected to the positive pin of the 5V mini water pumptriggerconnected to Arduino UNO D2
5V Mini Water Pump
positive pinconnected to Relay Module normally opennegative pinconnected to the negative terminal of the 12V battery
Documented Code
Arduino UNO Code
#include <LiquidCrystal_I2C.h>
LiquidCrystal_I2C lcd(0x27, 16, 2);

void setup() {
  Serial.begin(9600);
  lcd.init();
  lcd.backlight();
  lcd.clear();
  pinMode(2, OUTPUT);
  digitalWrite(2, HIGH);
  delay(1000);
  lcd.setCursor(0, 0);
  lcd.print("Rithunand's");
  lcd.setCursor(0, 1);
  lcd.print("SYSTEM IS ON ");
  lcd.print("");
  delay(3000);
  lcd.clear();
}

void loop() {
  int value = analogRead(A0);
  Serial.println(value);
  if (value > 950) {
    digitalWrite(2, LOW);
    lcd.setCursor(0, 0);
    lcd.print("Water Pump is ON ");
  } else {
    digitalWrite(2, HIGH);
    lcd.setCursor(0, 0);
    lcd.print("Water Pump is OFF");
  }

  if (value < 300) {
    lcd.setCursor(0, 1);
    lcd.print("Moisture : HIGH");
  } else if (value > 300 && value < 950) {
    lcd.setCursor(0, 1);
    lcd.print("Moisture : MID ");
  } else if (value > 950) {
    lcd.setCursor(0, 1);
    lcd.print("Moisture : LOW ");
  }
}
This code initializes the LCD display and sets up the Arduino to read the moisture level from the Humidity YL-69 sensor. Depending on the moisture level, it controls the relay to turn the water pump on or off and updates the display with the system status and moisture level.