
Arduino Nano-Based Dino Jump Game with Nokia 5110 LCD Display
View and Edit Project In Cirkit Designer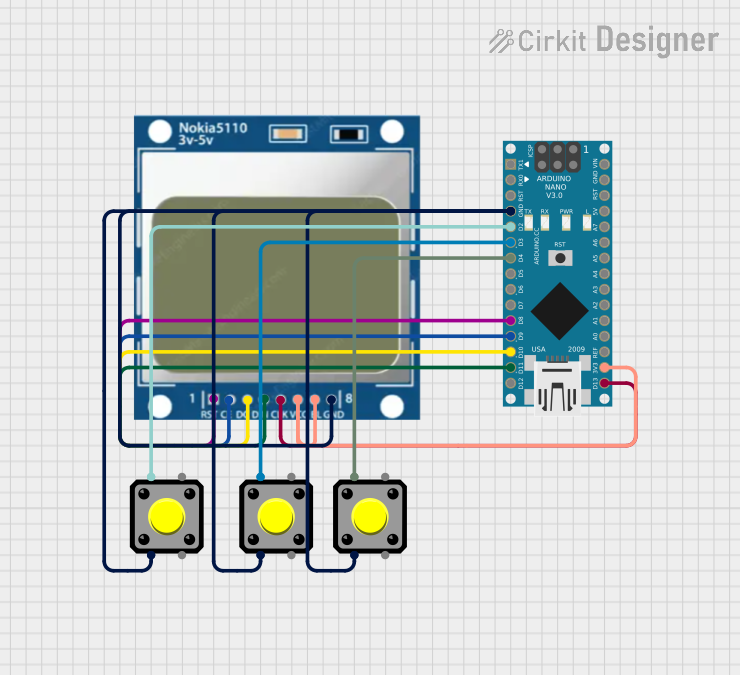
Circuit Documentation
Summary
This circuit consists of an Arduino Nano microcontroller, three pushbuttons, and a Nokia 5110 LCD display. The Arduino Nano is programmed to control the LCD display and read inputs from the pushbuttons. The pushbuttons are used to interact with the system, and the LCD display is used to show visual feedback.
Component List
Arduino Nano
- Description: A small, complete, and breadboard-friendly board based on the ATmega328P.
- Pins: D1/TX, D0/RX, RESET, GND, D2, D3, D4, D5, D6, D7, D8, D9, D10, D11/MOSI, D12/MISO, VIN, 5V, A7, A6, A5, A4, A3, A2, A1, A0, AREF, 3V3, D13/SCK
Pushbutton (3 instances)
- Description: A simple pushbutton used for user input.
- Pins: Pin 2, Pin 1, Pin 3, Pin 4
Nokia 5110 LCD
- Description: A basic graphic LCD screen for lots of applications.
- Pins: RST, CE, DC, DIN, CLK, VCC, BL, GND
Wiring Details
Arduino Nano
- GND: Connected to GND of all pushbuttons and Nokia 5110 LCD.
- D2: Connected to Pin 1 of the first pushbutton.
- D3: Connected to Pin 1 of the second pushbutton.
- D4: Connected to Pin 1 of the third pushbutton.
- D8: Connected to RST of the Nokia 5110 LCD.
- D9: Connected to CE of the Nokia 5110 LCD.
- D10: Connected to DC of the Nokia 5110 LCD.
- D11/MOSI: Connected to DIN of the Nokia 5110 LCD.
- D13/SCK: Connected to CLK of the Nokia 5110 LCD.
- 3V3: Connected to VCC and BL of the Nokia 5110 LCD.
Pushbutton 1
- Pin 2: Connected to GND.
- Pin 1: Connected to D2 of the Arduino Nano.
Pushbutton 2
- Pin 2: Connected to GND.
- Pin 1: Connected to D3 of the Arduino Nano.
Pushbutton 3
- Pin 2: Connected to GND.
- Pin 1: Connected to D4 of the Arduino Nano.
Nokia 5110 LCD
- RST: Connected to D8 of the Arduino Nano.
- CE: Connected to D9 of the Arduino Nano.
- DC: Connected to D10 of the Arduino Nano.
- DIN: Connected to D11/MOSI of the Arduino Nano.
- CLK: Connected to D13/SCK of the Arduino Nano.
- VCC: Connected to 3V3 of the Arduino Nano.
- BL: Connected to 3V3 of the Arduino Nano.
- GND: Connected to GND of the Arduino Nano and pushbuttons.
Code Documentation
#include <Adafruit_GFX.h>
#include <Adafruit_PCD8544.h>

// Pin definitions
#define DINO_PIN 2  // Button for jump
#define SCREEN_WIDTH 84
#define SCREEN_HEIGHT 48

Adafruit_PCD8544 display(10, 9, 8, 7, 6);

int dinoY = 38;  // Dino's Y position
bool isJumping = false;
int jumpHeight = 0;
int obstacleX = SCREEN_WIDTH;
const int groundY = 40;

void setup() {
  pinMode(DINO_PIN, INPUT_PULLUP);
  display.begin();
  display.setContrast(50);
  display.clearDisplay();
}

void loop() {
  display.clearDisplay();

  // Draw ground
  display.drawLine(0, groundY, SCREEN_WIDTH, groundY, BLACK);

  // Dino jumping logic
  if (digitalRead(DINO_PIN) == LOW && !isJumping) {
    isJumping = true;
  }
  if (isJumping) {
    jumpHeight += 2;
    if (jumpHeight >= 12) {
      isJumping = false;
    }
  } else if (jumpHeight > 0) {
    jumpHeight -= 2;
  }
  dinoY = groundY - 8 - jumpHeight;

  // Draw Dino
  display.fillRect(10, dinoY, 8, 8, BLACK);

  // Obstacle movement
  obstacleX -= 2;
  if (obstacleX < 0) {
    obstacleX = SCREEN_WIDTH;
  }
  display.fillRect(obstacleX, groundY - 8, 8, 8, BLACK);

  // Collision detection
  if (obstacleX < 18 && obstacleX > 8 && dinoY > groundY - 16) {
    display.setCursor(20, 20);
    display.print("Game Over");
    display.display();
    while (1);  // Stop game
  }

  display.display();
  delay(50);
}
This code initializes the Nokia 5110 LCD and sets up a simple game where a dinosaur jumps over obstacles. The pushbutton connected to pin D2 is used to make the dinosaur jump. The game logic includes drawing the ground, handling the jump mechanics, moving the obstacles, and detecting collisions.