
Arduino UNO Controlled Traffic Light with Touch Sensor Interaction
View and Edit Project In Cirkit Designer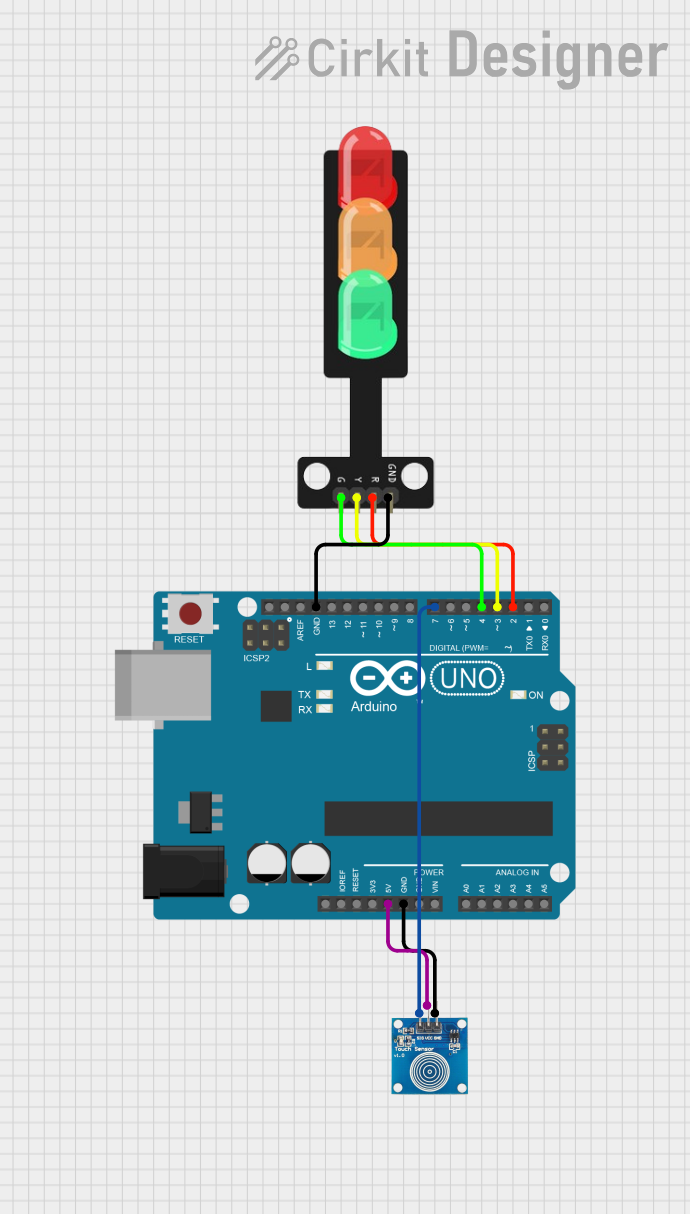
Traffic Light Control System Documentation
Summary
This document describes a traffic light control system designed using an Arduino UNO microcontroller, a touch sensor, and a traffic light module with three LEDs (Red, Yellow, Green). The system operates by cycling through the traffic light states (Red, Yellow, Green, Off) in response to touch sensor inputs. Each press of the touch sensor advances the traffic light to the next state in the sequence.
Component List
Arduino UNO
- Description: A microcontroller board based on the ATmega328P.
- Purpose: Acts as the central control unit for the traffic light system, reading touch sensor inputs and driving the traffic light LEDs.
- Pins: UNUSED, IOREF, Reset, 3.3V, 5V, GND, Vin, A0-A5, SCL, SDA, AREF, D0-D13.
Traffic Light
- Description: A module with three LEDs representing a traffic light.
- Purpose: Displays the traffic light state as directed by the Arduino UNO.
- Pins: Green, Yellow, Red, GND.
Touch Sensor
- Description: A capacitive touch sensor module.
- Purpose: Provides user input to control the traffic light states.
- Pins: IO, VCC, GND.
Wiring Details
Arduino UNO
- 5V connected to Touch Sensor VCC.
- GND connected to Touch Sensor GND and Traffic Light GND.
- D7 connected to Touch Sensor IO.
- D4 connected to Traffic Light Green.
- D3 connected to Traffic Light Yellow.
- D2 connected to Traffic Light Red.
Traffic Light
- Green connected to Arduino UNO D4.
- Yellow connected to Arduino UNO D3.
- Red connected to Arduino UNO D2.
- GND connected to Arduino UNO GND.
Touch Sensor
- IO connected to Arduino UNO D7.
- VCC connected to Arduino UNO 5V.
- GND connected to Arduino UNO GND.
Documented Code
/*
 * This Arduino sketch controls a traffic light system using a touch sensor.
 * When the touch sensor is pressed, the red LED turns on. On the next press,
 * the yellow LED turns on. On the next press, the green LED turns on. On the
 * next press, all LEDs turn off. This cycle repeats with each subsequent press.
 */

const int touchPin = 7; // Pin connected to the touch sensor
const int redLEDPin = 2; // Pin connected to the red LED
const int yellowLEDPin = 3; // Pin connected to the yellow LED
const int greenLEDPin = 4; // Pin connected to the green LED

int currentState = 0; // Variable to store the current state of the LEDs
int lastTouchState = LOW; // Variable to store the last state of the touch sensor

void setup() {
  pinMode(touchPin, INPUT); // Set touch sensor pin as input
  pinMode(redLEDPin, OUTPUT); // Set red LED pin as output
  pinMode(yellowLEDPin, OUTPUT); // Set yellow LED pin as output
  pinMode(greenLEDPin, OUTPUT); // Set green LED pin as output
  digitalWrite(redLEDPin, LOW); // Ensure red LED is off
  digitalWrite(yellowLEDPin, LOW); // Ensure yellow LED is off
  digitalWrite(greenLEDPin, LOW); // Ensure green LED is off
}

void loop() {
  int touchState = digitalRead(touchPin); // Read the state of the touch sensor

  if (touchState == HIGH && lastTouchState == LOW) {
    // If the touch sensor is pressed
    currentState = (currentState + 1) % 4; // Move to the next state
    updateLEDs(); // Update the LEDs based on the current state
  }

  lastTouchState = touchState; // Update the last touch state
}

void updateLEDs() {
  // Turn off all LEDs
  digitalWrite(redLEDPin, LOW);
  digitalWrite(yellowLEDPin, LOW);
  digitalWrite(greenLEDPin, LOW);

  // Turn on the appropriate LED based on the current state
  if (currentState == 1) {
    digitalWrite(redLEDPin, HIGH);
  } else if (currentState == 2) {
    digitalWrite(yellowLEDPin, HIGH);
  } else if (currentState == 3) {
    digitalWrite(greenLEDPin, HIGH);
  }
}
This code is saved in a file named sketch.ino. It is designed to be uploaded to the Arduino UNO microcontroller to control the traffic light system.