
Arduino Nano Controlled Battery-Powered Servo Motor System with LED Indicators
View and Edit Project In Cirkit Designer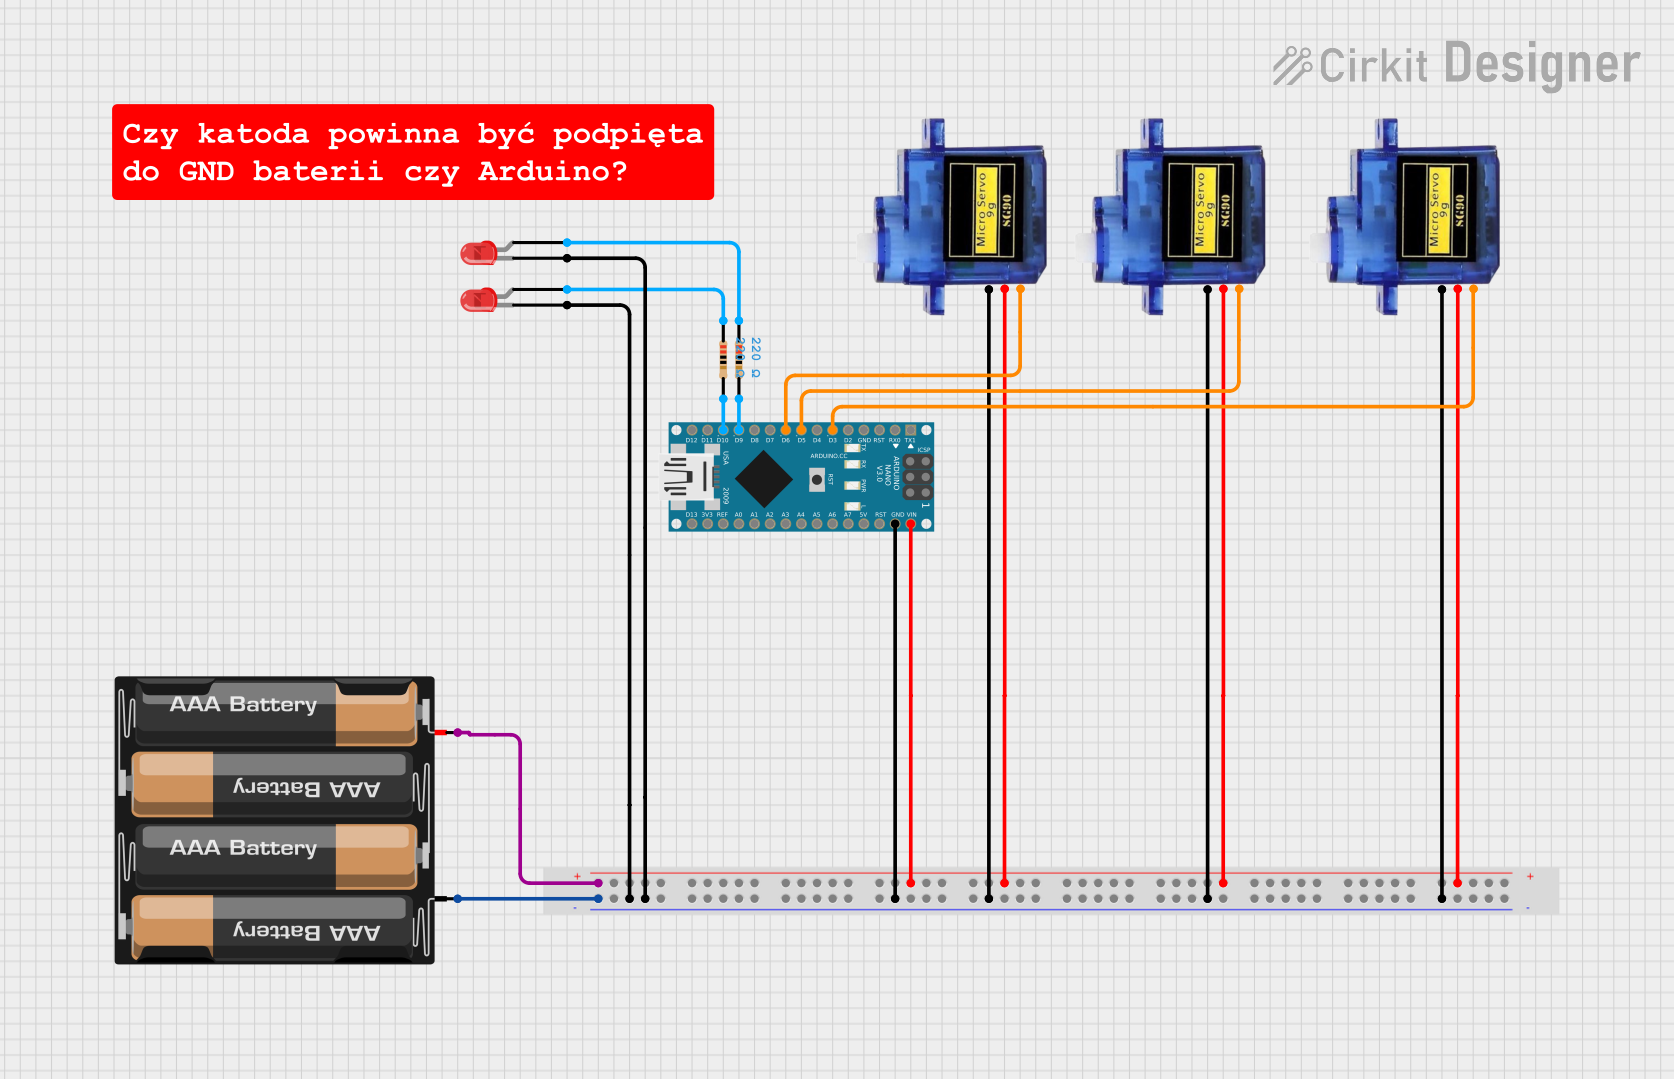
Circuit Documentation
Summary
This circuit consists of an Arduino Nano microcontroller, three micro servos, two LEDs with resistors, a 4 x AAA battery mount, and a breadboard. The Arduino Nano controls the servos and LEDs, which are powered by the battery mount through the breadboard.
Component List
4 x AAA Battery Mount
- Description: Battery holder for four AAA batteries.
- Pins:
-,+
Micro Servo 9G
- Description: Small servo motor.
- Pins:
GND,+5V,PWM
Breadboard
- Description: Prototyping board for making temporary circuits.
- Pins: Multiple pins for connections.
Resistor (220 Ohms)
- Description: Resistor with a resistance of 220 Ohms.
- Pins:
pin1,pin2
LED: Two Pin (red)
- Description: Red LED with two pins.
- Pins:
cathode,anode
Arduino Nano
- Description: Microcontroller board based on the ATmega328.
- Pins:
D1/TX,D0/RX,RESET,GND,D2,D3,D4,D5,D6,D7,D8,D9,D10,D11/MOSI,D12/MISO,VIN,5V,A7,A6,A5,A4,A3,A2,A1,A0,AREF,3V3,D13/SCK
Wiring Details
4 x AAA Battery Mount
-connected to Breadboardpin3Y+connected to Breadboardpin3Z
Micro Servo 9G (Instance 1)
PWMconnected to Arduino NanoD3GNDconnected to Breadboardpin57Y+5Vconnected to Breadboardpin58Z
Micro Servo 9G (Instance 2)
PWMconnected to Arduino NanoD6GNDconnected to Breadboardpin28Y+5Vconnected to Breadboardpin29Z
Micro Servo 9G (Instance 3)
PWMconnected to Arduino NanoD5GNDconnected to Breadboardpin42Y+5Vconnected to Breadboardpin43Z
Breadboard
pin23Zconnected to Arduino NanoVINpin22Yconnected to Arduino NanoGNDpin5Yconnected to LED (Instance 1)cathodepin6Yconnected to LED (Instance 2)cathode
Resistor (220 Ohms) (Instance 1)
pin2connected to Arduino NanoD9pin1connected to LED (Instance 2)anode
Resistor (220 Ohms) (Instance 2)
pin2connected to Arduino NanoD10pin1connected to LED (Instance 1)anode
LED: Two Pin (red) (Instance 1)
cathodeconnected to Breadboardpin5Yanodeconnected to Resistor (Instance 2)pin1
LED: Two Pin (red) (Instance 2)
cathodeconnected to Breadboardpin6Yanodeconnected to Resistor (Instance 1)pin1
Arduino Nano
D3connected to Micro Servo 9G (Instance 1)PWMD5connected to Micro Servo 9G (Instance 3)PWMD6connected to Micro Servo 9G (Instance 2)PWMD9connected to Resistor (Instance 1)pin2D10connected to Resistor (Instance 2)pin2VINconnected to Breadboardpin23ZGNDconnected to Breadboardpin22Y
Code Documentation
Arduino Nano Code
void setup() {
  // put your setup code here, to run once:

}

void loop() {
  // put your main code here, to run repeatedly:

}
This code is a basic template for the Arduino Nano. The setup() function is where you initialize your components, and the loop() function is where you place the code that runs continuously.