
Arduino UNO-Based Water Level and Temperature Monitoring System with Wi-Fi Connectivity
View and Edit Project In Cirkit Designer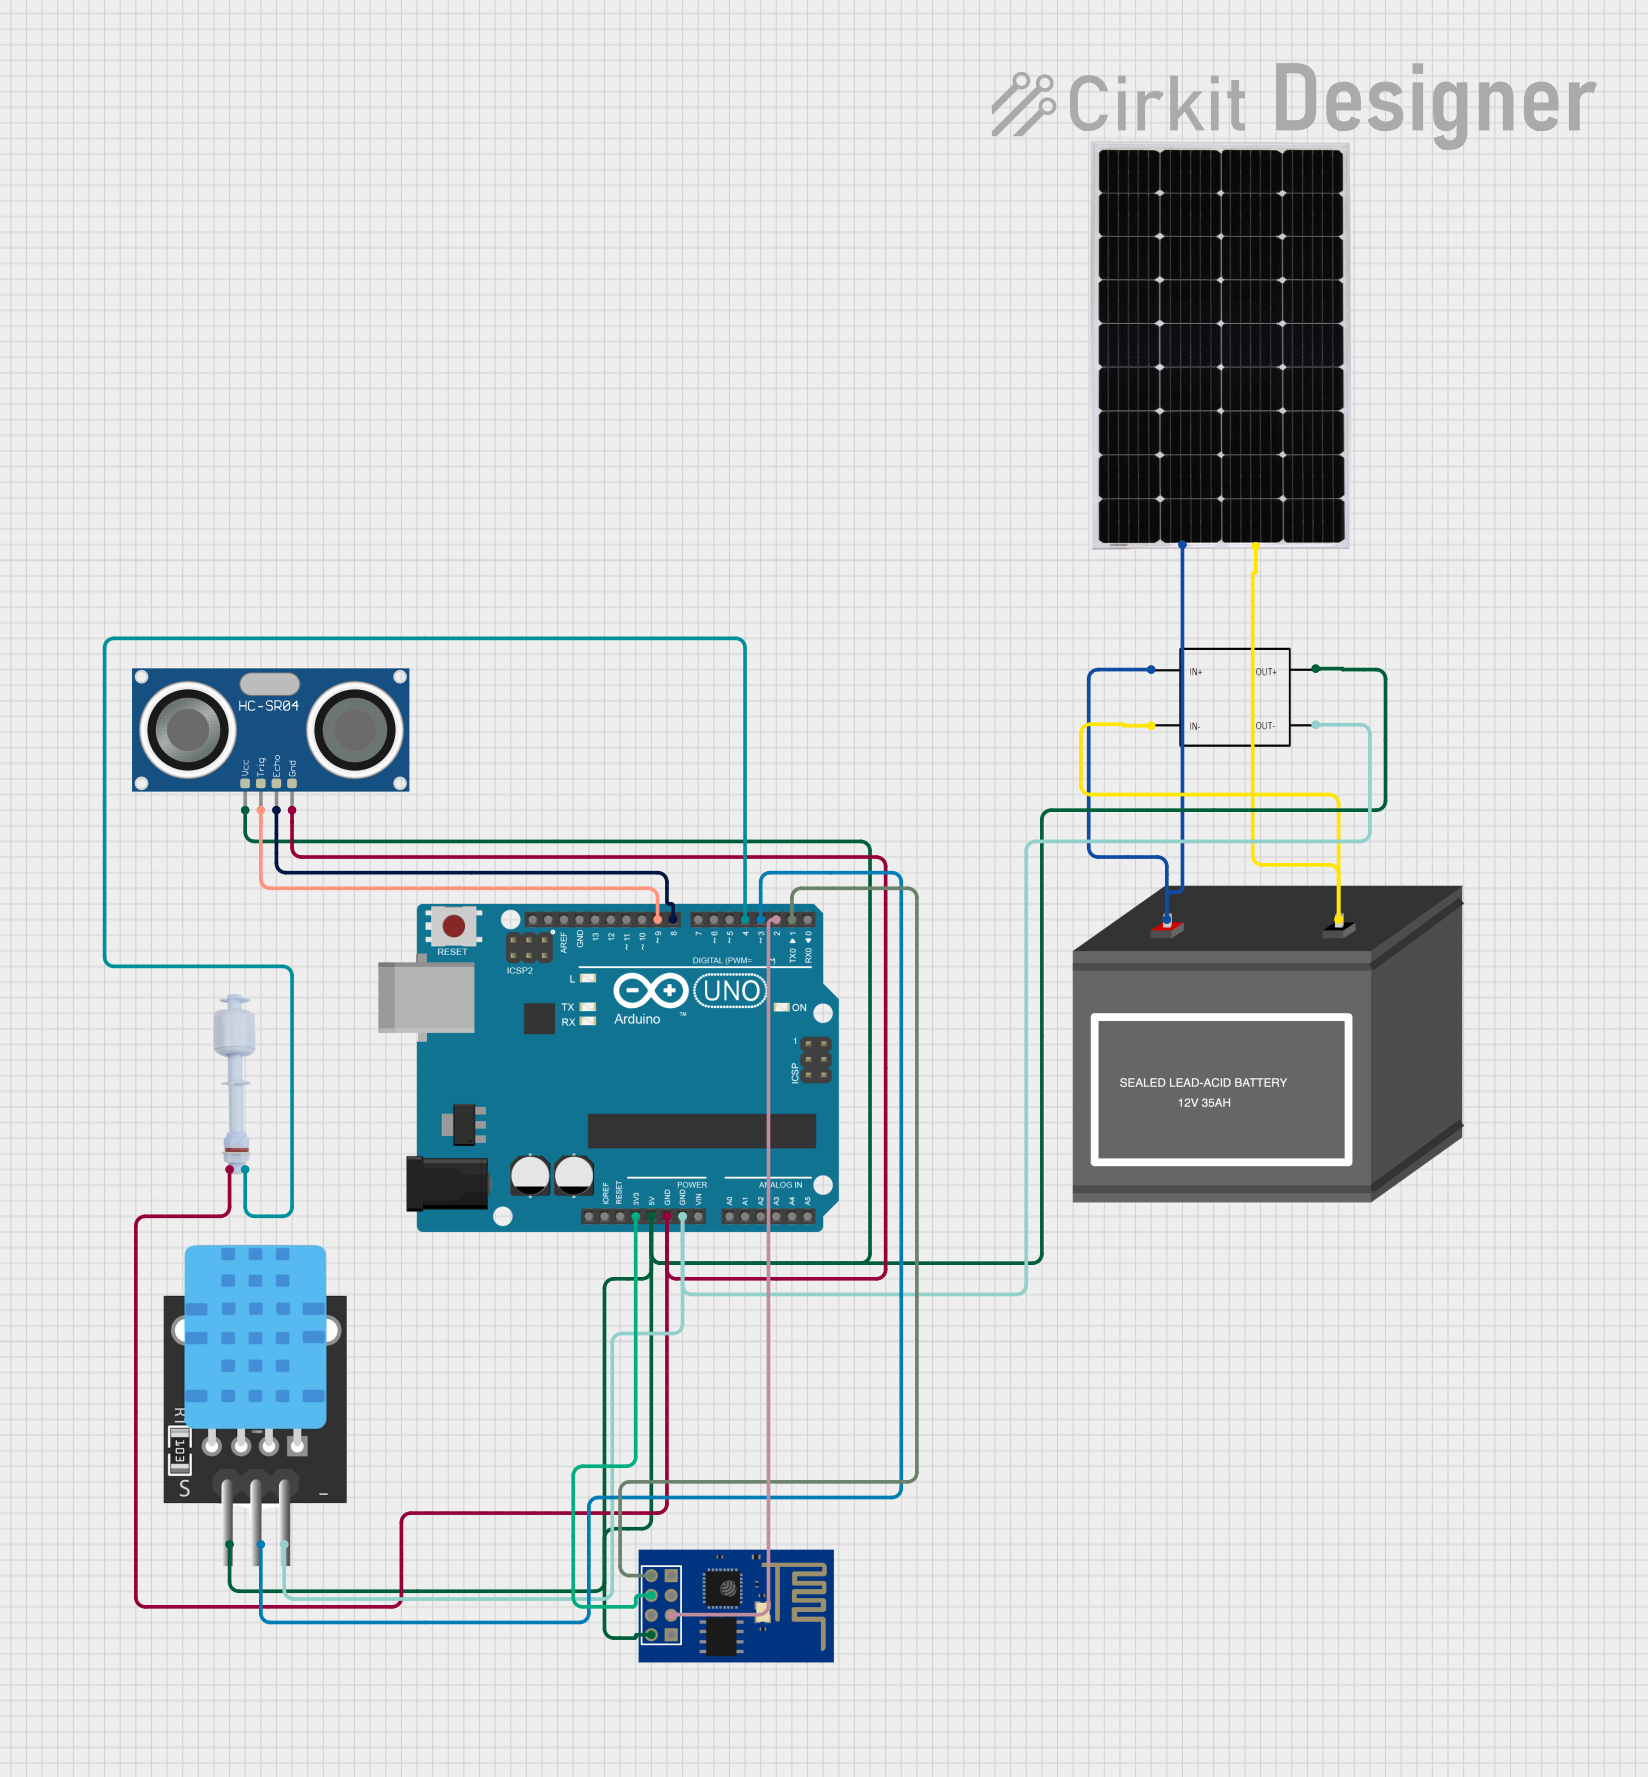
Circuit Documentation
Summary
The circuit in question is designed to interface an Arduino UNO with various sensors and modules, including a Float Switch, an HC-SR04 Ultrasonic Sensor, a temperature sensor (TEMP), and an ESP8266 ESP-01 WiFi Module. The circuit is powered by a combination of a Solar Panel and a 12V Battery (mini), with a Step-Down Converter to regulate the voltage. The Arduino UNO serves as the central processing unit, reading sensor data and communicating with the WiFi module.
Component List
Arduino UNO
- Microcontroller board based on the ATmega328P
- It has 14 digital input/output pins, 6 analog inputs, a 16 MHz quartz crystal, a USB connection, a power jack, an ICSP header, and a reset button.
Float Switch
- A device used to detect the level of liquid within a tank.
- The switch may actuate a pump, an indicator, an alarm, or other devices.
HC-SR04 Ultrasonic Sensor
- An ultrasonic distance sensor that provides 2cm to 400cm of non-contact measurement functionality with a ranging accuracy that can reach up to 3mm.
TEMP (Temperature Sensor)
- A sensor that measures the temperature of the environment.
ESP8266 ESP-01 WiFi Module
- A self-contained SOC with integrated TCP/IP protocol stack that can give any microcontroller access to your WiFi network.
Solar Panel
- A panel designed to absorb the sun's rays as a source of energy for generating electricity.
12V Battery (mini)
- A small battery that provides 12V DC power supply.
Step-Down Converter
- A DC-DC converter that steps down voltage from a higher level to a lower level.
Wiring Details
Arduino UNO
3.3Vconnected to ESP8266 ESP-01 WiFi ModuleCH_PD5Vconnected to HC-SR04 Ultrasonic SensorVCC, TEMP5V, Step-Down ConverterOUT+GNDconnected to HC-SR04 Ultrasonic SensorGND, Float SwitchGND, TEMPGND, Step-Down ConverterOUT-D9connected to HC-SR04 Ultrasonic SensorTRIGD8connected to HC-SR04 Ultrasonic SensorECHOD4connected to Float SwitchDigital PinD3connected to TEMPD3D2connected to ESP8266 ESP-01 WiFi ModuleGPIO_0D1connected to ESP8266 ESP-01 WiFi ModuleTXD
Float Switch
GNDconnected to Arduino UNOGNDDigital Pinconnected to Arduino UNOD4
HC-SR04 Ultrasonic Sensor
VCCconnected to Step-Down ConverterOUT+TRIGconnected to Arduino UNOD9ECHOconnected to Arduino UNOD8GNDconnected to Arduino UNOGND
TEMP (Temperature Sensor)
5Vconnected to Step-Down ConverterOUT+D3connected to Arduino UNOD3GNDconnected to Step-Down ConverterOUT-
ESP8266 ESP-01 WiFi Module
CH_PDconnected to Arduino UNO3.3VVCCconnected to Step-Down ConverterOUT+GPIO_0connected to Arduino UNOD2TXDconnected to Arduino UNOD1
Solar Panel
+connected to Step-Down ConverterIN+-connected to Step-Down ConverterIN-
12V Battery (mini)
+connected to Step-Down ConverterIN+-connected to Step-Down ConverterIN-
Step-Down Converter
IN+connected to Solar Panel+and 12V Battery (mini)+IN-connected to Solar Panel-and 12V Battery (mini)-OUT+connected to HC-SR04 Ultrasonic SensorVCC, TEMP5V, Arduino UNO5VOUT-connected to TEMPGND, Arduino UNOGND
Documented Code
Arduino UNO Code (sketch.ino)
void setup() {
  // put your setup code here, to run once:

}

void loop() {
  // put your main code here, to run repeatedly:

}
Note: The provided code is a template and does not contain any functional code. It needs to be populated with the logic for interfacing with the sensors and modules based on the specific requirements of the circuit's application.