
Circuit Documentation
Summary
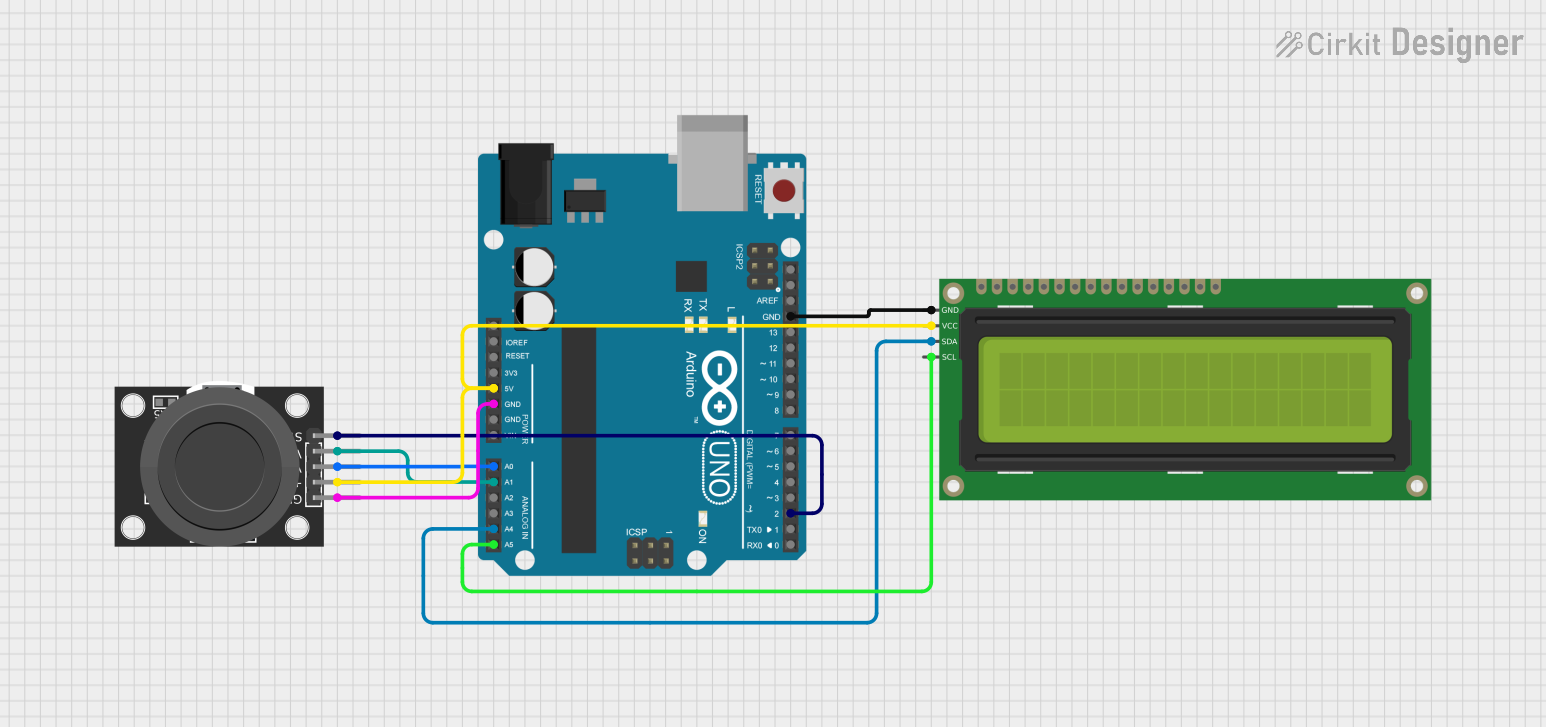
This circuit consists of an Arduino UNO microcontroller, a KY-023 Dual Axis Joystick Module, and a 16x2 I2C LCD. The Arduino UNO serves as the central controller, interfacing with the joystick for input and the LCD for output. The joystick provides analog input for two axes and a digital input for a button press, while the LCD displays information via the I2C protocol.
Component List
Arduino UNO
- Description: A microcontroller board based on the ATmega328P.
- Pins: UNUSED, IOREF, Reset, 3.3V, 5V, GND, Vin, A0, A1, A2, A3, A4, A5, SCL, SDA, AREF, D13, D12, D11, D10, D9, D8, D7, D6, D5, D4, D3, D2, D1, D0
KY-023 Dual Axis Joystick Module
- Description: A joystick module that provides analog output for X and Y axes and a digital output for a button press.
- Pins: GND, +5V, VRx, VRy, SW
16x2 I2C LCD
- Description: A 16x2 character LCD display with I2C interface.
- Pins: GND, VCC, SDA, SCL
Wiring Details
Arduino UNO
- 5V: Connected to VCC of 16x2 I2C LCD and +5V of KY-023 Dual Axis Joystick Module
- GND: Connected to GND of 16x2 I2C LCD and GND of KY-023 Dual Axis Joystick Module
- A0: Connected to VRx of KY-023 Dual Axis Joystick Module
- A1: Connected to VRy of KY-023 Dual Axis Joystick Module
- A4: Connected to SDA of 16x2 I2C LCD
- A5: Connected to SCL of 16x2 I2C LCD
- D2: Connected to SW of KY-023 Dual Axis Joystick Module
KY-023 Dual Axis Joystick Module
- GND: Connected to GND of Arduino UNO
- +5V: Connected to 5V of Arduino UNO
- VRx: Connected to A0 of Arduino UNO
- VRy: Connected to A1 of Arduino UNO
- SW: Connected to D2 of Arduino UNO
16x2 I2C LCD
- GND: Connected to GND of Arduino UNO
- VCC: Connected to 5V of Arduino UNO
- SDA: Connected to A4 of Arduino UNO
- SCL: Connected to A5 of Arduino UNO
Documented Code
Arduino UNO Code
void setup() {
  // put your setup code here, to run once:

}

void loop() {
  // put your main code here, to run repeatedly:

}
This code is a basic template for the Arduino UNO. The setup() function is where you initialize your components and settings, and the loop() function is where you place the main logic that runs repeatedly.
Additional Documentation
// This file is intended for additional documentation purposes.
This section is reserved for any additional documentation that may be required for the project.