
Circuit Documentation
Summary
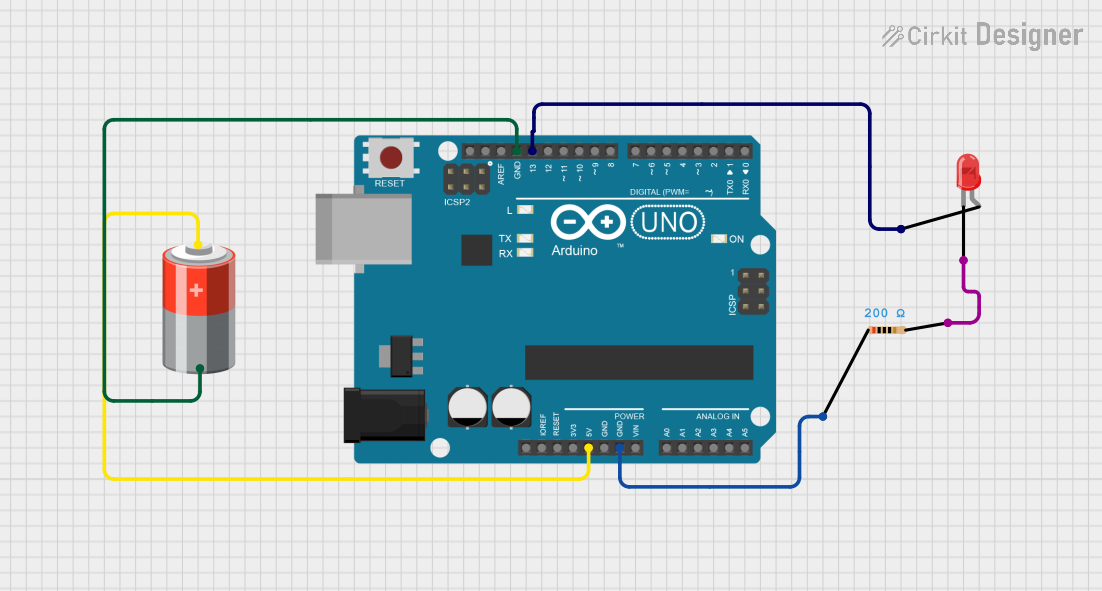
This circuit consists of an Arduino UNO microcontroller, a red LED, a resistor, and a 5V battery. The Arduino UNO is powered by the 5V battery and controls the LED through one of its digital pins. The resistor is used to limit the current flowing through the LED to prevent damage.
Component List
LED: Two Pin (red)
- Description: A red LED with two pins: anode and cathode.
- Pins:
- Anode
- Cathode
Arduino UNO
- Description: A microcontroller board based on the ATmega328P.
- Pins:
- UNUSED
- IOREF
- Reset
- 3.3V
- 5V
- GND
- Vin
- A0
- A1
- A2
- A3
- A4
- A5
- SCL
- SDA
- AREF
- D13
- D12
- D11
- D10
- D9
- D8
- D7
- D6
- D5
- D4
- D3
- D2
- D1
- D0
Resistor
- Description: A resistor with a resistance of 200 Ohms.
- Pins:
- Pin1
- Pin2
- Properties:
- Resistance: 200 Ohms
5V Battery
- Description: A 5V battery used to power the circuit.
- Pins:
-
Wiring Details
LED: Two Pin (red)
- Anode: Connected to D13 pin of Arduino UNO.
- Cathode: Connected to Pin2 of the resistor.
Arduino UNO
- 5V: Connected to the + pin of the 5V battery.
- GND: Connected to the - pin of the 5V battery and Pin1 of the resistor.
- D13: Connected to the anode of the LED.
Resistor
- Pin1: Connected to the GND pin of the Arduino UNO.
- Pin2: Connected to the cathode of the LED.
5V Battery
- +: Connected to the 5V pin of the Arduino UNO.
- -: Connected to the GND pin of the Arduino UNO.
Code Documentation
Arduino UNO Code
void setup() {
  // put your setup code here, to run once:

}

void loop() {
  // put your main code here, to run repeatedly:

}
This code is a basic template for the Arduino UNO. The setup() function is where you initialize your settings, and the loop() function is where the main code runs repeatedly. In this circuit, you would typically add code to control the LED, such as turning it on and off.
Additional Documentation
The additional documentation file is empty and can be used to add further details or instructions as needed.