Cirkit Designer
Your all-in-one circuit design IDE
Home /
Project Documentation
ESP32-Based NTP Clock with DHT22 Temperature Sensor and WS2812 LED Matrix Display
Circuit Documentation
Summary
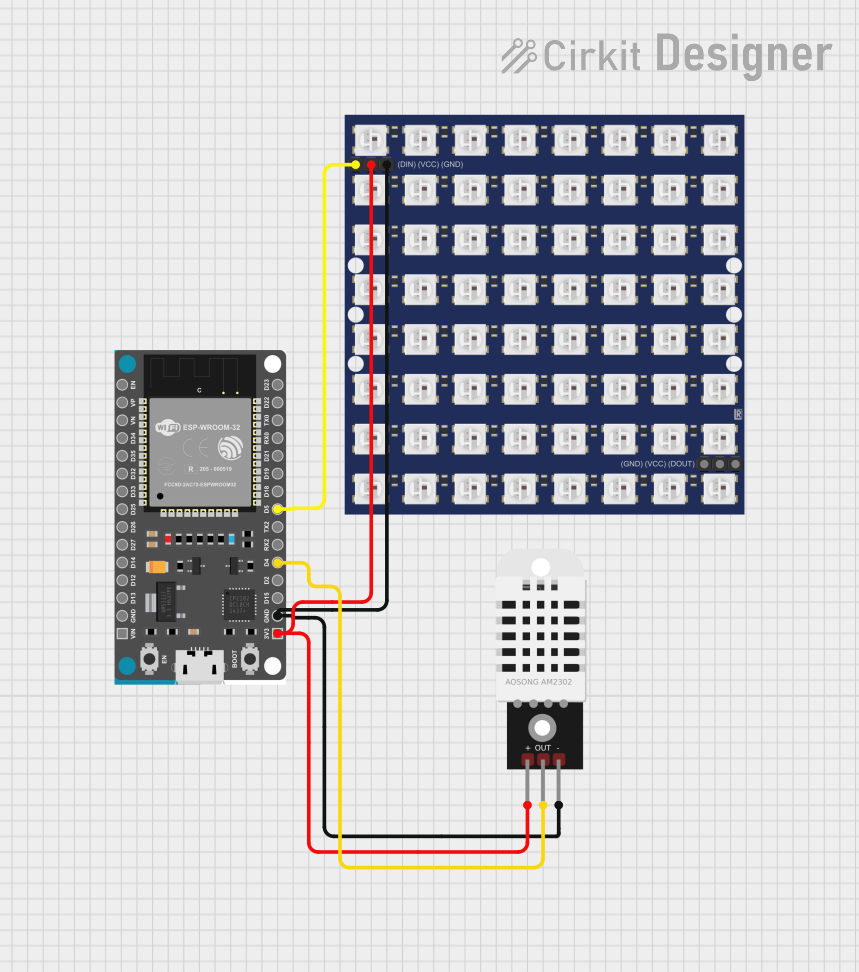
This circuit is designed to display the current date, time, and temperature on an 8x8 WS2812 RGB LED matrix. The ESP32 Devkit V1 microcontroller is used as the central processing unit, which connects to a Wi-Fi network to retrieve the current time from an NTP server and reads temperature data from a DHT22 sensor. The ESP32 controls the LED matrix to display the information and communicates with the DHT22 sensor to get temperature readings.
Component List
ESP32 Devkit V1
- Description: A microcontroller development board based on the ESP32 chip, which is a powerful Wi-Fi and Bluetooth enabled MCU.
- Pins: 3V3, GND, D15, D2, D4, RX2, TX2, D5, D18, D19, D21, RX0, TX0, D22, D23, EN, VP, VN, D34, D35, D32, D33, D25, D26, D27, D14, D12, D13, VIN
DHT22
- Description: A digital temperature and humidity sensor that provides reliable readings for environmental monitoring.
- Pins: +, Out, -
WS2812 RGB LED matrix 8x8
- Description: An 8x8 matrix of individually addressable RGB LEDs, commonly used for creating colorful displays and effects.
- Pins: DIN, VCC, GND, DOUT
Wiring Details
ESP32 Devkit V1
- 3V3: Powers the WS2812 RGB LED matrix and the DHT22 sensor.
- GND: Common ground for the WS2812 RGB LED matrix and the DHT22 sensor.
- D4: Data input for the DHT22 sensor.
- D5: Data output to the DIN pin of the WS2812 RGB LED matrix.
DHT22
- +: Connected to the 3V3 output from the ESP32 Devkit V1.
- Out: Data output connected to the D4 pin of the ESP32 Devkit V1.
- -: Connected to the GND on the ESP32 Devkit V1.
WS2812 RGB LED matrix 8x8
- DIN: Data input connected to the D5 pin of the ESP32 Devkit V1.
- VCC: Powered by the 3V3 output from the ESP32 Devkit V1.
- GND: Common ground connected to the GND on the ESP32 Devkit V1.
- DOUT: Not connected in this configuration.
Documented Code
/*
 * Date, Time, and Temperature Display Project
 * This code displays the current date, time, and temperature on an 8x8 WS2812
 * RGB LED matrix. The date and time are updated every second using an NTP
 * client. The temperature is read from a DHT22 sensor connected to GPIO 4.
 */

#include <WiFi.h>
#include <NTPClient.h>
#include <WiFiUdp.h>
#include <DHT.h>
#include <Adafruit_NeoPixel.h>

// WiFi credentials
const char* ssid     = "your_SSID";
const char* password = "your_PASSWORD";

// NTP Client settings
WiFiUDP ntpUDP;
NTPClient timeClient(ntpUDP, "pool.ntp.org", 0, 60000);

// DHT22 settings
#define DHTPIN 4  // GPIO4 on ESP32 connected to DHT22 Out
#define DHTTYPE DHT22
DHT dht(DHTPIN, DHTTYPE);

// WS2812 settings
#define LED_PIN 5  // GPIO5 on ESP32 connected to WS2812 DIN
#define NUM_LEDS 64
Adafruit_NeoPixel strip = Adafruit_NeoPixel(NUM_LEDS, LED_PIN, NEO_GRB + NEO_KHZ800);

void setup() {
  // Initialize Serial Monitor
  Serial.begin(115200);
  delay(100);

  // Connect to WiFi
  Serial.print("Connecting to ");
  Serial.println(ssid);
  WiFi.begin(ssid, password);

  while (WiFi.status() != WL_CONNECTED) {
    delay(1000);
    Serial.print(".");
  }

  Serial.println("");
  Serial.println("WiFi connected.");

  // Initialize NTP Client
  timeClient.begin();

  // Initialize DHT22 sensor
  dht.begin();

  // Initialize WS2812 LED matrix
  strip.begin();
  strip.show(); // Initialize all pixels to 'off'
}

void loop() {
  // Update the NTP client
  timeClient.update();

  // Get the current date and time
  unsigned long epochTime = timeClient.getEpochTime();
  struct tm *ptm = gmtime ((time_t *)&epochTime);
  int monthDay = ptm->tm_mday;
  int currentMonth = ptm->tm_mon+1;
  int currentYear = ptm->tm_year+1900;
  int currentHour = ptm->tm_hour;
  int currentMinute = ptm->tm_min;
  int currentSecond = ptm->tm_sec;

  // Read temperature from DHT22 sensor
  float temperature = dht.readTemperature();

  // Display the date, time, and temperature on the Serial Monitor
  Serial.print("Date: ");
  Serial.print(currentYear);
  Serial.print("-");
  Serial.print(currentMonth);
  Serial.print("-");
  Serial.print(monthDay);
  Serial.print(" Time: ");
  Serial.print(currentHour);
  Serial.print(":");
  Serial.print(currentMinute);
  Serial.print(":");
  Serial.print(currentSecond);
  Serial.print(" Temperature: ");
  Serial.print(temperature);
  Serial.println(" *C");

  // Display the date, time, and temperature on the LED matrix
  displayDateTimeTemperature(currentYear, currentMonth, monthDay, currentHour,
                             currentMinute, currentSecond, temperature);

  // Wait for a second before updating again
  delay(1000);
}

void displayDateTimeTemperature(int year, int month, int day, int hour, int minute,
                                int second, float temperature) {
  // Clear the LED matrix
  strip.clear();

  // Display the date, time, and temperature on the LED matrix
  // This is a placeholder function. You will need to implement the actual
  // code to display the date, time, and temperature on the LED matrix.
  // You can use the Adafruit_NeoPixel library functions to set the color
  // of individual LEDs in the matrix.

  // Example: Set the first LED to red
  strip.setPixelColor(0, strip.Color(255, 0, 0));

  // Show the updated LED matrix
  strip.show();
}
Note: The displayDateTimeTemperature function is a placeholder and needs to be implemented to display the actual date, time, and temperature on the LED matrix using the Adafruit_NeoPixel library functions.