
Arduino-Controlled Traffic Light System with Joystick Interaction
View and Edit Project In Cirkit Designer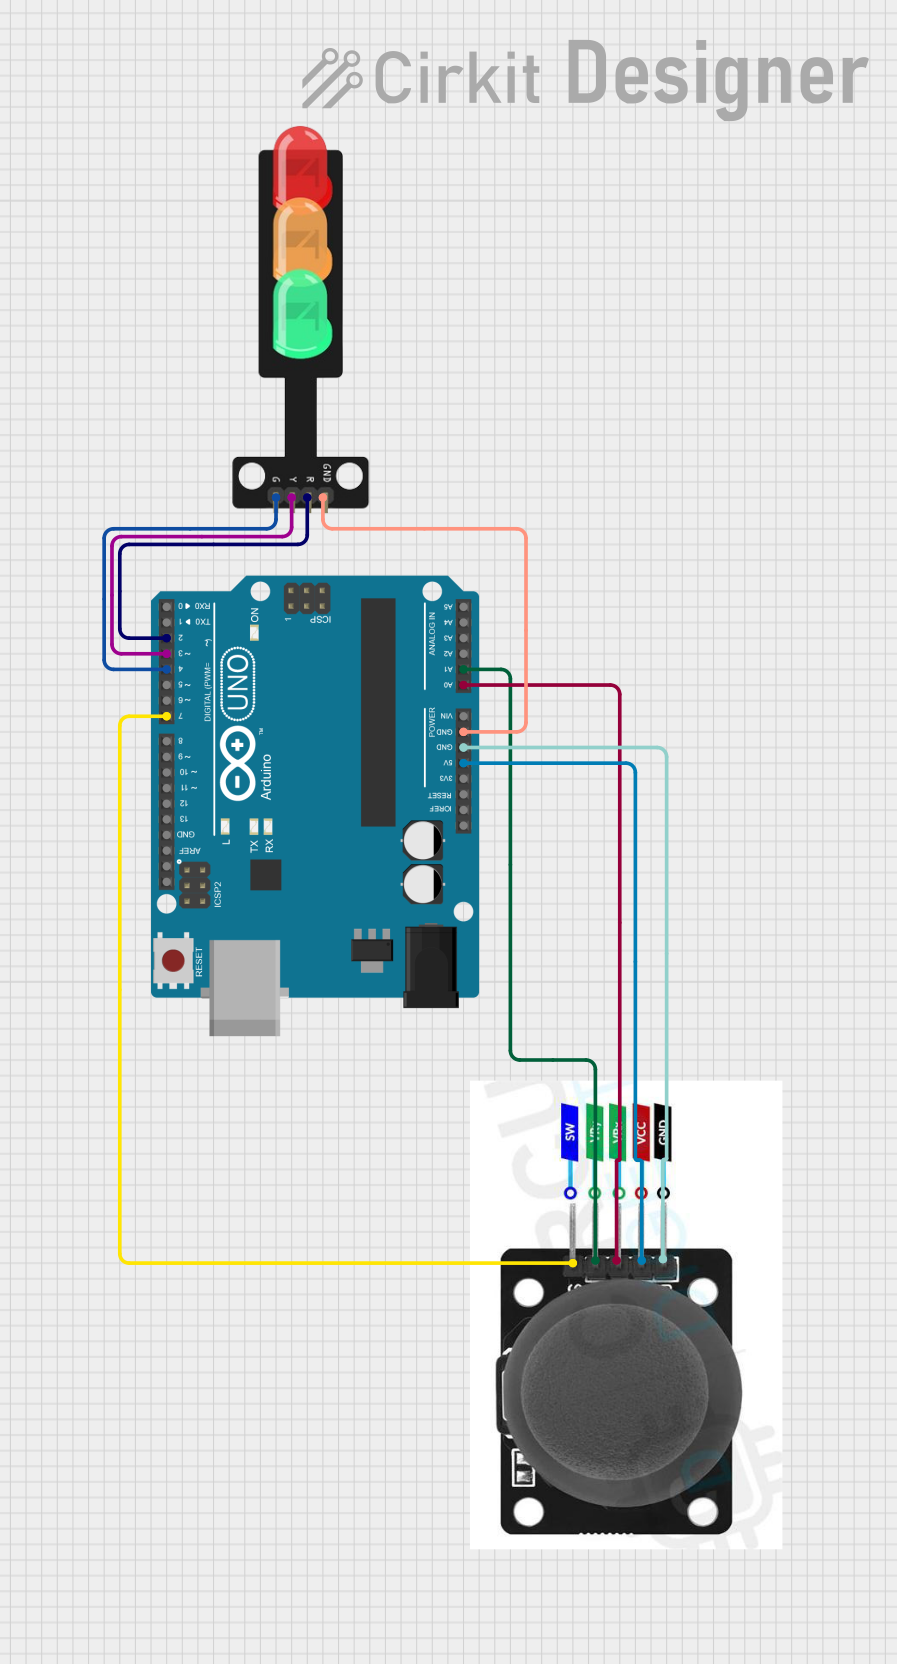
Traffic Light Control Circuit Documentation
Summary
This circuit is designed to control a traffic light system using an Arduino UNO microcontroller and a joystick module. The traffic light has three LEDs (Red, Yellow, Green) that are controlled by the joystick's position. The joystick's X-axis and Y-axis movements are used to select which LED to illuminate, while the switch on the joystick can be used to turn all LEDs on or off. The Arduino UNO reads the joystick's analog values to determine its position and then lights the corresponding LED on the traffic light.
Component List
Traffic Light
- Description: A module with three LEDs (Green, Yellow, Red) representing a traffic light.
- Pins: Green, Yellow, Red, GND
Arduino UNO
- Description: A microcontroller board based on the ATmega328P.
- Pins: UNUSED, IOREF, Reset, 3.3V, 5V, GND, Vin, A0-A5, SCL, SDA, AREF, D0-D13
Joystick Module
- Description: An input module with a two-axis joystick and a pushbutton switch.
- Pins: SW, VRY, VRX, VCC, GND
Wiring Details
Traffic Light
- Green LED: Connected to Arduino UNO pin D4
- Yellow LED: Connected to Arduino UNO pin D3
- Red LED: Connected to Arduino UNO pin D2
- GND: Connected to Arduino UNO GND
Arduino UNO
- 5V: Provides power to the Joystick module VCC
- GND: Common ground for Traffic Light and Joystick module
- A0: Reads the X-axis value from Joystick module VRX
- A1: Reads the Y-axis value from Joystick module VRY
- D2: Controls the Red LED on the Traffic Light
- D3: Controls the Yellow LED on the Traffic Light
- D4: Controls the Green LED on the Traffic Light
- D7: Reads the switch state from Joystick module SW
Joystick Module
- SW: Connected to Arduino UNO pin D7
- VRY: Connected to Arduino UNO pin A1
- VRX: Connected to Arduino UNO pin A0
- VCC: Powered by Arduino UNO 5V
- GND: Connected to Arduino UNO GND
Documented Code
/*
 * This Arduino sketch controls a traffic light system using a joystick module.
 * When the joystick is moved up, the red LED turns on. When the joystick is
 * moved left, the yellow LED turns on. When the joystick is moved right, the
 * green LED turns on. When the joystick is moved down, all LEDs turn on.
 */

const int redLEDPin = 2;    // Red LED connected to D2
const int yellowLEDPin = 3; // Yellow LED connected to D3
const int greenLEDPin = 4;  // Green LED connected to D4
const int joystickSWPin = 7; // Joystick switch connected to D7
const int joystickVRXPin = A0; // Joystick X-axis connected to A0
const int joystickVRYPin = A1; // Joystick Y-axis connected to A1

void setup() {
  pinMode(redLEDPin, OUTPUT);
  pinMode(yellowLEDPin, OUTPUT);
  pinMode(greenLEDPin, OUTPUT);
  pinMode(joystickSWPin, INPUT_PULLUP);
  Serial.begin(9600);
}

void loop() {
  int xValue = analogRead(joystickVRXPin);
  int yValue = analogRead(joystickVRYPin);

  // Center values for the joystick
  const int centerX = 512;
  const int centerY = 512;
  const int threshold = 100;

  // Turn off all LEDs initially
  digitalWrite(redLEDPin, LOW);
  digitalWrite(yellowLEDPin, LOW);
  digitalWrite(greenLEDPin, LOW);

  if (yValue < centerY - threshold) { // Joystick moved up
    digitalWrite(redLEDPin, HIGH);
  } else if (xValue < centerX - threshold) { // Joystick moved left
    digitalWrite(yellowLEDPin, HIGH);
  } else if (xValue > centerX + threshold) { // Joystick moved right
    digitalWrite(greenLEDPin, HIGH);
  } else if (yValue > centerY + threshold) { // Joystick moved down
    digitalWrite(redLEDPin, HIGH);
    digitalWrite(yellowLEDPin, HIGH);
    digitalWrite(greenLEDPin, HIGH);
  }

  delay(100); // Small delay to debounce joystick movements
}
This code is saved as sketch.ino and is intended to be uploaded to the Arduino UNO microcontroller. It sets up the pins connected to the LEDs and joystick, reads the joystick's position, and controls the LEDs accordingly.