
ESP32-Based Smart Energy Monitor with LCD Display and Telegram Integration
View and Edit Project In Cirkit Designer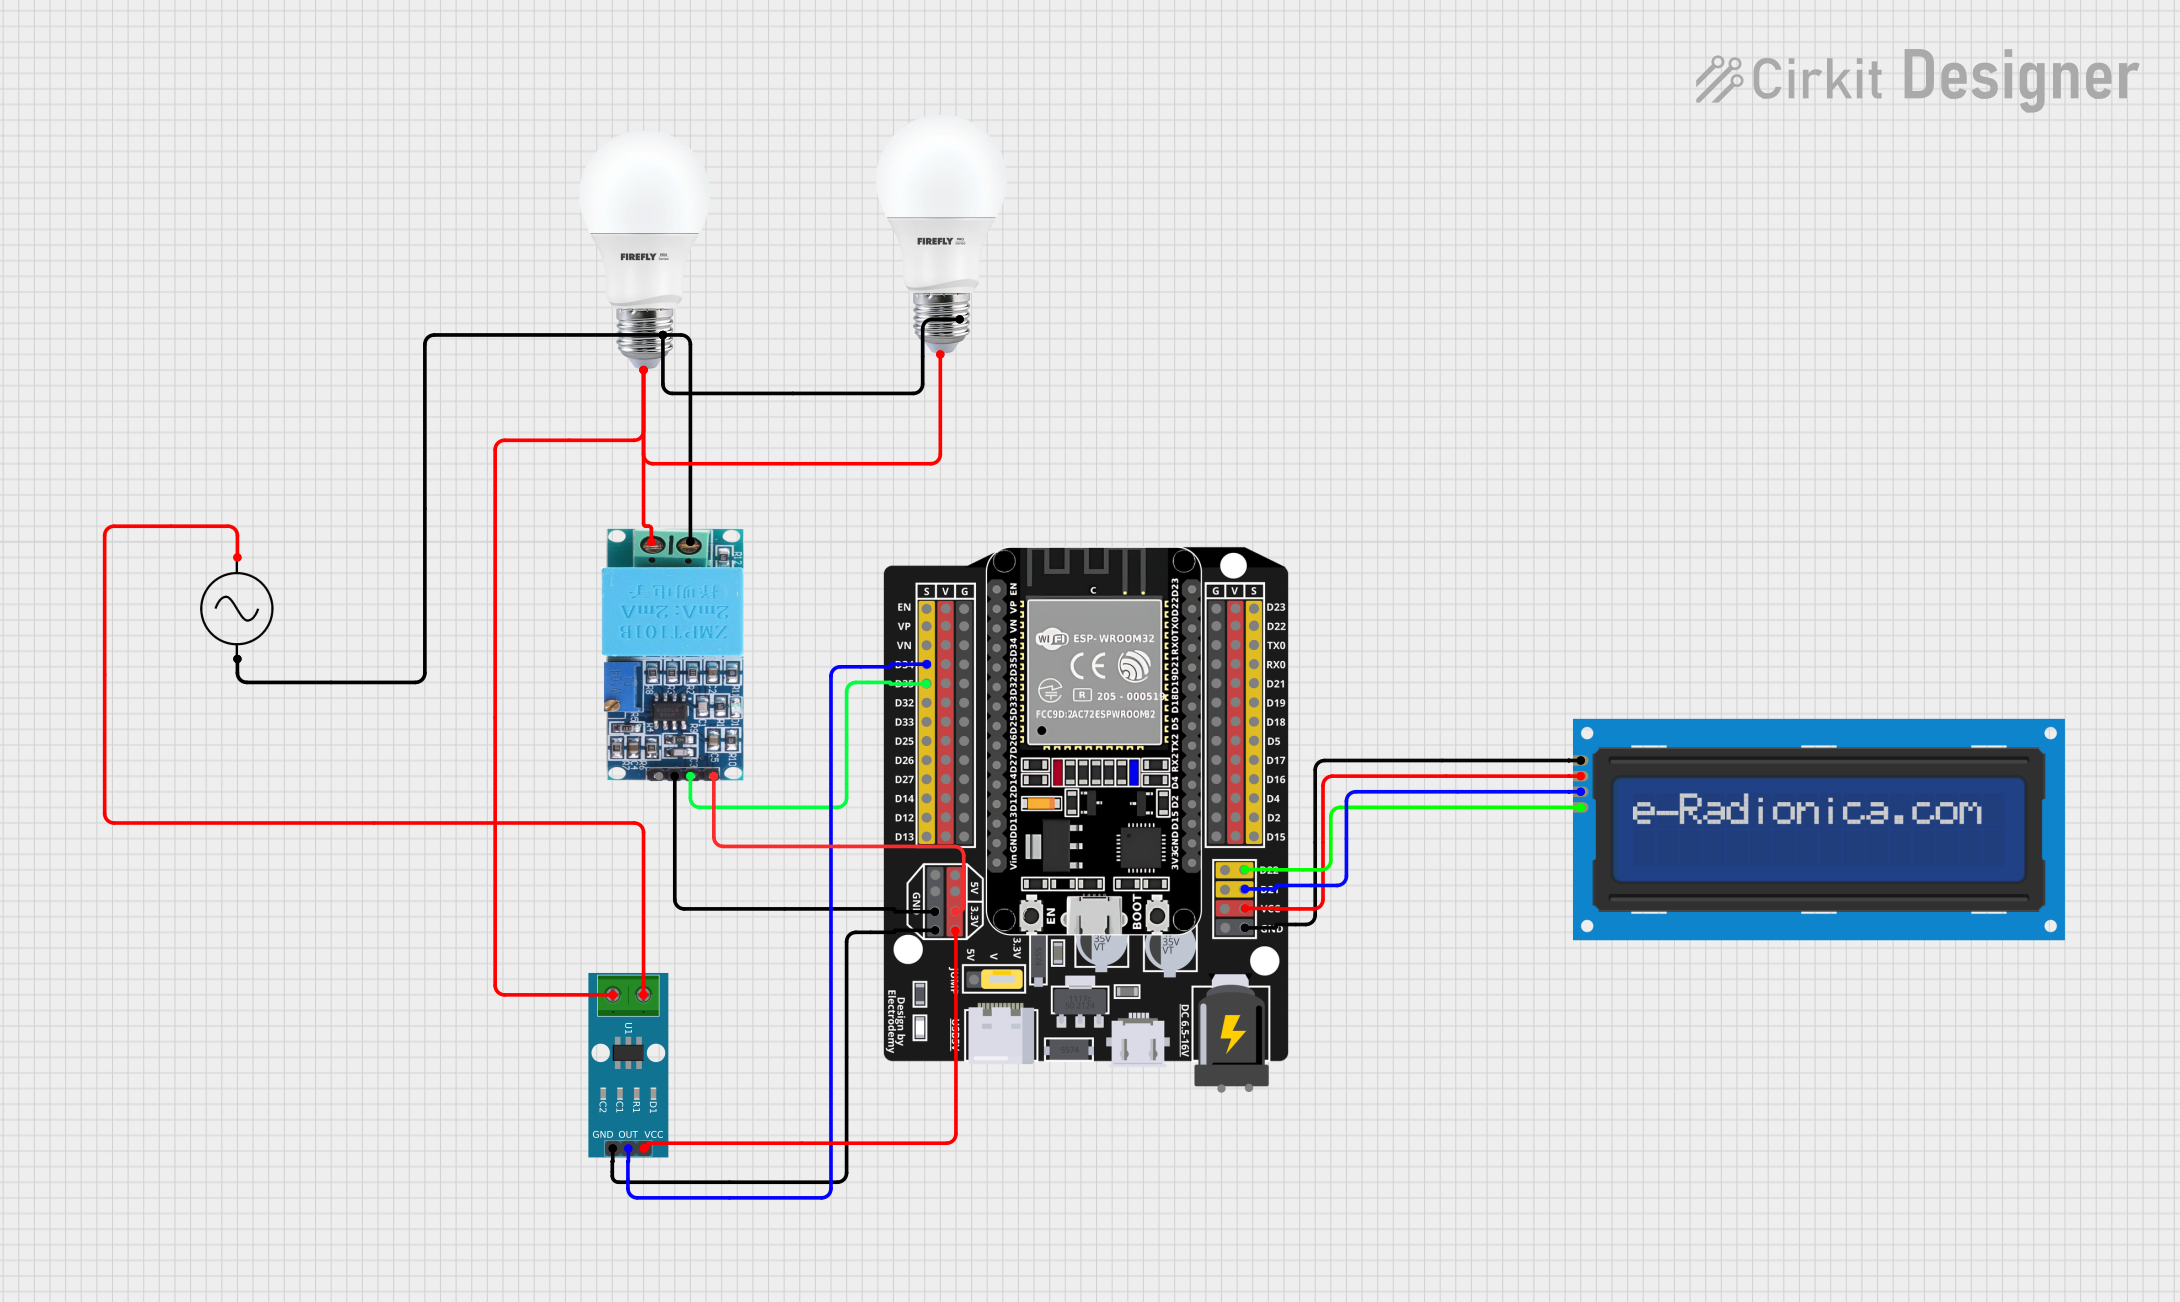
Circuit Documentation
Summary
The circuit in question is designed to monitor and display electrical parameters such as voltage, current, and power consumption. It also calculates the cost of energy consumed and can send this information to a Blynk application and a Telegram bot. The circuit utilizes an ESP32 microcontroller for processing and communication, an LCD screen for display, a ZMPT101B module for voltage sensing, an ACS712 current sensor for current measurement, and a couple of bulbs as a load. The ESP32 communicates with the LCD over I2C and reads sensor data from the ZMPT101B and ACS712 modules. The AC supply powers the bulbs and provides input to the sensors.
Component List
LCD Screen 16x2 I2C
- Description: A 16x2 character LCD display with an I2C interface for displaying data.
- Purpose: To display voltage, current, power, energy consumption, and cost.
ESP32 - Expansion Board
- Description: A microcontroller board based on the ESP32 chip with WiFi capabilities.
- Purpose: To process sensor data, control the LCD display, and handle communication with Blynk and Telegram.
AC Supply
- Description: Provides alternating current as a power source.
- Purpose: To power the bulbs and provide input to the sensors for measurement.
Bulb
- Description: An electrical device that emits light when powered by an AC supply.
- Purpose: Acts as a load in the circuit and allows for power consumption measurement.
ZMPT101B
- Description: A module for voltage sensing in AC power systems.
- Purpose: To measure the voltage of the AC supply.
ACS712 Current Sensor 5A 20A 30A
- Description: A hall-effect-based linear current sensor.
- Purpose: To measure the current flowing through the circuit.
Wiring Details
LCD Screen 16x2 I2C
- SCL: Connected to ESP32 pin D22.
- SDA: Connected to ESP32 pin D21.
- VCC: Connected to ESP32 pin VCC.
- GND: Connected to ESP32 pin G.
ESP32 - Expansion Board
- D22: Connected to LCD SCL.
- D21: Connected to LCD SDA.
- VCC: Provides power to the LCD.
- G: Common ground for the circuit.
- D34: Reads current sensor output from ACS712.
- D32: Reads voltage sensor output from ZMPT101B.
- 3.3V: Provides power to ZMPT101B and ACS712.
- EN, VP, VN, D25-D27, D14-D19, D5, D17, D16, D4, D2, D15, 5V, V: Not connected in this circuit.
AC Supply
- +ve: Connected to ACS712 pin 1 and ZMPT101B pin FASE.
- -ve: Connected to Bulb (-) and ZMPT101B pin NEUTRO.
Bulb
- + (Instance 1): Connected to AC Supply +ve.
- - (Instance 1): Connected to AC Supply -ve.
- + (Instance 2): Connected to AC Supply +ve.
- - (Instance 2): Connected to AC Supply -ve.
ZMPT101B
- OUT: Connected to ESP32 pin D32.
- GND: Connected to ESP32 pin G.
- VCC: Connected to ESP32 pin 3.3V.
- NEUTRO: Connected to AC Supply -ve.
- FASE: Connected to AC Supply +ve.
ACS712 Current Sensor 5A 20A 30A
- 1: Connected to AC Supply +ve.
- 2: Connected to Bulb (+).
- GND: Connected to ESP32 pin G.
- OUT: Connected to ESP32 pin D34.
- VCC: Connected to ESP32 pin 3.3V.
Documented Code
The code for the ESP32 microcontroller is written in C++ and is designed to be compiled and uploaded using the Arduino IDE. The code includes several libraries for handling various functionalities such as energy monitoring, WiFi connectivity, Blynk communication, I2C communication, and LCD display control.
// Include necessary libraries
#include "EmonLib.h"
#include <EEPROM.h>
#include <WiFi.h>
#include <BlynkSimpleEsp32.h>
#include <Wire.h>
#include <LiquidCrystal_I2C.h>
#include <HTTPClient.h>
#include <ArduinoJson.h>

// Initialize LCD with I2C address
LiquidCrystal_I2C lcd(0x27, 16, 2);

// Define constants for calibration and credentials
const float vCalibration = 42.5;
const float currCalibration = 1.80;
const char auth[] = "BlynkAuthToken";
const char ssid[] = "YourSSID";
const char pass[] = "YourPassword";
const float ratePerkWh = 6.5;

// Create instances for energy monitoring and timers
EnergyMonitor emon;
BlynkTimer timer;

// Variables for energy calculation and EEPROM storage
float kWh = 0.0;
float cost = 0.0;
unsigned long lastMillis = millis();
const int addrKWh = 12;
const int addrCost = 16;
int displayPage = 0;
const int resetButtonPin = 4;

// Function prototypes
void sendEnergyDataToBlynk();
void readEnergyDataFromEEPROM();
void saveEnergyDataToEEPROM();
void updateLCD();
void changeDisplayPage();
void sendBillToTelegram();
void resetEEPROM();

// Setup function
void setup() {
  // Initialize serial, WiFi, Blynk, LCD, EEPROM, and pins
  // Read stored data from EEPROM
  // Setup voltage and current inputs
  // Setup timers
}

// Main loop function
void loop() {
  // Run Blynk and timers
  // Check if the reset button is pressed
}

// Function definitions for sending data to Blynk, reading/saving EEPROM data,
// updating the LCD, changing display pages, sending bills to Telegram, and resetting EEPROM
The code is structured with a setup function to initialize the system and a loop function that runs continuously. It includes functions to send data to Blynk, read and save data to EEPROM, update the LCD display, change the display pages, send bills to Telegram, and reset EEPROM data. The actual implementation of these functions is omitted for brevity but would include the logic for each operation as described in the function prototypes.