
Circuit Documentation
Summary
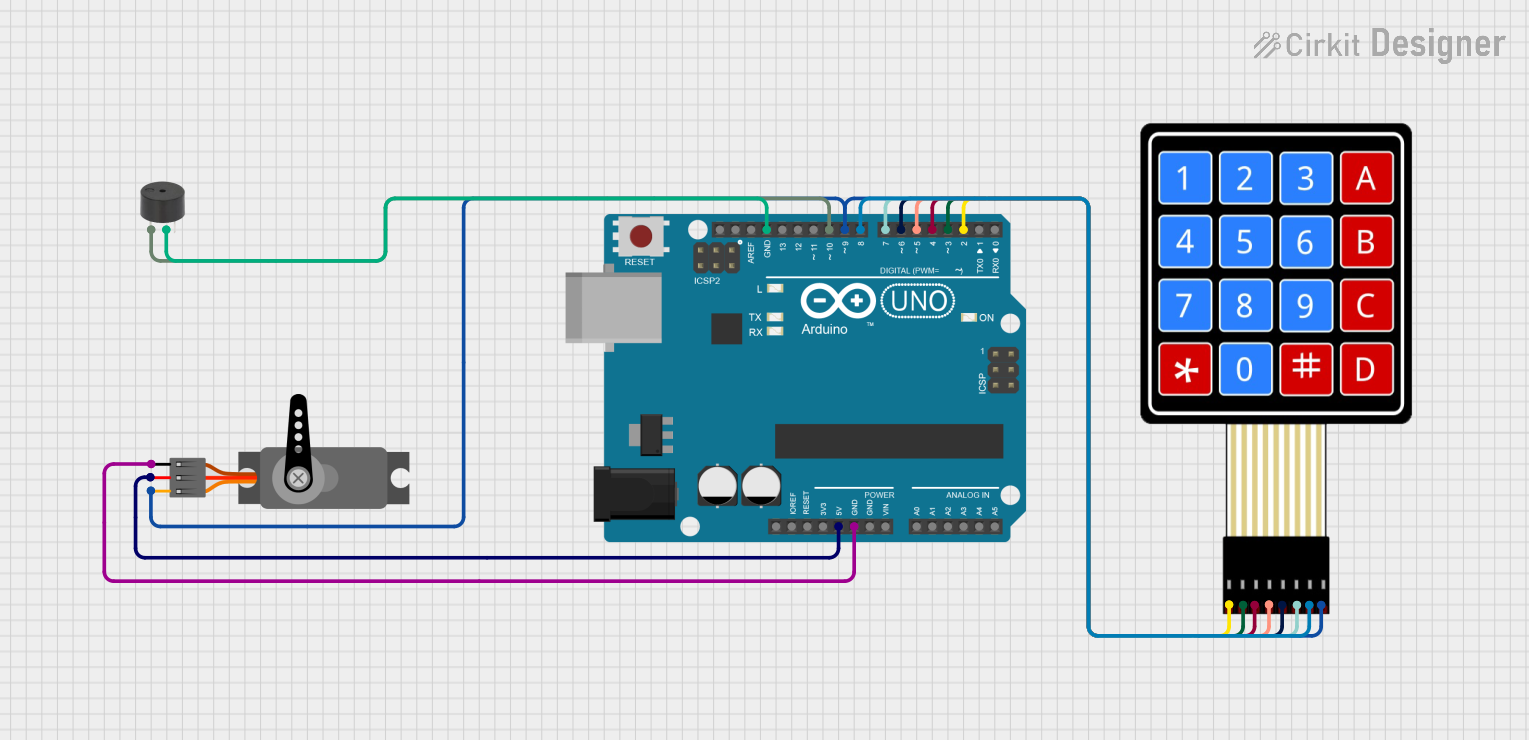
This circuit consists of an Arduino UNO microcontroller, a servo motor, a 4x4 membrane matrix keypad, and a buzzer. The Arduino UNO controls the servo motor and the buzzer based on input received from the keypad. The user can set a timer using the keypad, and once the timer expires, the servo motor stops, and the buzzer sounds an alarm.
Component List
Arduino UNO
- Description: A microcontroller board based on the ATmega328P.
- Pins: UNUSED, IOREF, Reset, 3.3V, 5V, GND, Vin, A0, A1, A2, A3, A4, A5, SCL, SDA, AREF, D13, D12, D11, D10, D9, D8, D7, D6, D5, D4, D3, D2, D1, D0
Servo
- Description: A servo motor used for precise control of angular position.
- Pins: GND, VCC, PWM
4X4 Membrane Matrix Keypad
- Description: A keypad with 4 rows and 4 columns used for user input.
- Pins: R1, R2, R3, R4, C1, C2, C3, C4
Buzzer
- Description: An electronic device that produces a sound when activated.
- Pins: PIN, GND
Wiring Details
Arduino UNO
- GND: Connected to Servo GND, Buzzer GND
- 5V: Connected to Servo VCC
- D9: Connected to Keypad C4, Servo PWM
- D10: Connected to Buzzer PIN
- D8: Connected to Keypad C3
- D7: Connected to Keypad C2
- D6: Connected to Keypad C1
- D5: Connected to Keypad R4
- D4: Connected to Keypad R3
- D3: Connected to Keypad R2
- D2: Connected to Keypad R1
Servo
- GND: Connected to Arduino UNO GND
- VCC: Connected to Arduino UNO 5V
- PWM: Connected to Arduino UNO D9
4X4 Membrane Matrix Keypad
- C4: Connected to Arduino UNO D9
- C3: Connected to Arduino UNO D8
- C2: Connected to Arduino UNO D7
- C1: Connected to Arduino UNO D6
- R4: Connected to Arduino UNO D5
- R3: Connected to Arduino UNO D4
- R2: Connected to Arduino UNO D3
- R1: Connected to Arduino UNO D2
Buzzer
- PIN: Connected to Arduino UNO D10
- GND: Connected to Arduino UNO GND
Code Documentation
#include <Servo.h>
#include <Keypad.h>

Servo myServo;
const int buzzerPin = 10;

// Keypad setup
const byte ROWS = 4; // Four rows
const byte COLS = 4; // Four columns
char keys[ROWS][COLS] = {
  {'1','2','3','A'},
  {'4','5','6','B'},
  {'7','8','9','C'},
  {'*','0','#','D'}
};
byte rowPins[ROWS] = {9, 8, 7, 6}; // Connect to the row pinouts of the keypad
byte colPins[COLS] = {5, 4, 3, 2}; // Connect to the column pinouts of the keypad

Keypad keypad = Keypad(makeKeymap(keys), rowPins, colPins, ROWS, COLS);

void setup() {
  myServo.attach(9); // Attach servo to pin 9
  pinMode(buzzerPin, OUTPUT);
  Serial.begin(9600);
  Serial.println("Enter time in seconds:");
}

void loop() {
  static String inputString = "";
  char key = keypad.getKey();

  if (key) {
    if (key == '#') {
      int timeDuration = inputString.toInt();
      Serial.print("Timer set for: ");
      Serial.print(timeDuration);
      Serial.println(" seconds");
      inputString = "";
      startTimer(timeDuration);
    } else if (key == '*') {
      inputString = "";
      Serial.println("Input cleared");
    } else {
      inputString += key;
      Serial.print(key);
    }
  }
}

void startTimer(int duration) {
  myServo.write(90); // Start the servo motor
  delay(duration * 1000); // Wait for the specified duration
  myServo.write(0); // Stop the servo motor
  triggerAlarm();
}

void triggerAlarm() {
  for (int i = 0; i < 5; i++) {
    digitalWrite(buzzerPin, HIGH);
    delay(500);
    digitalWrite(buzzerPin, LOW);
    delay(500);
  }
  Serial.println("Time's up!");
}
This code initializes the servo motor, keypad, and buzzer. The user can input a time duration using the keypad, and the servo motor will run for the specified duration. Once the timer expires, the servo motor stops, and the buzzer sounds an alarm.