
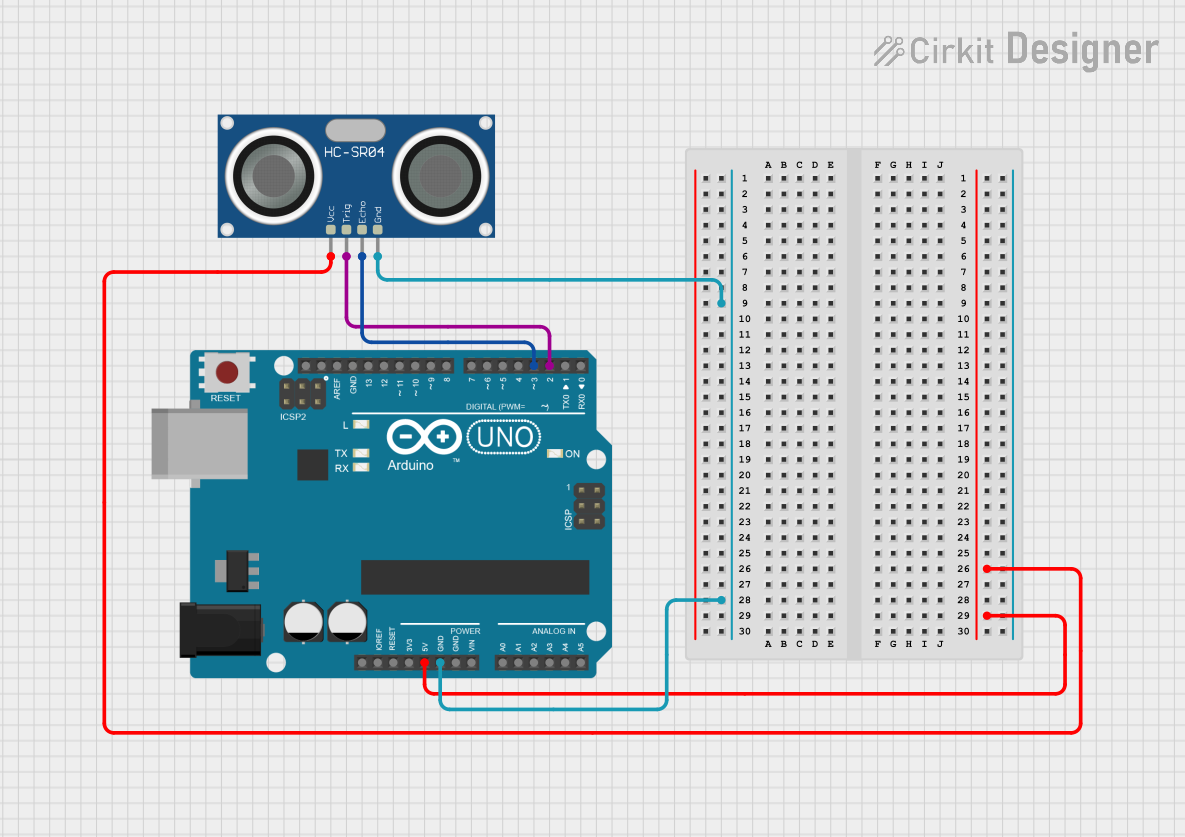
Circuit Documentation
Summary of the Circuit
This circuit integrates an Arduino UNO microcontroller board with an HC-SR04 Ultrasonic Sensor. The purpose of this setup is to utilize the ultrasonic sensor to measure distances, which is a common application in robotics and automation for object detection or range finding. The Arduino UNO serves as the control unit to process the signals from the HC-SR04 sensor.
Component List
Arduino UNO
- Description: A microcontroller board based on the ATmega328P.
- Pins: UNUSED, IOREF, Reset, 3.3V, 5V, GND, Vin, A0-A5, SCL, SDA, AREF, D0-D13.
- Purpose: Acts as the central processing unit for the circuit, reading sensor data and executing embedded code.
HC-SR04 Ultrasonic Sensor
- Description: An ultrasonic distance sensor capable of measuring distances from 2cm to 400cm.
- Pins: VCC, TRIG, ECHO, GND.
- Purpose: To emit ultrasonic waves and measure the time taken for the echo to return, thus calculating the distance to an object.
Wiring Details
Arduino UNO
- 5V connected to HC-SR04 Ultrasonic Sensor VCC.
- GND connected to HC-SR04 Ultrasonic Sensor GND.
- D3 connected to HC-SR04 Ultrasonic Sensor ECHO.
- D2 connected to HC-SR04 Ultrasonic Sensor TRIG.
HC-SR04 Ultrasonic Sensor
- VCC connected to Arduino UNO 5V.
- TRIG connected to Arduino UNO D2.
- ECHO connected to Arduino UNO D3.
- GND connected to Arduino UNO GND.
Documented Code
The following code is intended to be uploaded to the Arduino UNO microcontroller to interface with the HC-SR04 Ultrasonic Sensor. The code is structured with a setup() function to initialize the sensor and a loop() function to continuously measure and process the distance data.
void setup() {
  // Initialize the HC-SR04 Ultrasonic Sensor
  pinMode(2, OUTPUT); // TRIG pin as output
  pinMode(3, INPUT);  // ECHO pin as input
}

void loop() {
  // Trigger the ultrasonic pulse
  digitalWrite(2, LOW);
  delayMicroseconds(2);
  digitalWrite(2, HIGH);
  delayMicroseconds(10);
  digitalWrite(2, LOW);

  // Read the echo pulse
  long duration = pulseIn(3, HIGH);
  long distance = duration * 0.034 / 2; // Calculate the distance

  // Process the distance and implement your logic here

  delay(100); // Delay between measurements
}
Note: The provided code is a template and requires further implementation for specific applications. The loop() function should include logic to handle the distance data, such as triggering events or actions when certain distance thresholds are met.