Raspberry Pi 3B Temperature-Controlled LED Indicator
Circuit Documentation
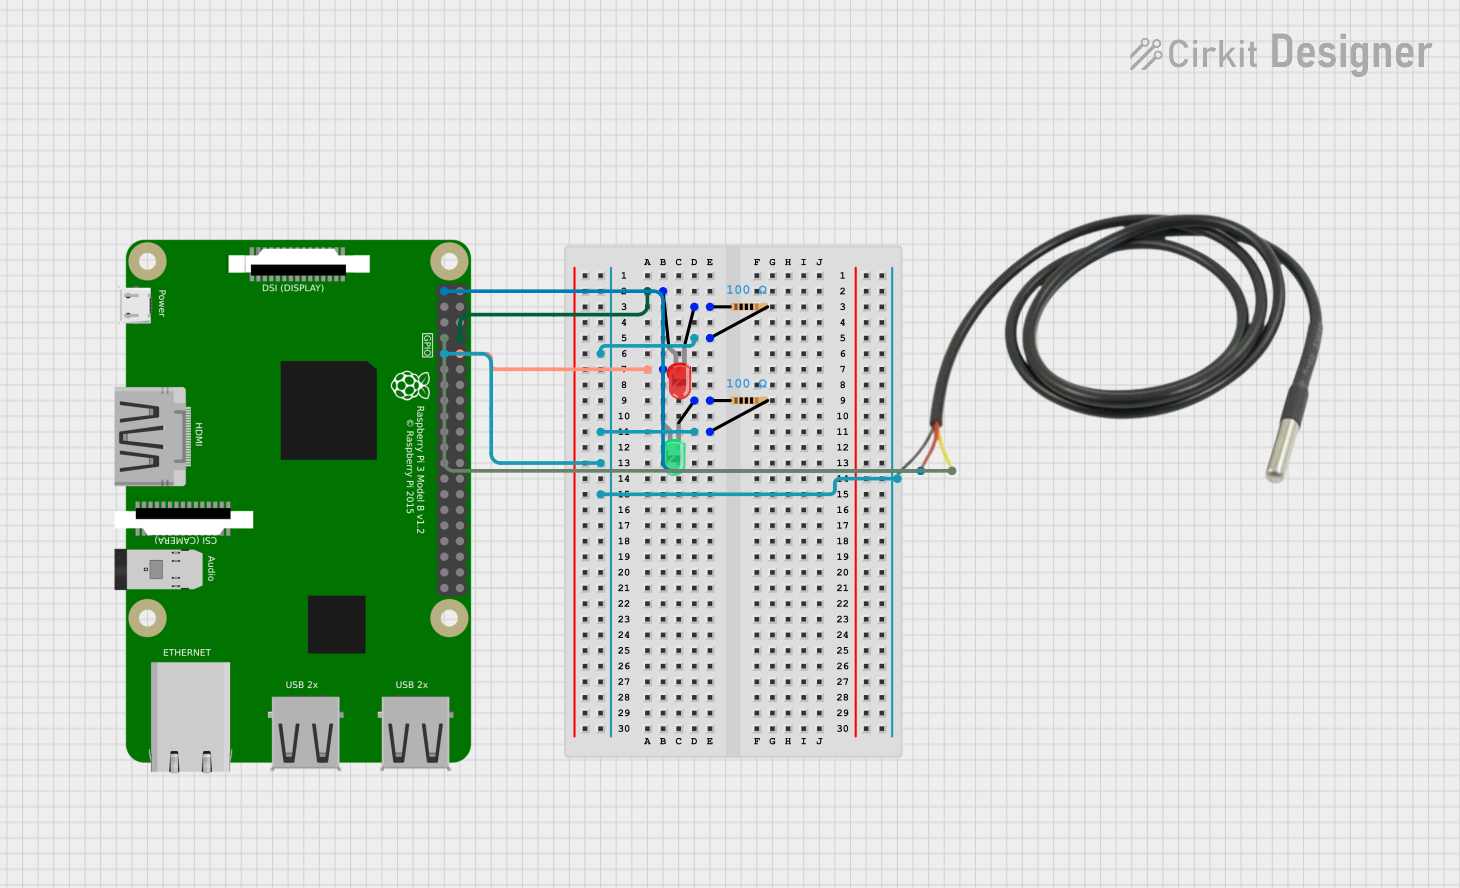
Summary of the Circuit
This circuit is designed to control two LEDs (one red and one green) using a Raspberry Pi 3B based on temperature readings from a temperature sensor. The red LED is connected to GPIO14 and is controlled by the temperature: it turns on when the temperature is equal to or above 60°F and turns off when below this threshold. The green LED is connected to GPIO15 but does not have a control mechanism defined in the provided code. Both LEDs are connected to ground through individual resistors. The temperature sensor is powered by the 3.3V pin on the Raspberry Pi and communicates via GPIO4.
Component List
Raspberry Pi 3B
- Description: A microcontroller board capable of running Python scripts and interfacing with various electronic components via its GPIO pins.
- Purpose: Acts as the central controller for the circuit, reading temperature data and controlling the state of the red LED.
LED: Two Pin (red)
- Description: A simple red LED with an anode and cathode for basic light-emitting functionality.
- Purpose: Indicates when the temperature is at or above the threshold by lighting up.
LED: Two Pin (green)
- Description: A simple green LED with an anode and cathode for basic light-emitting functionality.
- Purpose: Currently, it does not have a defined control mechanism in the circuit.
Temperature Sensor
- Description: A sensor capable of measuring temperature and providing data to the Raspberry Pi.
- Purpose: Measures the ambient temperature and provides data to the Raspberry Pi for controlling the red LED.
Resistor (100 Ohms)
- Description: A resistor with a resistance of 100 Ohms.
- Purpose: Limits the current flowing through the LEDs to prevent damage.
Wiring Details
Raspberry Pi 3B
- GPIO14: Connected to the anode of the red LED.
- GPIO15: Connected to the anode of the green LED.
- GPIO4: Connected to the data pin of the temperature sensor.
- 3v3: Connected to the VDD pin of the temperature sensor.
- GND: Connected to the cathodes of the LEDs (via resistors) and the GND pin of the temperature sensor.
LED: Two Pin (red)
- Anode: Connected to GPIO14 of the Raspberry Pi 3B.
- Cathode: Connected to one end of a 100 Ohm resistor.
LED: Two Pin (green)
- Anode: Connected to GPIO15 of the Raspberry Pi 3B.
- Cathode: Connected to one end of a 100 Ohm resistor.
Temperature Sensor
- Temp GND Black: Connected to GND on the Raspberry Pi 3B.
- Temp VDD Red: Connected to 3v3 on the Raspberry Pi 3B.
- Temp DQ Data Yellow: Connected to GPIO4 on the Raspberry Pi 3B.
Resistor (100 Ohms)
- One end connected to the cathode of the red LED and the other end to GND on the Raspberry Pi 3B.
- One end connected to the cathode of the green LED and the other end to GND on the Raspberry Pi 3B.
Documented Code
"""
This Python script controls an LED connected to GPIO14 of a Raspberry Pi 3B.
The LED turns on when the onboard temperature is >= 60°F and turns off when
the temperature is < 60°F.
"""

import RPi.GPIO as GPIO
import time

ledPin = 14  # GPIO14
thresholdTempF = 60.0  # Temperature threshold in Fahrenheit

def setup():
    GPIO.setmode(GPIO.BCM)
    GPIO.setup(ledPin, GPIO.OUT)

def getTemperature():
    # Placeholder function to simulate temperature reading
    # Replace with actual temperature sensor code
    return 32.0  # Return a dummy temperature in Celsius

def loop():
    while True:
        tempC = getTemperature()  # Get the temperature in Celsius
        tempF = (tempC * 9.0 / 5.0) + 32.0  # Convert to Fahrenheit
        if tempF >= thresholdTempF:
            GPIO.output(ledPin, GPIO.HIGH)  # Turn on the LED
        else:
            GPIO.output(ledPin, GPIO.LOW)  # Turn off the LED
        time.sleep(1)  # Wait for 1 second before checking again

def destroy():
    GPIO.cleanup()  # Release all GPIO

if __name__ == '__main__':
    try:
        setup()
        loop()
    except KeyboardInterrupt:
        destroy()
Filename: sketch.ino
Description: The code sets up the Raspberry Pi GPIO pins and enters a loop where it continuously checks the temperature. If the temperature is above the threshold, it turns on the red LED; otherwise, it turns it off. The temperature reading function is a placeholder and should be replaced with actual sensor reading code.