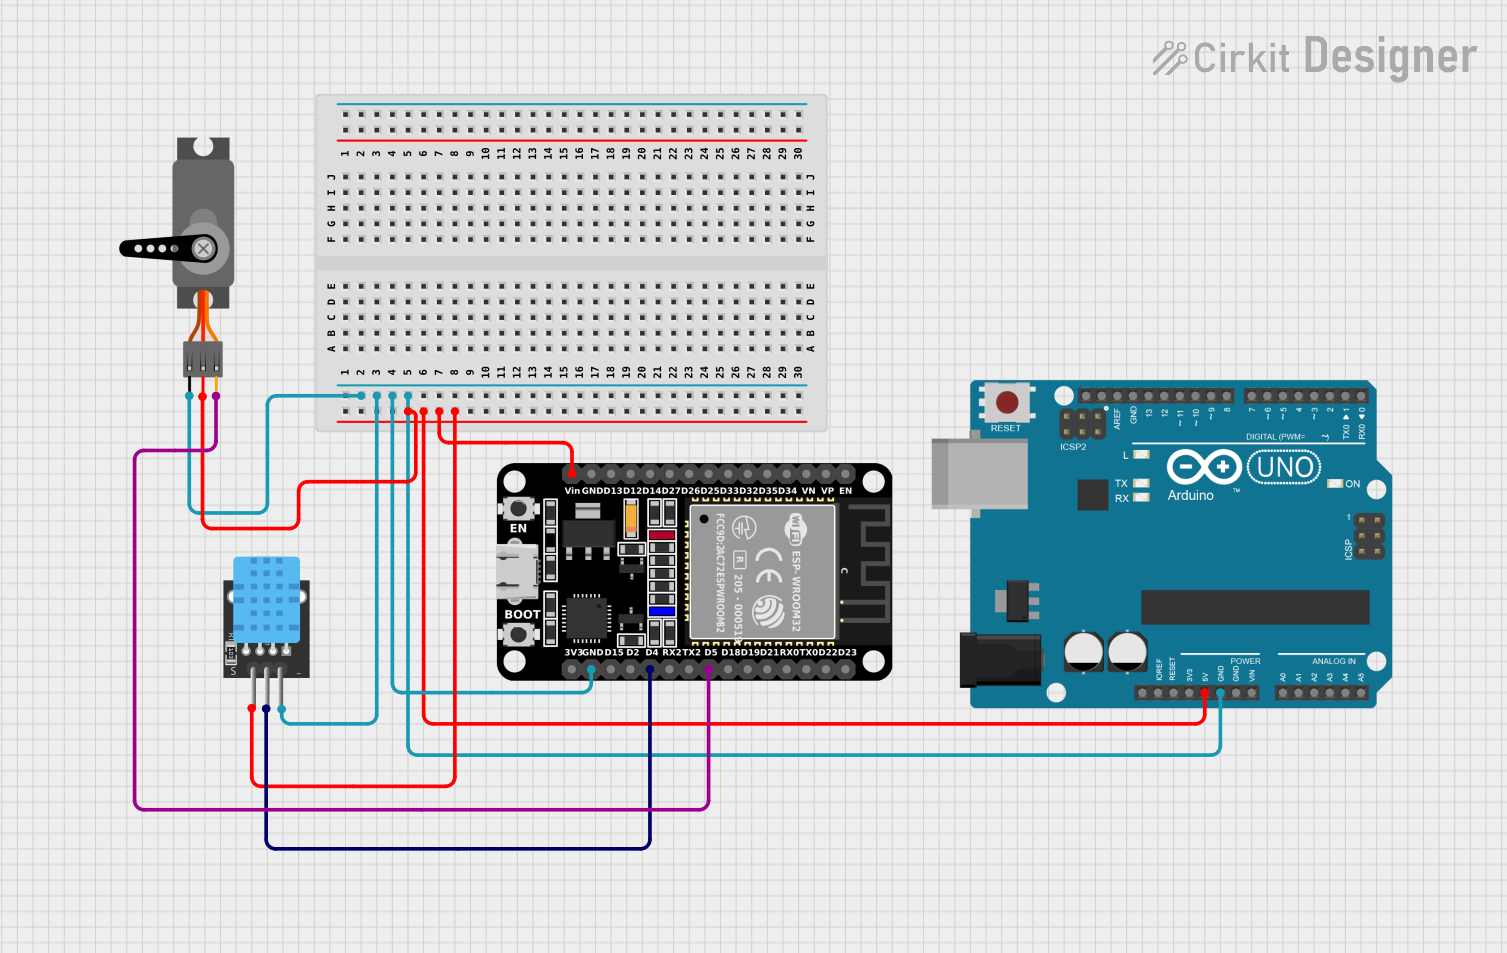
ESP32 and Arduino UNO Based Temperature-Responsive Servo Control

Circuit Documentation
Summary of the Circuit
This circuit integrates an Arduino UNO microcontroller with an ESP32 (30-pin variant), a DHT11 temperature and humidity sensor, and a servo motor. The Arduino UNO serves as the primary controller, interfacing with the DHT11 sensor to read environmental data and controlling the servo motor based on the temperature readings. The ESP32 is included in the circuit and may serve as a secondary controller or for wireless communication capabilities, although its specific role is not defined in the provided code. The DHT11 sensor provides temperature and humidity readings, and the servo motor is actuated based on the temperature data.
Component List
Arduino UNO
- Microcontroller board based on the ATmega328P
- Features digital I/O pins, analog input pins, and various power pins
- Utilized for reading sensor data and controlling the servo motor
ESP32 (30 pin)
- A powerful microcontroller with Wi-Fi and Bluetooth capabilities
- Features a wide range of GPIO pins for interfacing with various peripherals
- Its role in this circuit is not explicitly defined in the provided code
DHT11
- A basic, low-cost digital temperature and humidity sensor
- Provides reliable readings for a wide range of temperatures and humidity levels
- Interfaced with the Arduino UNO for environmental data acquisition
Servo
- An actuator capable of precise angular positioning
- Controlled by PWM signals
- Actuated by the Arduino UNO based on temperature readings from the DHT11 sensor
Wiring Details
Arduino UNO
- GND: Connected to the common ground net
- 5V: Supplies power to the servo motor and the DHT11 sensor
- Digital Pins: Not directly connected in the provided net list
ESP32 (30 pin)
- GND: Connected to the common ground net
- Vin: Connected to the 5V net, possibly for power supply
- D5: Connected to the PWM pin of the servo motor
- D4: Connected to the signal pin of the DHT11 sensor
DHT11
- GND: Connected to the common ground net
- 5V: Receives power from the 5V net
- S (Signal): Connected to the D4 pin of the ESP32
Servo
- GND: Connected to the common ground net
- VCC: Receives power from the 5V net
- PWM: Controlled by the D5 pin of the ESP32
Documented Code
Arduino UNO Code
#include <DHT.h>
#include <Servo.h>

// Define pins
#define DHTPIN 4       // GPIO pin connected to the DHT11 sensor
#define DHTTYPE DHT11  // DHT11 sensor type
#define SERVOPIN 5     // GPIO pin connected to the servo motor

// Initialize DHT sensor
DHT dht(DHTPIN, DHTTYPE);

// Initialize servo motor
Servo myservo;

void setup() {
  // Start serial communication
  Serial.begin(115200);

  // Initialize DHT sensor
  dht.begin();

  // Attach the servo motor to the servo pin
  myservo.attach(SERVOPIN);
}

void loop() {
  // Read temperature as Celsius
  float temperature = dht.readTemperature();

  // Read humidity
  float humidity = dht.readHumidity();

  // Check if any reads failed
  if (isnan(temperature) || isnan(humidity)) {
    Serial.println("Failed to read from DHT sensor!");
    return;
  }

  // Print temperature and humidity to the Serial Monitor
  Serial.print("Temperature: ");
  Serial.print(temperature);
  Serial.print("°C  |  Humidity: ");
  Serial.print(humidity);
  Serial.println("%");

  // Example logic: Move the servo based on the temperature
  if (temperature > 30.0) {
    myservo.write(90);  // Move the servo to 90 degrees
    Serial.println("Servo moved to 90 degrees");
  } else {
    myservo.write(0);   // Move the servo to 0 degrees
    Serial.println("Servo moved to 0 degrees");
  }

  // Wait a few seconds between measurements
  delay(2000);
}
ESP32 Code
The provided code for the ESP32 is identical to the Arduino UNO code. This could indicate that the ESP32 is intended to perform the same functions as the Arduino UNO, or it may be a placeholder for future development. The actual implementation in the circuit should be verified, and the code should be adjusted to reflect the ESP32's specific role and pin assignments.
// The code for ESP32 is identical to the Arduino UNO code provided above.
// Please refer to the Arduino UNO code section.
Note: The actual pin definitions for the ESP32 should be verified as the code provided uses Arduino pin definitions. Adjustments may be necessary to match the ESP32's pinout.