Arduino and ESP32 IoT Cat Feeder with Load Cell Monitoring

Circuit Documentation
Summary
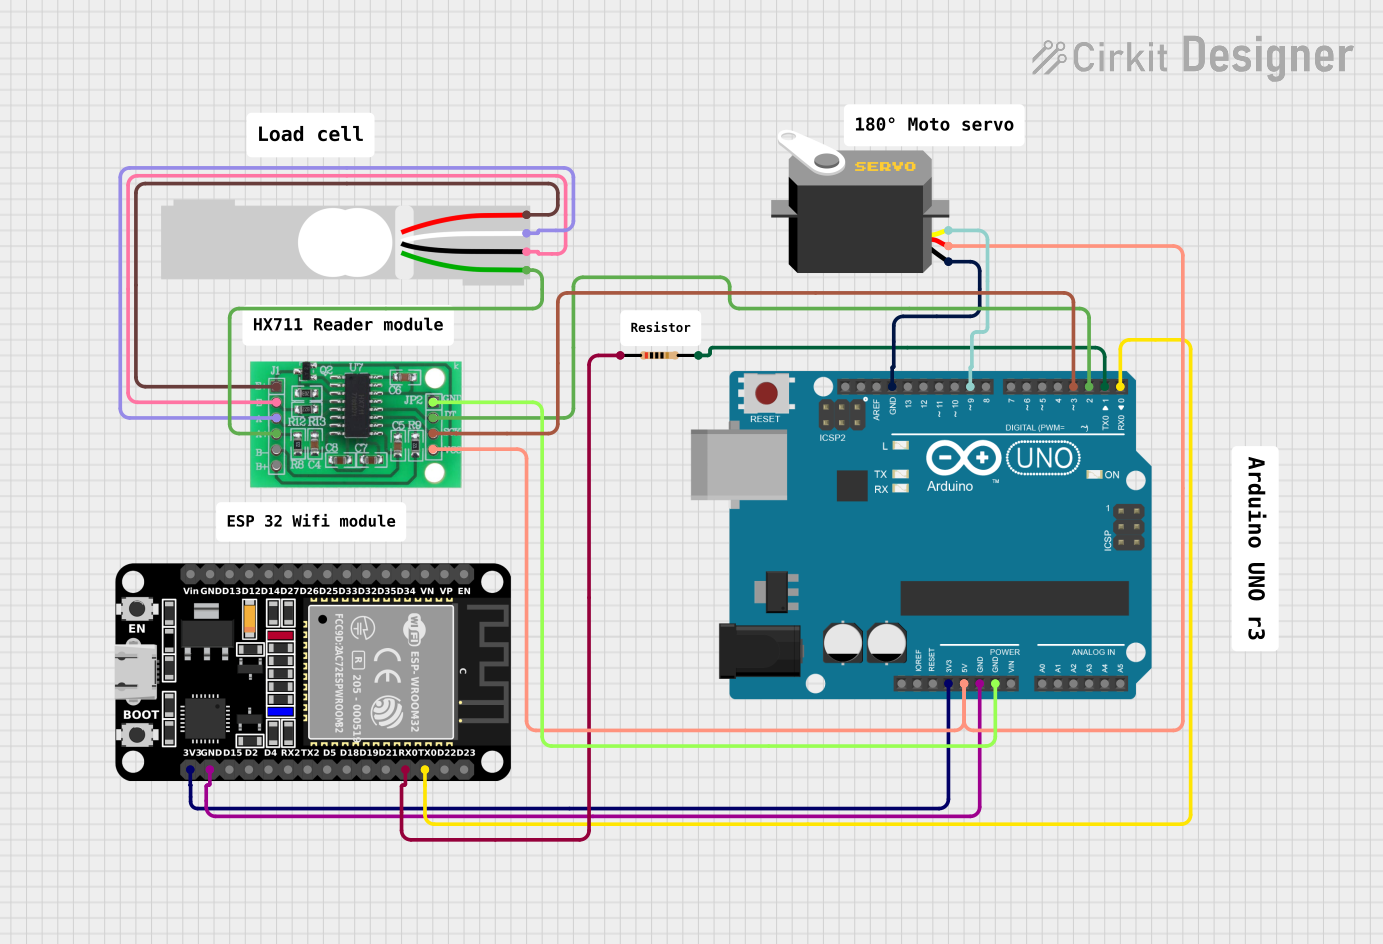
This circuit is designed to control a cat feeder system based on IoT (Internet of Things) principles. The core of the system is an Arduino UNO microcontroller, which interfaces with an ESP32 module for IoT connectivity, a servo motor to dispense food, and a load cell connected through an HX711 bridge sensor interface to measure the amount of food dispensed. The Arduino UNO controls the servo based on the weight data from the load cell and communicates this data to the ESP32 for potential remote monitoring or control.
Component List
Arduino UNO
- Microcontroller board based on the ATmega328P.
- It has 14 digital input/output pins, 6 analog inputs, a 16 MHz quartz crystal, a USB connection, a power jack, an ICSP header, and a reset button.
ESP32 (30 pin)
- A powerful microcontroller with integrated Wi-Fi and Bluetooth, suitable for a wide range of IoT applications.
- It has a rich set of peripherals and is widely used for both hobbyist and commercial IoT projects.
Resistor (200 Ohms)
- A passive two-terminal electrical component that implements electrical resistance as a circuit element.
- In this circuit, it is used for interfacing between the Arduino UNO and the ESP32.
Servo
- An actuator that allows for precise control of angular or linear position, velocity, and acceleration.
- It is commonly used in radio-controlled devices and is used here to control the dispensing mechanism of the cat feeder.
Load Cell - Red/white/black/green
- A transducer that is used to create an electrical signal whose magnitude is directly proportional to the force being measured.
- In this circuit, it is used to measure the weight of the cat food dispensed.
HX711 - Bridge Sensor Interface
- A precision 24-bit analog-to-digital converter (ADC) designed for weigh scales and industrial control applications to interface directly with a bridge sensor.
- This component is used to read the data from the load cell and communicate it to the Arduino UNO.
Wiring Details
Arduino UNO
3.3Vconnected to ESP323V3pin.5Vconnected to HX7113.3/3.5V Supplypin and Servovccpin.GNDconnected to ESP32GND, HX711GND - GROUND, and Servognd.D9connected to Servopulse.D3connected to HX711SCK - CLOCK (IN).D2connected to HX711DATA (OUT).D1connected to one side of the Resistor.D0connected to ESP32TX0.
ESP32 (30 pin)
3V3connected to Arduino UNO3.3V.GNDconnected to Arduino UNOGND.TX0connected to Arduino UNOD0.RX0connected to the other side of the Resistor.
Resistor (200 Ohms)
- One side connected to Arduino UNO
D1. - The other side connected to ESP32
RX0.
Servo
gndconnected to Arduino UNOGND.vccconnected to Arduino UNO5V.pulseconnected to Arduino UNOD9.
Load Cell - Red/white/black/green
E+connected to HX711E+.A-connected to HX711A-.E-connected to HX711E-.A+connected to HX711A+.
HX711 - Bridge Sensor Interface
3.3/3.5V Supplyconnected to Arduino UNO5V.GND - GROUNDconnected to Arduino UNOGND.SCK - CLOCK (IN)connected to Arduino UNOD3.DATA (OUT)connected to Arduino UNOD2.E+,A-,E-,A+connected to corresponding pins on the Load Cell.
Documented Code
/*
 * Cat Feeder based on IoT
 * This Arduino sketch controls a servo motor to dispense food for a cat.
 * It also reads data from a load cell via the HX711 interface to measure
 * the amount of food dispensed. The Arduino communicates with an ESP32
 * for IoT functionality.
 */

#include <Servo.h>
#include <HX711.h>

// Pin definitions
const int servoPin = 9;
const int hx711DataPin = 2;
const int hx711ClockPin = 3;
const int esp32TxPin = 0;
const int esp32RxPin = 1;

// Create servo and HX711 instances
Servo myServo;
HX711 scale;

void setup() {
  // Initialize serial communication
  Serial.begin(9600);
  Serial1.begin(115200); // Serial1 for ESP32 communication

  // Initialize servo
  myServo.attach(servoPin);
  myServo.write(0); // Initial position

  // Initialize HX711
  scale.begin(hx711DataPin, hx711ClockPin);
  scale.set_scale(); // Set the scale (calibration factor)
  scale.tare(); // Reset the scale to 0

  // Wait for the scale to stabilize
  delay(2000);
}

void loop() {
  // Read weight from load cell
  float weight = scale.get_units(10);
  Serial.print("Weight: ");
  Serial.print(weight);
  Serial.println(" g");

  // Check if weight is below threshold, if so, dispense food
  if (weight < 50) { // Example threshold
    dispenseFood();
  }

  // Send weight data to ESP32
  Serial1.print("Weight: ");
  Serial1.print(weight);
  Serial1.println(" g");

  // Wait before next loop iteration
  delay(1000);
}

void dispenseFood() {
  // Rotate servo to dispense food
  myServo.write(90); // Rotate to 90 degrees
  delay(1000); // Wait for 1 second
  myServo.write(0); // Return to initial position
  delay(1000); // Wait for 1 second
}
This code is responsible for the operation of the cat feeder. It initializes the servo and the HX711 load cell interface, reads the weight of the food, and dispenses food if the weight is below a certain threshold. It also communicates the weight data to the ESP32 for IoT applications.