
Arduino-Based Gas Detection and Alert System with GSM Communication
View and Edit Project In Cirkit Designer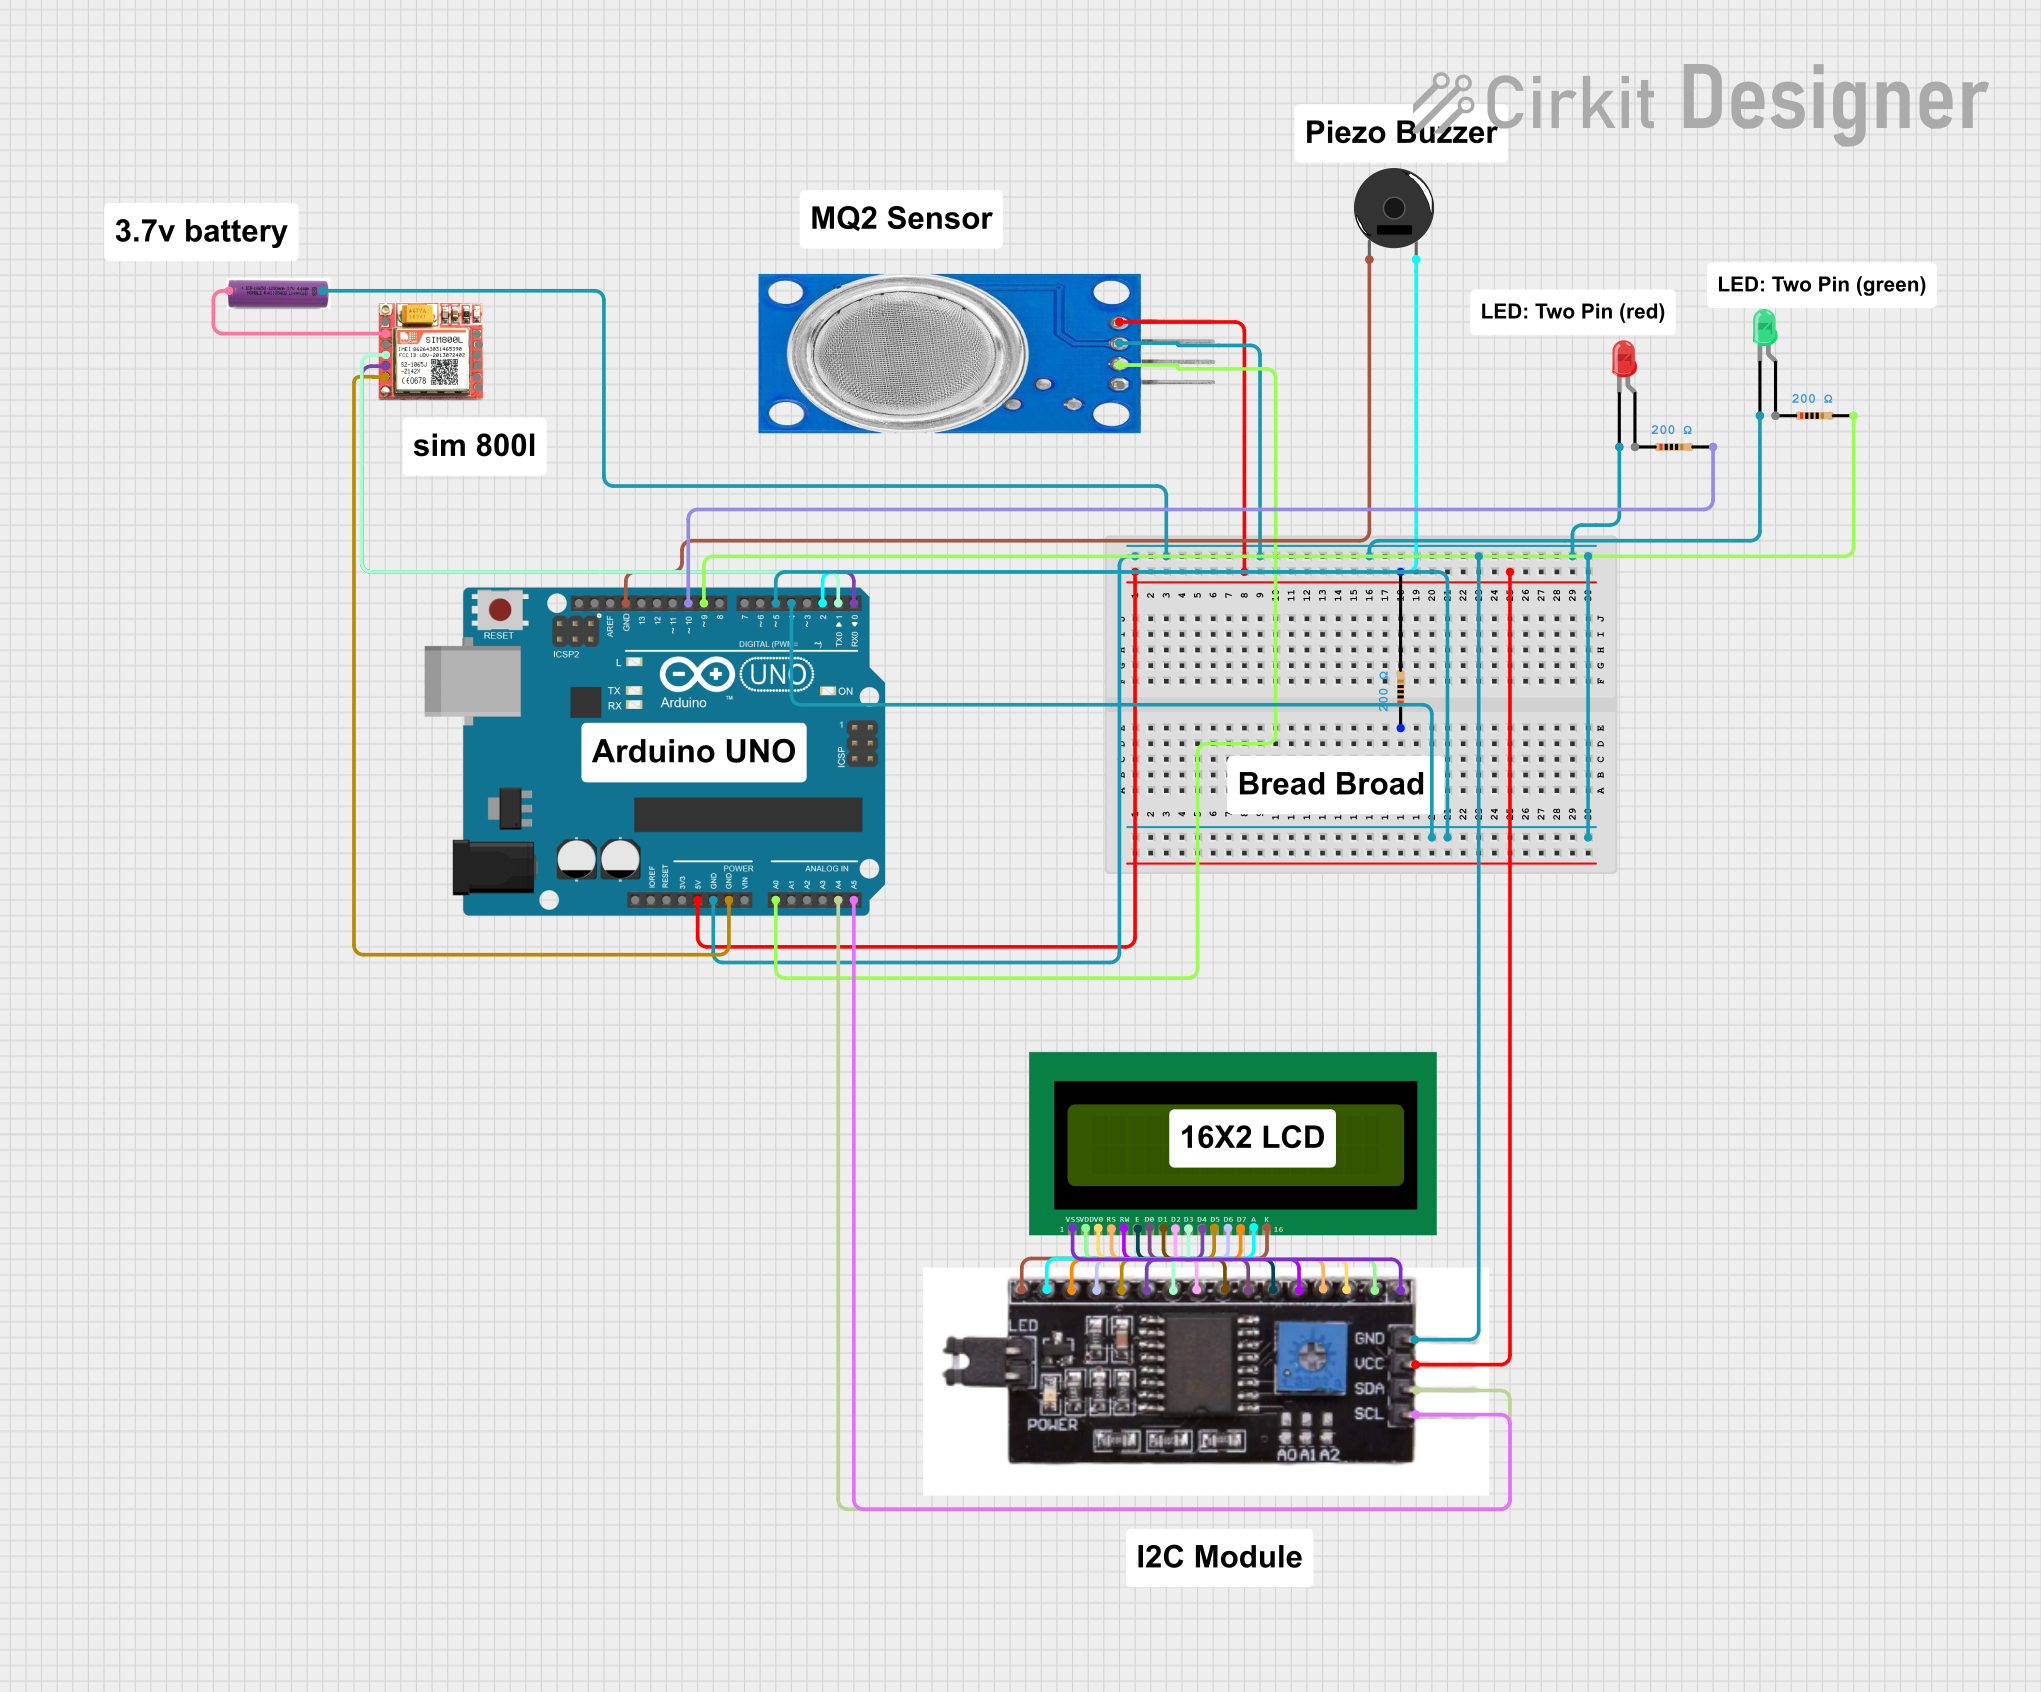
Circuit Documentation
Summary
The circuit in question appears to be a gas detection system with alerting capabilities. It uses an Arduino UNO as the central microcontroller to interface with various components including an MQ135 gas sensor, a SIM800L GSM module for communication, a piezo buzzer for audible alerts, LEDs for visual indication, and an I2C LCD module for displaying information. The system is designed to detect gas concentrations above a certain threshold and then alert the user via SMS and phone call, while also providing local visual and audible warnings.
Component List
Arduino UNO
- Microcontroller board based on the ATmega328P
- Provides digital and analog I/O pins for interfacing with other components
Resistor (200 Ohms)
- Limits current to protect connected components
- Three instances of this component are used in the circuit
Piezo Buzzer
- Emits an audible alert when activated
LED: Two Pin (Red)
- Provides visual indication, typically used for warnings or alerts
LED: Two Pin (Green)
- Provides visual indication, typically used to show normal operation
SIM800L
- GSM module for cellular communication
- Allows the system to send SMS and make calls
3.7v Battery
- Power source for the SIM800L module
MQ135 Gas Sensor
- Detects various gases in the air
- Outputs an analog signal proportional to gas concentration
16X2 LCD
- Displays text information
- Used here with an I2C module for easy communication with the Arduino
I2C Module
- Interface module for the 16X2 LCD
- Simplifies connection to the Arduino using the I2C protocol
Wiring Details
Arduino UNO
- 5V pin connected to the VCC pins of the MQ135 sensor and the I2C module
- GND pin connected to the ground pins of the battery, MQ135 sensor, green LED, I2C module, red LED, and the piezo buzzer
- A0 pin connected to the A0 pin of the MQ135 sensor
- A4 (SDA) pin connected to the SDA pin of the I2C module
- A5 (SCL) pin connected to the SCL pin of the I2C module
- D2 pin connected to one pin of the piezo buzzer
- D4 pin connected to the cathode of the red LED
- D5 pin connected to the cathode of the green LED
- D9 and D10 pins connected to the second pins of two separate 200 Ohm resistors
- D0 (RX) and D1 (TX) pins connected to the TXD and RXD pins of the SIM800L module, respectively
Resistor (200 Ohms)
- Three instances, each with one pin connected to a digital pin on the Arduino (D4, D5, D10) and the other pin connected to the cathode of an LED or the piezo buzzer
Piezo Buzzer
- One pin connected to the D2 pin on the Arduino
- The other pin connected to the GND
LED: Two Pin (Red)
- Anode connected to a 200 Ohm resistor (which is connected to D4 on the Arduino)
- Cathode connected to GND
LED: Two Pin (Green)
- Anode connected to a 200 Ohm resistor (which is connected to D5 on the Arduino)
- Cathode connected to GND
SIM800L
- VCC connected to the positive terminal of the 3.7v battery
- GND connected to the negative terminal of the battery and the GND on the Arduino
- RXD connected to the D1 (TX) pin on the Arduino
- TXD connected to the D0 (RX) pin on the Arduino
MQ135 Gas Sensor
- VCC connected to the 5V on the Arduino
- GND connected to GND on the Arduino
- A0 connected to the A0 pin on the Arduino
16X2 LCD and I2C Module
- The I2C module is directly interfaced with the 16X2 LCD, connecting all corresponding pins (VSS, VDD, VO, RS, RW, E, D0-D7, A, K)
- The I2C module's SDA and SCL pins are connected to the A4 and A5 pins on the Arduino, respectively
- The I2C module's VCC and GND pins are connected to the 5V and GND pins on the Arduino, respectively
Documented Code
#include <Wire.h>
#include <LiquidCrystal_I2C.h>
#include <SoftwareSerial.h>

#define MQ135_PIN A0
#define RED_LED_PIN 4
#define GREEN_LED_PIN 5
#define BUZZER_PIN 2
#define GSM_RX_PIN 1
#define GSM_TX_PIN 0

LiquidCrystal_I2C lcd(0x27, 16, 2);
SoftwareSerial gsm(GSM_RX_PIN, GSM_TX_PIN);

const int threshold = 310;
const unsigned long smsInterval = 60000;
const unsigned long callInterval = 180000;
unsigned long lastSmsTime = 0;
unsigned long lastCallTime = 0;

// Timer variables for LED blinking and buzzer activation
unsigned long ledBlinkTimer = 0;
unsigned long buzzerTimer = 0;

void setup() {
  pinMode(RED_LED_PIN, OUTPUT);
  pinMode(GREEN_LED_PIN, OUTPUT);
  pinMode(BUZZER_PIN, OUTPUT);
  lcd.begin();
  lcd.backlight();
  gsm.begin(9600);
  digitalWrite(GREEN_LED_PIN, HIGH);
}

void loop() {
  int mq135Value = analogRead(MQ135_PIN);
  lcd.setCursor(0, 0);
  if (mq135Value > threshold) {
    lcd.print("Gas Detected");
    digitalWrite(GREEN_LED_PIN, LOW);
    startBlinkingRedLed();
    startBuzzer();
    sendAlert();
  } else {
    lcd.print("No Gas Detected");
    digitalWrite(GREEN_LED_PIN, HIGH);
    digitalWrite(RED_LED_PIN, LOW);
    noTone(BUZZER_PIN);
  }
  lcd.setCursor(0, 1);
  lcd.print("AQI: ");
  lcd.print(mq135Value);
  handleLedBlinking();
  handleBuzzer();
  delay(1000);
}

void startBlinkingRedLed() {
  ledBlinkTimer = millis();
}

void handleLedBlinking() {
  if (millis() - ledBlinkTimer >= 500) {
    digitalWrite(RED_LED_PIN, !digitalRead(RED_LED_PIN));
    ledBlinkTimer = millis();
  }
}

void startBuzzer() {
  buzzerTimer = millis();
  tone(BUZZER_PIN, 325);
}

void handleBuzzer() {
  if (millis() - buzzerTimer >= 5000) {
    noTone(BUZZER_PIN);
  }
}

void sendAlert() {
  sendSms();
  makeCall();
}

void sendSms() {
  unsigned long currentTime = millis();
  if (currentTime - lastSmsTime >= smsInterval) {
    gsm.print("AT+CMGF=1\r");
    delay(100);
    gsm.print("AT+CMGS=\"+918446656933\"\r");
    delay(100);
    gsm.print("Gas leakage detected");
    delay(100);
    gsm.write(26);
    lastSmsTime = currentTime;
  }
}

void makeCall() {
  unsigned long currentTime = millis();
  if (currentTime - lastCallTime >= callInterval) {
    gsm.print("ATD+918446656933;\r");
    delay(30000);
    gsm.print("ATH\r");
    lastCallTime = currentTime;
  }
}
This code is responsible for reading the gas sensor data, controlling the LEDs and buzzer based on the gas concentration, and using the GSM module to send SMS and make calls when gas is detected. The LCD displays the gas concentration and alert messages.