Cirkit Designer
Your all-in-one circuit design IDE
Home /
Project Documentation
Arduino UNO RFID Reader with 16x2 I2C LCD Display
Circuit Documentation
Summary
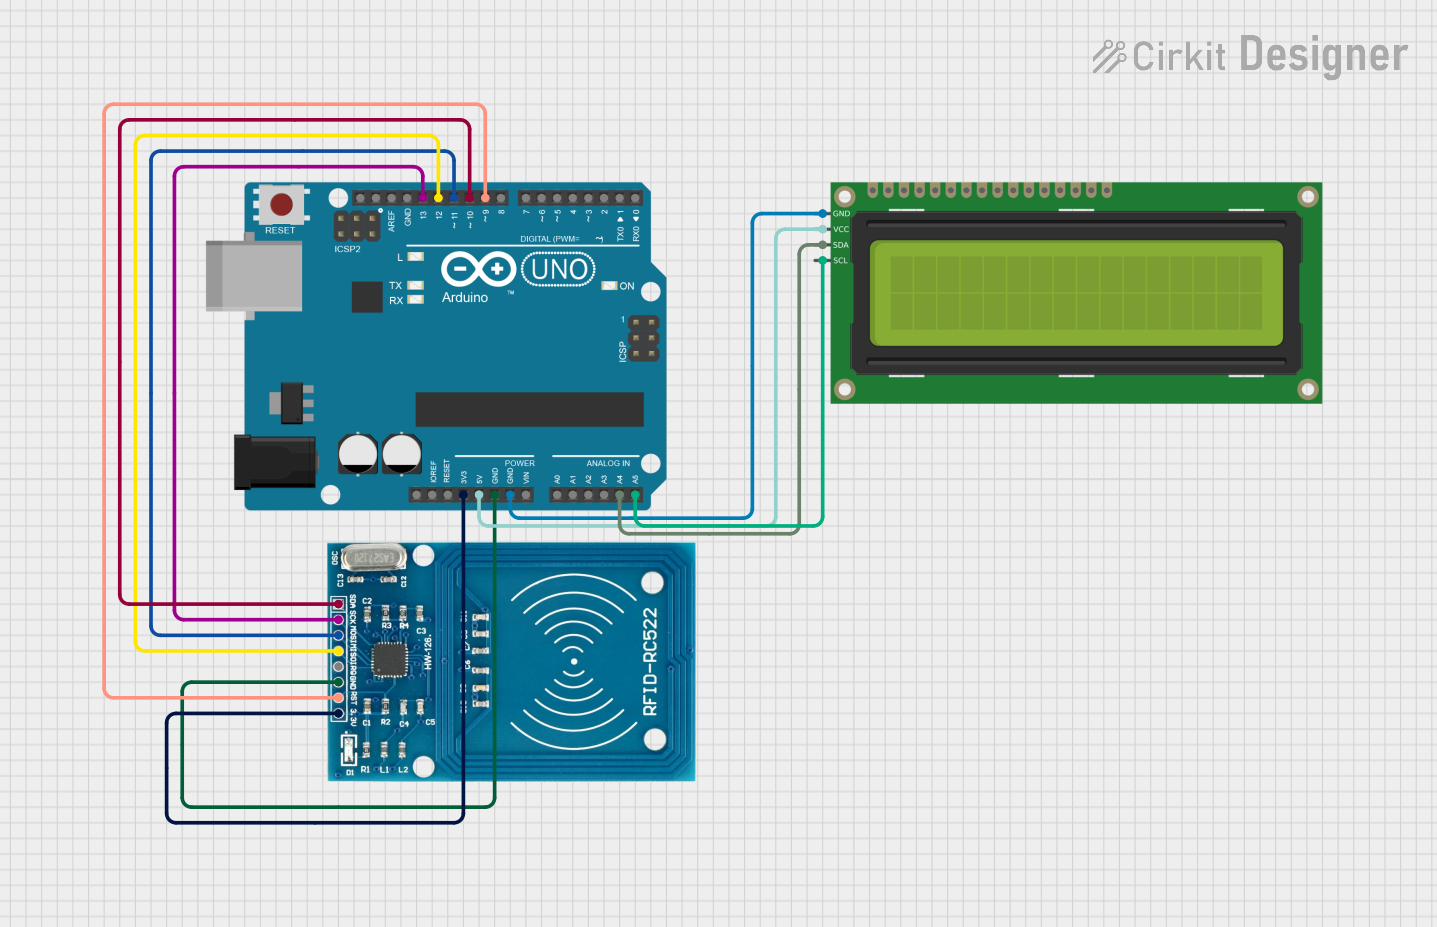
This circuit interfaces an RFID-RC522 module and a 16x2 I2C LCD with an Arduino UNO. When an RFID card is recognized by the RC522, a message is displayed on the LCD screen.
Component List
Arduino UNO
- Description: A microcontroller board based on the ATmega328P.
- Pins: UNUSED, IOREF, Reset, 3.3V, 5V, GND, Vin, A0, A1, A2, A3, A4, A5, SCL, SDA, AREF, D13, D12, D11, D10, D9, D8, D7, D6, D5, D4, D3, D2, D1, D0
16x2 I2C LCD
- Description: A 16x2 character LCD display with I2C interface.
- Pins: GND, VCC, SDA, SCL
RFID-RC522
- Description: An RFID module for reading RFID tags.
- Pins: VCC (3.3V), RST, GND, IRQ, MISO, MOSI, SCK, SDA
Wiring Details
Arduino UNO
- 3.3V: Connected to RFID-RC522 VCC (3.3V)
- 5V: Connected to 16x2 I2C LCD VCC
- GND: Connected to RFID-RC522 GND and 16x2 I2C LCD GND
- A4: Connected to 16x2 I2C LCD SDA
- A5: Connected to 16x2 I2C LCD SCL
- D13: Connected to RFID-RC522 SCK
- D12: Connected to RFID-RC522 MISO
- D11: Connected to RFID-RC522 MOSI
- D10: Connected to RFID-RC522 SDA
- D9: Connected to RFID-RC522 RST
16x2 I2C LCD
- GND: Connected to Arduino UNO GND
- VCC: Connected to Arduino UNO 5V
- SDA: Connected to Arduino UNO A4
- SCL: Connected to Arduino UNO A5
RFID-RC522
- VCC (3.3V): Connected to Arduino UNO 3.3V
- RST: Connected to Arduino UNO D9
- GND: Connected to Arduino UNO GND
- SCK: Connected to Arduino UNO D13
- MISO: Connected to Arduino UNO D12
- MOSI: Connected to Arduino UNO D11
- SDA: Connected to Arduino UNO D10
Code Documentation
/*
 * This Arduino sketch interfaces an RFID-RC522 module and a 16x2 I2C LCD.
 * When an RFID card is recognized by the RC522, a message is displayed
 * on the LCD screen.
 */

#include <Wire.h>
#include <LiquidCrystal_I2C.h>
#include <SPI.h>
#include <MFRC522.h>

#define SS_PIN 10
#define RST_PIN 9

MFRC522 rfid(SS_PIN, RST_PIN);
LiquidCrystal_I2C lcd(0x27, 16, 2);

void setup() {
  // Initialize serial communication
  Serial.begin(9600);
  // Initialize SPI bus
  SPI.begin();
  // Initialize RFID module
  rfid.PCD_Init();
  // Initialize LCD
  lcd.init();
  lcd.backlight();
  lcd.clear();
  lcd.setCursor(0, 0);
  lcd.print("Scan your card");
}

void loop() {
  // Look for new cards
  if (!rfid.PICC_IsNewCardPresent() || !rfid.PICC_ReadCardSerial()) {
    return;
  }
  // Show UID on serial monitor
  Serial.print("UID tag: ");
  String content = "";
  for (byte i = 0; i < rfid.uid.size; i++) {
    Serial.print(rfid.uid.uidByte[i] < 0x10 ? " 0" : " ");
    Serial.print(rfid.uid.uidByte[i], HEX);
    content.concat(String(rfid.uid.uidByte[i] < 0x10 ? " 0" : " "));
    content.concat(String(rfid.uid.uidByte[i], HEX));
  }
  Serial.println();
  content.toUpperCase();
  // Display message on LCD
  lcd.clear();
  lcd.setCursor(0, 0);
  lcd.print("Write text here");
  delay(2000); // Wait for 2 seconds
  lcd.clear();
  lcd.setCursor(0, 0);
  lcd.print("Scan your card");
  // Halt PICC
  rfid.PICC_HaltA();
  // Stop encryption on PCD
  rfid.PCD_StopCrypto1();
}
This code initializes the RFID and LCD modules, continuously checks for new RFID cards, and displays a message on the LCD when a card is detected.