
Arduino UNO Controlled Servo Dispenser with Ultrasonic Sensor and RTC
View and Edit Project In Cirkit Designer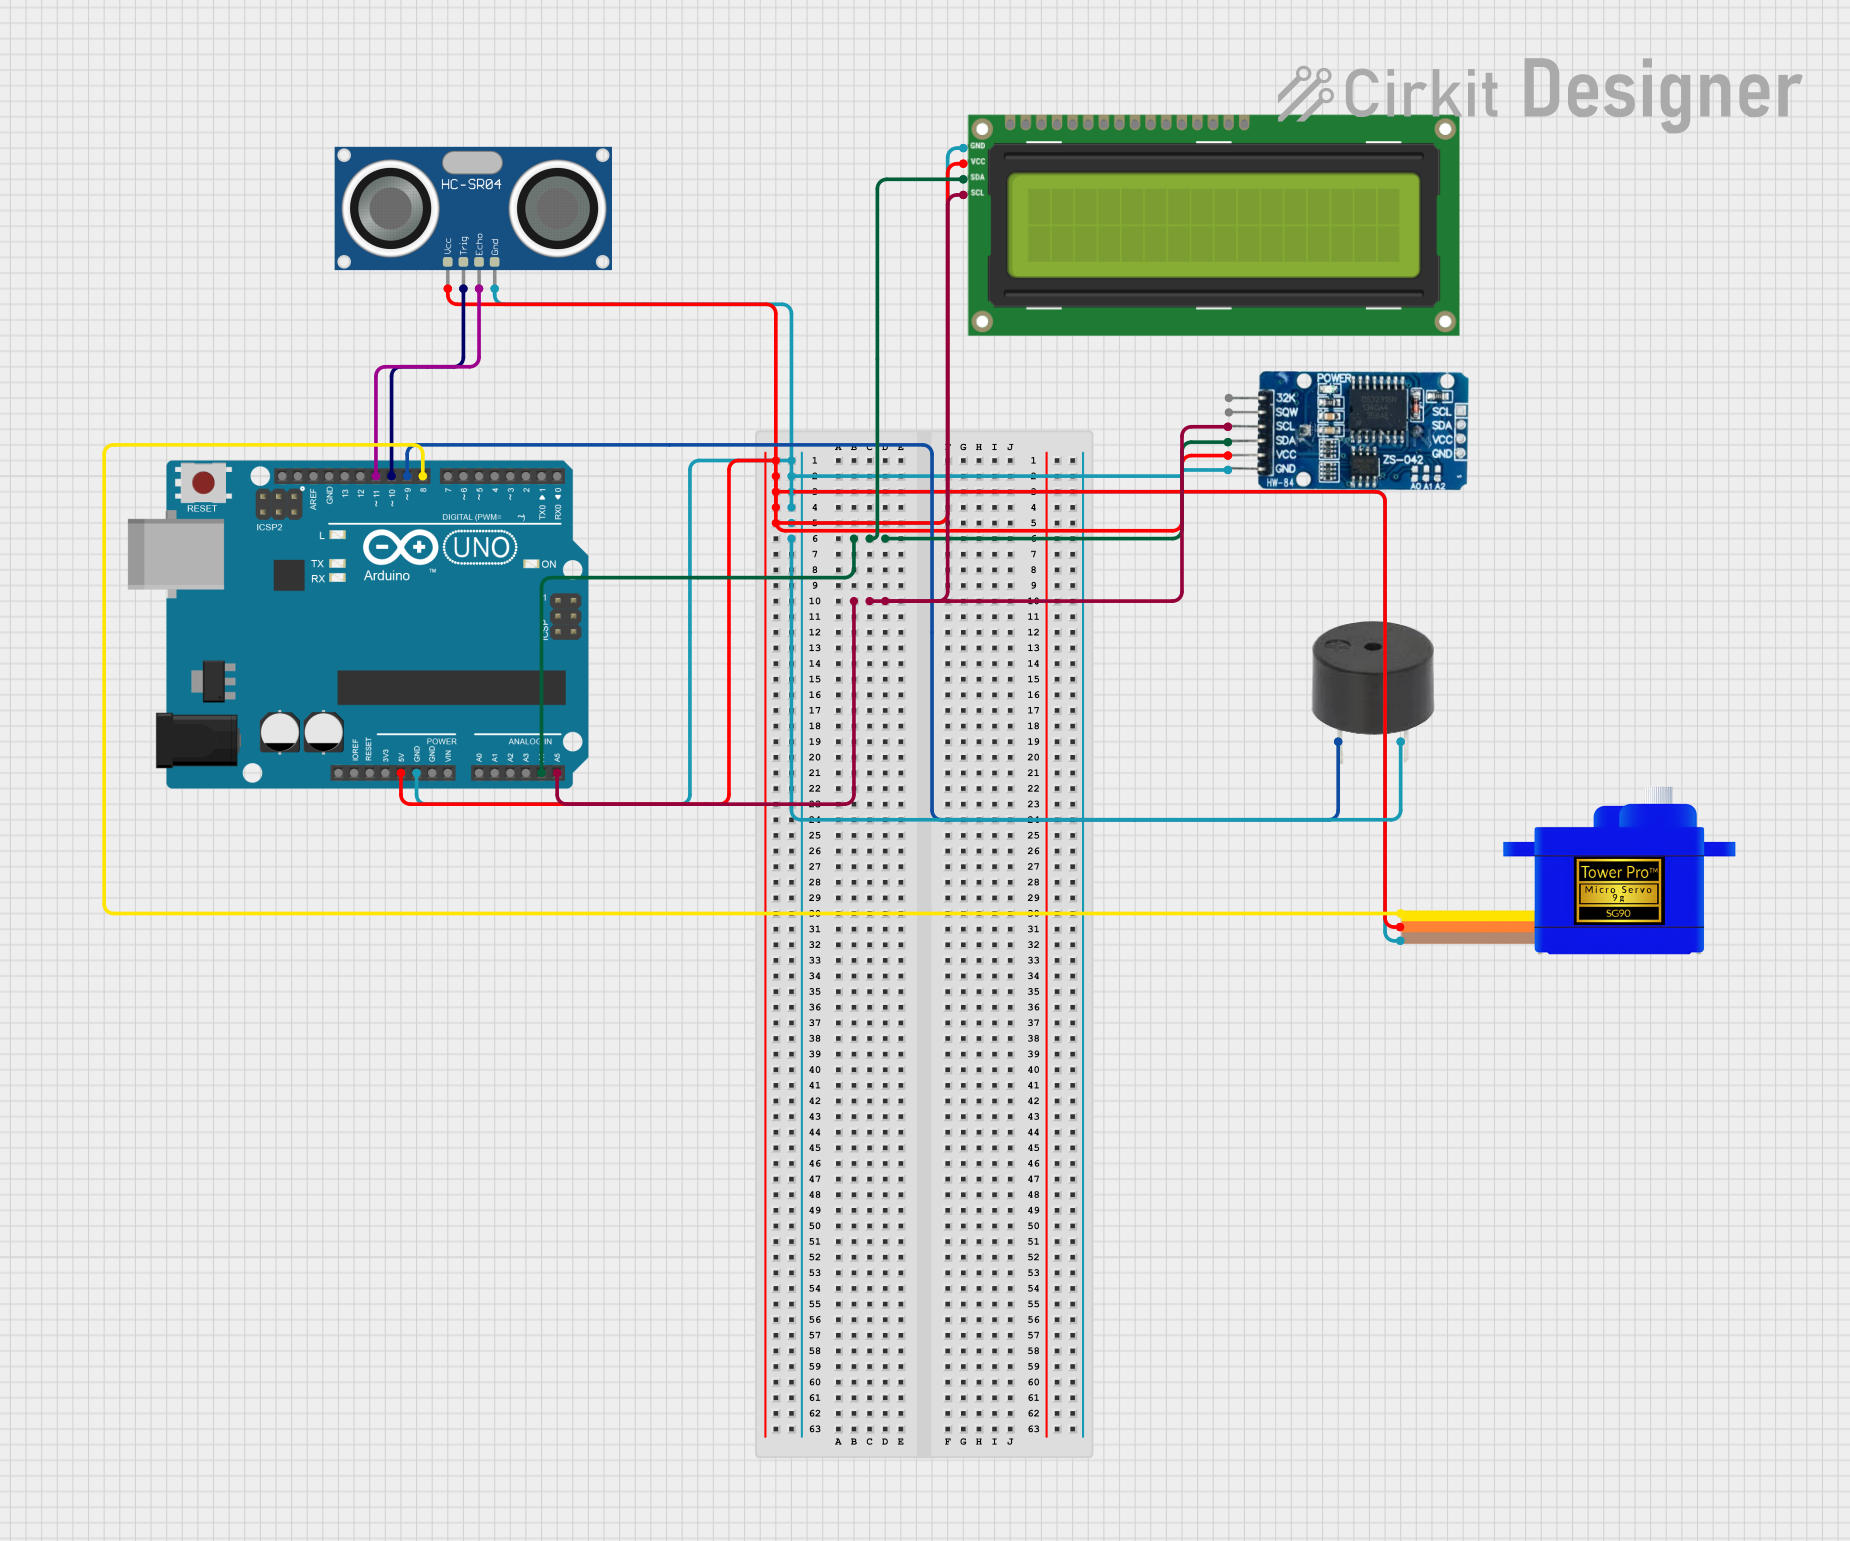
Circuit Documentation
Summary
This circuit is designed to interface an Arduino UNO with a variety of components including an RTC DS3231 (Real-Time Clock), an I2C LCD 16x2 Screen, a buzzer, an HC-SR04 Ultrasonic Sensor, and a Servomotor SG90. The Arduino UNO serves as the central processing unit, controlling the servo based on distance measurements from the ultrasonic sensor and time from the RTC, displaying information on the LCD, and providing feedback through the buzzer.
Component List
Arduino UNO
- Microcontroller board based on the ATmega328P
- Features digital I/O pins, analog input pins, and various power pins
RTC DS3231
- Highly accurate I2C real-time clock with an integrated temperature-compensated crystal oscillator (TCXO) and crystal
I2C LCD 16x2 Screen
- Alphanumeric liquid crystal display capable of displaying 16 characters per line across 2 lines
- Utilizes the I2C communication protocol for interfacing
Buzzer
- An electromechanical component that produces sound when an electrical signal is applied
HC-SR04 Ultrasonic Sensor
- A sensor that measures distance by emitting ultrasonic waves and timing the echo received back
Servomotor SG90
- A small and lightweight servo motor capable of precise control of angular position
Wiring Details
Arduino UNO
5Vpin provides power to RTC DS3231, Servomotor SG90, HC-SR04 Ultrasonic Sensor, and I2C LCD 16x2 ScreenGNDpin is connected to the ground pins of all other componentsA4 (SDA)pin is connected to the SDA pins of the RTC DS3231 and I2C LCD 16x2 Screen for I2C communicationA5 (SCL)pin is connected to the SCL pins of the RTC DS3231 and I2C LCD 16x2 Screen for I2C communicationD11pin is connected to the ECHO pin of the HC-SR04 Ultrasonic SensorD10pin is connected to the TRIG pin of the HC-SR04 Ultrasonic SensorD9pin is connected to the buzzerD8pin is connected to the SIG pin of the Servomotor SG90
RTC DS3231
VCCpin connected to 5V power supply from Arduino UNOGNDpin connected to groundSCLandSDApins connected to corresponding SCL and SDA pins on Arduino UNO for I2C communication
I2C LCD 16x2 Screen
VCC (5V)pin connected to 5V power supply from Arduino UNOGNDpin connected to groundSCLandSDApins connected to corresponding SCL and SDA pins on Arduino UNO for I2C communication
Buzzer
PINconnected to D9 on Arduino UNOGNDconnected to ground
HC-SR04 Ultrasonic Sensor
VCCpin connected to 5V power supply from Arduino UNOGNDpin connected to groundTRIGpin connected to D10 on Arduino UNOECHOpin connected to D11 on Arduino UNO
Servomotor SG90
SIGpin connected to D8 on Arduino UNOVCCpin connected to 5V power supply from Arduino UNOGNDpin connected to ground
Documented Code
#include <Wire.h>
#include <LiquidCrystal_I2C.h>
#include <RTClib.h>
#include <Servo.h>

// Pin definitions
const int servoPin = 8;           // Pin connected to the servo motor
const int trigPin = 10;           // Pin connected to the trig pin of the ultrasonic sensor
const int echoPin = 11;           // Pin connected to the echo pin of the ultrasonic sensor
const int buzzerPin = 9;          // Pin connected to the passive buzzer

// Thresholds and intervals
const int distanceThreshold = 30; // Set distance threshold to 30 cm
const int movementThreshold = 5;  // Minimum change in distance to consider as movement
const long dispenseInterval = 10; // Interval for the servo to move in seconds

// Servo and sensor setup
Servo myServo;                    // Create a servo object
long previousDistance = 0;        // Variable to store the previous distance measurement
bool hasMoved = false;            // Flag to indicate if movement has been detected
int servoPosition = 0;            // Start servo at 0 degrees (original position)

// LCD and RTC setup
LiquidCrystal_I2C lcd(0x27, 16, 2); // Adjust the address and size to your LCD
RTC_DS3231 rtc;                    // Create an RTC object

// Buzzer timing variables
bool buzzerActive = false;
unsigned long buzzerStartTime = 0;
const unsigned long buzzerDuration = 2000; // 2 seconds for buzzing

void setup() {
  // Initial setup for serial communication, servo, pins, LCD, and RTC
  // ...
}

void loop() {
  // Main loop for checking distance, moving servo, and updating LCD
  // ...
}

// Function to activate the buzzer for 2 seconds
void activateBuzzer() {
  // ...
}

// Function to stop the buzzer
void stopBuzzer() {
  // ...
}
The provided code is a sketch for the Arduino UNO that interfaces with the connected components. It includes initialization of the servo, ultrasonic sensor, buzzer, LCD, and RTC. The main loop checks the distance measured by the ultrasonic sensor and moves the servo accordingly. It also updates the LCD with the current time or countdown until the next servo movement. The buzzer is activated at startup and when certain events occur, such as motion detection or countdown completion.