
Circuit Documentation
Summary
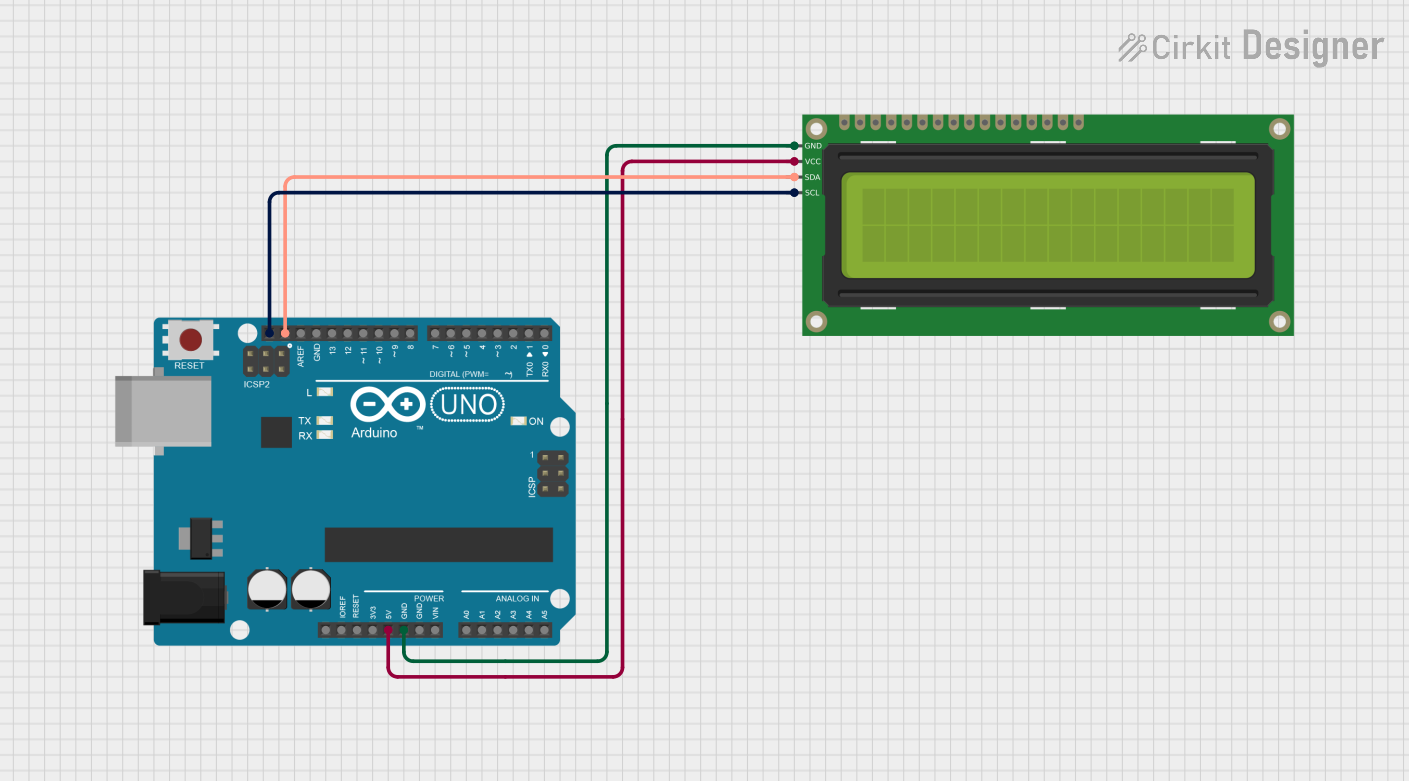
This circuit consists of an Arduino UNO microcontroller and a 16x2 I2C LCD display. The Arduino UNO is used to control the LCD, which displays a simple message. The I2C interface allows for easy communication between the Arduino and the LCD, utilizing only two data lines (SDA and SCL) along with power and ground connections.
Component List
Arduino UNO
- Description: A microcontroller board based on the ATmega328P. It is designed for creating interactive electronic projects.
- Purpose: Acts as the main controller for the circuit, managing the communication with the LCD and executing the programmed instructions.
16x2 I2C LCD
- Description: A liquid crystal display that can show 16 characters on 2 lines. It uses the I2C protocol for communication.
- Purpose: Displays text messages sent from the Arduino UNO.
Wiring Details
Arduino UNO
5V: Connected to the VCC pin of the 16x2 I2C LCD.
GND: Connected to the GND pin of the 16x2 I2C LCD.
SCL: Connected to the SCL pin of the 16x2 I2C LCD.
SDA: Connected to the SDA pin of the 16x2 I2C LCD.
16x2 I2C LCD
VCC: Connected to the 5V pin of the Arduino UNO.
GND: Connected to the GND pin of the Arduino UNO.
SCL: Connected to the SCL pin of the Arduino UNO.
SDA: Connected to the SDA pin of the Arduino UNO.
Documented Code
#include <Wire.h>
#include <LiquidCrystal_I2C.h>

// Set the LCD address to 0x27 for a 16 chars and 2 line display
LiquidCrystal_I2C lcd(0x27, 16, 2);

void setup() {
  // Initialize the LCD with the number of columns and rows
  lcd.begin(16, 2);
  // Turn on the backlight
  lcd.backlight();
  // Print "Hello, World!" to the LCD
  lcd.setCursor(0, 0); // Set the cursor to column 0, line 0
  lcd.print("Hello, World!");
}

void loop() {
  // Nothing to do here
}
This code initializes the LCD and displays the message "Hello, World!" on the screen. The setup function is called once when the program starts, while the loop function runs continuously, but in this case, it does nothing.