
Arduino UNO Based IoT Indoor Air Quality Monitor with WiFi Connectivity
View and Edit Project In Cirkit Designer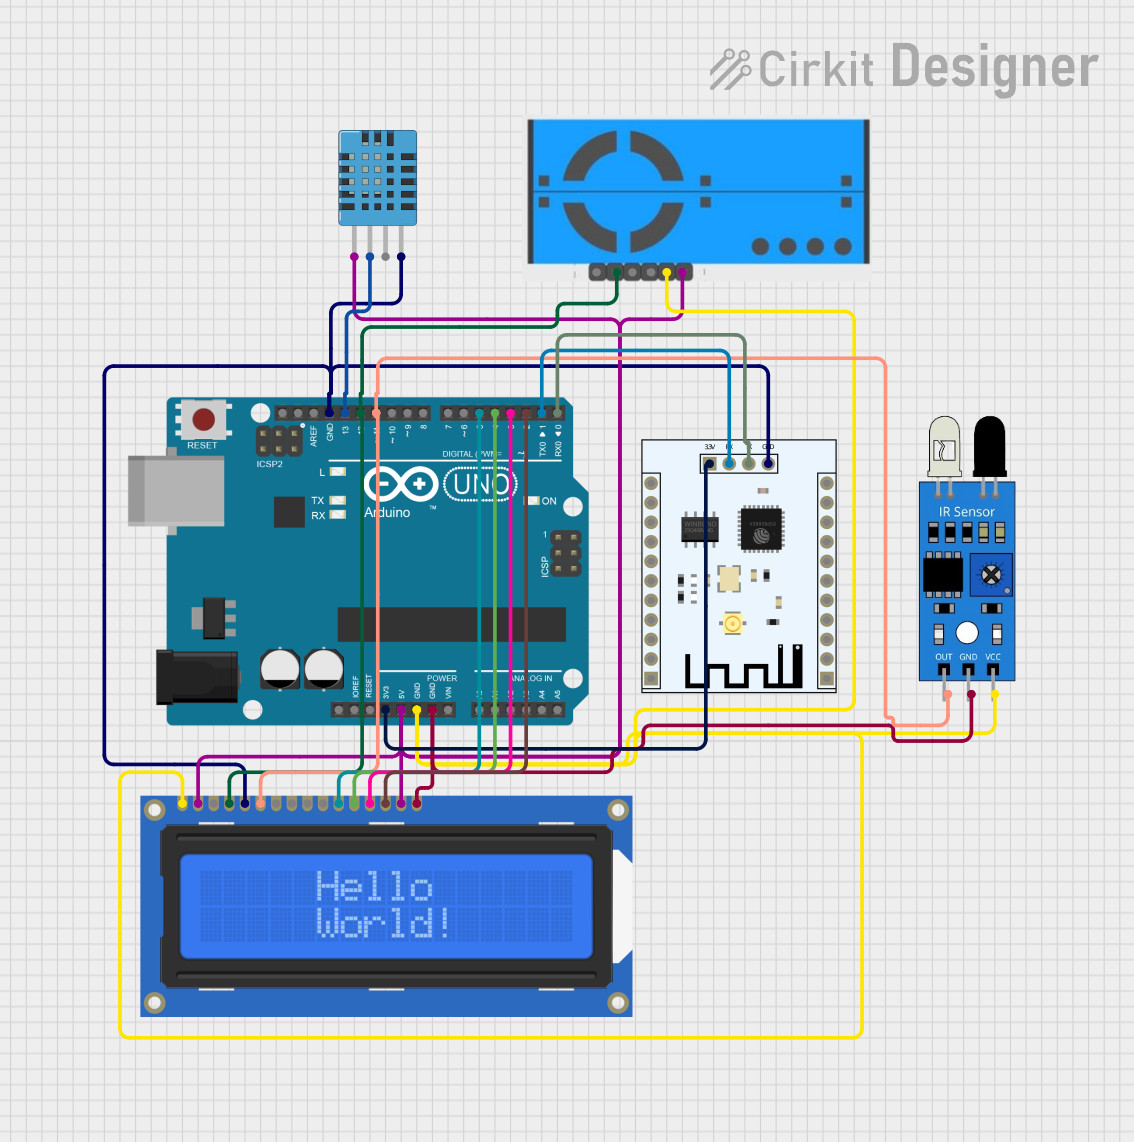
Circuit Documentation
Summary
The circuit in question is an Integrated Humidity, Infrared, and Particulates System (IHIP) designed for Internet of Things (IoT)-based indoor air quality monitoring and control. It utilizes an Arduino UNO as the main microcontroller to interface with a DHT11 humidity and temperature sensor, an IR sensor, a PM2.5 air quality sensor, and an ESP8266 WiFi module for IoT connectivity. The data collected from the sensors is displayed on an Adafruit Standard LCD 16x2 and transmitted over WiFi for remote monitoring.
Component List
Arduino UNO
- Microcontroller board based on the ATmega328P
- Features digital I/O pins, analog inputs, a USB connection for programming, and power management capabilities
DHT11 Humidity and Temperature Sensor
- A basic, low-cost digital temperature and humidity sensor
- Provides calibrated digital output
PM2.5 Air Quality Sensor and Breadboard Adapter Kit - PMS5003
- A sensor for measuring particulate matter in the air
- Outputs data via a serial interface
IR Sensor
- An infrared sensor capable of detecting obstacles and measuring distances
- Typically used in proximity sensing applications
ESP8266 ESP-201 WiFi Module
- A low-cost WiFi microchip with full TCP/IP stack and microcontroller capability
- Used for IoT applications to send data over the internet
Adafruit Standard LCD 16x2 white on blue
- A 16x2 character LCD display
- Features white text on a blue background with backlight
Wiring Details
Arduino UNO
3.3Vconnected to ESP82663.3V5Vconnected to PM2.5 SensorVCC, DHT11VDD, LCDVDD, and LCDLED+GNDconnected to IR Sensorvcc, PM2.5 SensorGND, LCDVSS, and LCDLED-D13connected to DHT11DATAD12connected to PM2.5 SensorTXand LCDRSD11connected to IR Sensoroutand LCDED5connected to LCDDB4D4connected to LCDDB5D3connected to LCDDB6D2connected to LCDDB7D1connected to ESP8266RXD0connected to ESP8266TX
DHT11 Humidity and Temperature Sensor
VDDconnected to Arduino5VDATAconnected to ArduinoD13GNDconnected to ArduinoGND
PM2.5 Air Quality Sensor and Breadboard Adapter Kit - PMS5003
VCCconnected to Arduino5VGNDconnected to ArduinoGNDTXconnected to ArduinoD12
IR Sensor
outconnected to ArduinoD11gndconnected to ArduinoGNDvccconnected to ArduinoGND(Note: This seems to be an error in the net list, asvccshould typically be connected to a positive voltage supply)
ESP8266 ESP-201 WiFi Module
3.3Vconnected to Arduino3.3VGNDconnected to ArduinoGNDRXconnected to ArduinoD1TXconnected to ArduinoD0
Adafruit Standard LCD 16x2 white on blue
VDDconnected to Arduino5VVSSconnected to ArduinoGNDV0connected to a contrast adjustment potentiometer (not listed in the parts)RSconnected to ArduinoD12R/Wconnected to ArduinoGNDEconnected to ArduinoD11DB4toDB7connected to ArduinoD5toD2respectivelyLED+connected to Arduino5VLED-connected to ArduinoGND
Documented Code
/*
 * IHIP (Integrated Humidity, Infrared, and Particulates System)
 * Internet of Things (IoT) - based Indoor Air Quality Monitoring and Controlling
 *
 * This Arduino sketch reads data from a DHT11 sensor, an IR sensor, and a PM2.5
 * air quality sensor. It displays the data on an LCD and sends it to an ESP8266
 * WiFi module for IoT-based monitoring.
 */

#include <DHT.h>
#include <LiquidCrystal.h>

// Pin definitions
#define DHTPIN 13
#define DHTTYPE DHT11
#define IRPIN 11
#define LCD_RS 12
#define LCD_E 11
#define LCD_D4 5
#define LCD_D5 4
#define LCD_D6 3
#define LCD_D7 2

// Initialize DHT sensor
DHT dht(DHTPIN, DHTTYPE);

// Initialize LCD
LiquidCrystal lcd(LCD_RS, LCD_E, LCD_D4, LCD_D5, LCD_D6, LCD_D7);

void setup() {
  // Start serial communication
  Serial.begin(9600);

  // Initialize DHT sensor
  dht.begin();

  // Initialize LCD
  lcd.begin(16, 2);
  lcd.print("IHIP System");

  // Initialize IR sensor pin
  pinMode(IRPIN, INPUT);
}

void loop() {
  // Read humidity and temperature from DHT11
  float humidity = dht.readHumidity();
  float temperature = dht.readTemperature();

  // Read IR sensor value
  int irValue = digitalRead(IRPIN);

  // Display data on LCD
  lcd.setCursor(0, 1);
  lcd.print("H:");
  lcd.print(humidity);
  lcd.print("% T:");
  lcd.print(temperature);
  lcd.print("C");

  // Send data to ESP8266
  Serial.print("Humidity: ");
  Serial.print(humidity);
  Serial.print("% Temperature: ");
  Serial.print(temperature);
  Serial.print("C IR: ");
  Serial.println(irValue);

  // Wait for 2 seconds before next loop
  delay(2000);
}
This code is designed to be uploaded to the Arduino UNO microcontroller. It initializes the connected sensors and LCD, reads sensor data, displays it on the LCD, and sends it over serial to the ESP8266 for remote monitoring.