
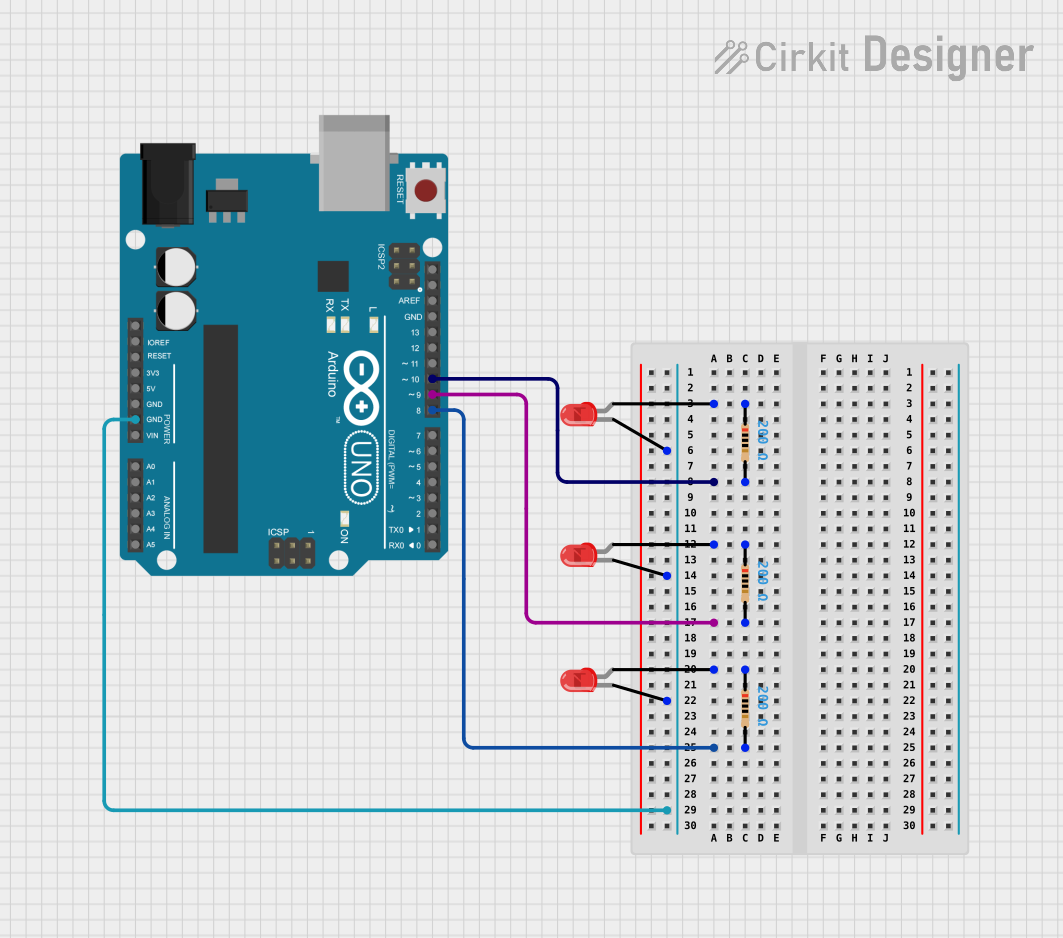
Circuit Documentation
Summary
This circuit consists of an Arduino UNO microcontroller connected to three red two-pin LEDs, each in series with a 200 Ohm resistor. The purpose of the circuit is to control the LEDs via the digital pins of the Arduino UNO. The common cathodes of the LEDs are connected to the ground (GND) of the Arduino, and the anodes are each connected to a resistor. The other end of each resistor is connected to a separate digital pin on the Arduino (D8, D9, and D10). The code for the Arduino UNO will determine the behavior of the LEDs.
Component List
Arduino UNO
- Description: A microcontroller board based on the ATmega328P.
- Pins: UNUSED, IOREF, Reset, 3.3V, 5V, GND, Vin, A0-A5, SCL, SDA, AREF, D0-D13
LED: Two Pin (red)
- Description: A red light-emitting diode with two pins: anode and cathode.
Resistor
- Description: A passive two-pin component with a resistance of 200 Ohms.
- Properties: Resistance: 200 Ohms
Wiring Details
Arduino UNO
- GND is connected to the cathodes of all three LEDs.
- Digital Pin D10 is connected to a 200 Ohm resistor leading to the anode of one LED.
- Digital Pin D9 is connected to a 200 Ohm resistor leading to the anode of the second LED.
- Digital Pin D8 is connected to a 200 Ohm resistor leading to the anode of the third LED.
LED: Two Pin (red)
- Cathode is connected to the GND of the Arduino UNO.
- Anode is connected to a 200 Ohm resistor.
Resistor
- One pin (pin1) is connected to the anode of an LED.
- The other pin (pin2) is connected to a digital pin (D8, D9, or D10) on the Arduino UNO.
Documented Code
void setup() {
  // put your setup code here, to run once:

}

void loop() {
  // put your main code here, to run repeatedly:

}
The provided code is a template with empty setup() and loop() functions. The setup() function is intended for initialization code that runs once when the Arduino is powered on or reset. The loop() function contains code that runs repeatedly, forming the main logic of the program. To control the LEDs, code should be added to these functions to set the digital pins (D8, D9, and D10) as outputs and to turn the LEDs on or off by writing HIGH or LOW to these pins, respectively.