
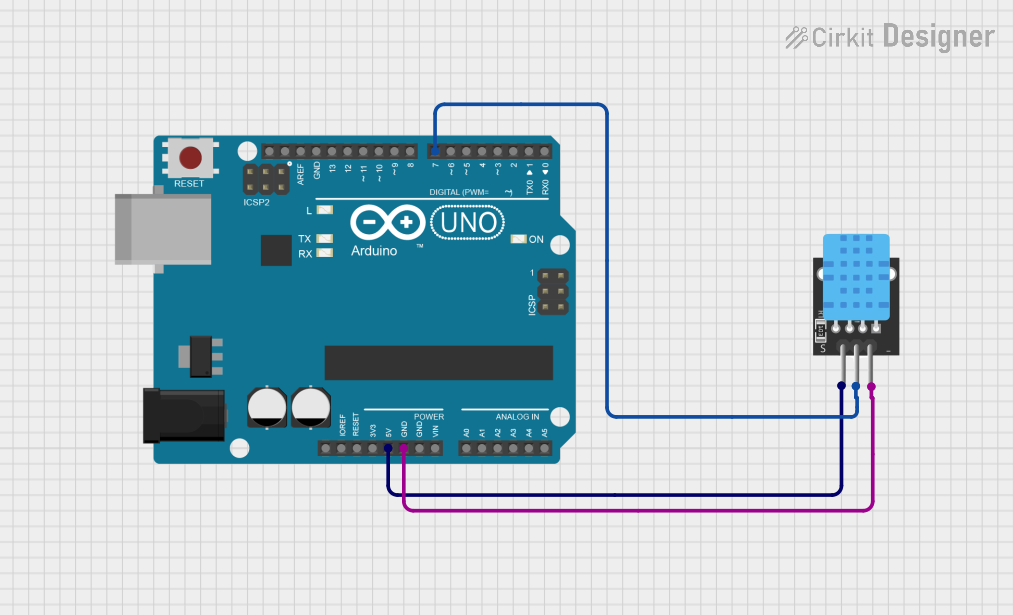
Circuit Documentation
Summary
The circuit in question consists of an Arduino UNO microcontroller board interfaced with a KY-015 DHT11 temperature and humidity sensor module. The Arduino UNO is responsible for controlling the sensor and processing the data it provides. The sensor module is powered by the 5V output from the Arduino and communicates with the microcontroller through one of its digital pins.
Component List
Arduino UNO
- Description: A microcontroller board based on the ATmega328P.
- Pins: UNUSED, IOREF, Reset, 3.3V, 5V, GND, Vin, A0-A5, SCL, SDA, AREF, D0-D13
- Purpose: Acts as the central processing unit of the circuit, reading sensor data and executing embedded code.
KY-015 DHT11 Temperature and Humidity Sensor
- Description: A basic, low-cost digital temperature and humidity sensor.
- Pins: 5V, S (Signal), GND
- Purpose: Measures the ambient temperature and humidity and sends this data to the Arduino UNO.
Wiring Details
Arduino UNO
- 5V to KY-015 DHT11 5V
- GND to KY-015 DHT11 GND
- D7 to KY-015 DHT11 Signal (S)
KY-015 DHT11 Temperature and Humidity Sensor
- 5V from Arduino UNO 5V
- GND from Arduino UNO GND
- Signal (S) to Arduino UNO D7
Documented Code
Arduino UNO Code (sketch.ino)
#include <dht.h>;
#define tempPin 7;
dht DHT;

void setup() {
  // Initialize serial communication at 9600 bits per second:
  Serial.begin(9600);
  // Set the data pin as input:
  pinMode(tempPin, INPUT);
}

void loop() {
  // Read the data from the sensor:
  int chk = DHT.read(tempPin);
  // The read data is now stored in the DHT object and can be accessed.
  // For example, to get the temperature and humidity:
  // float temperature = DHT.temperature;
  // float humidity = DHT.humidity;
}
This code initializes the DHT library for the temperature and humidity sensor and sets up the Arduino to read data from the sensor connected to digital pin 7. The setup() function begins serial communication and configures the data pin as an input. The loop() function reads the sensor data and stores it in the DHT object, from which temperature and humidity can be accessed. However, the code snippet provided does not include the actual data processing or output to the serial monitor. Additional code would be required to complete the functionality for data output and handling.