
Voice-Activated Home Automation System with Arduino and ESP8266
View and Edit Project In Cirkit Designer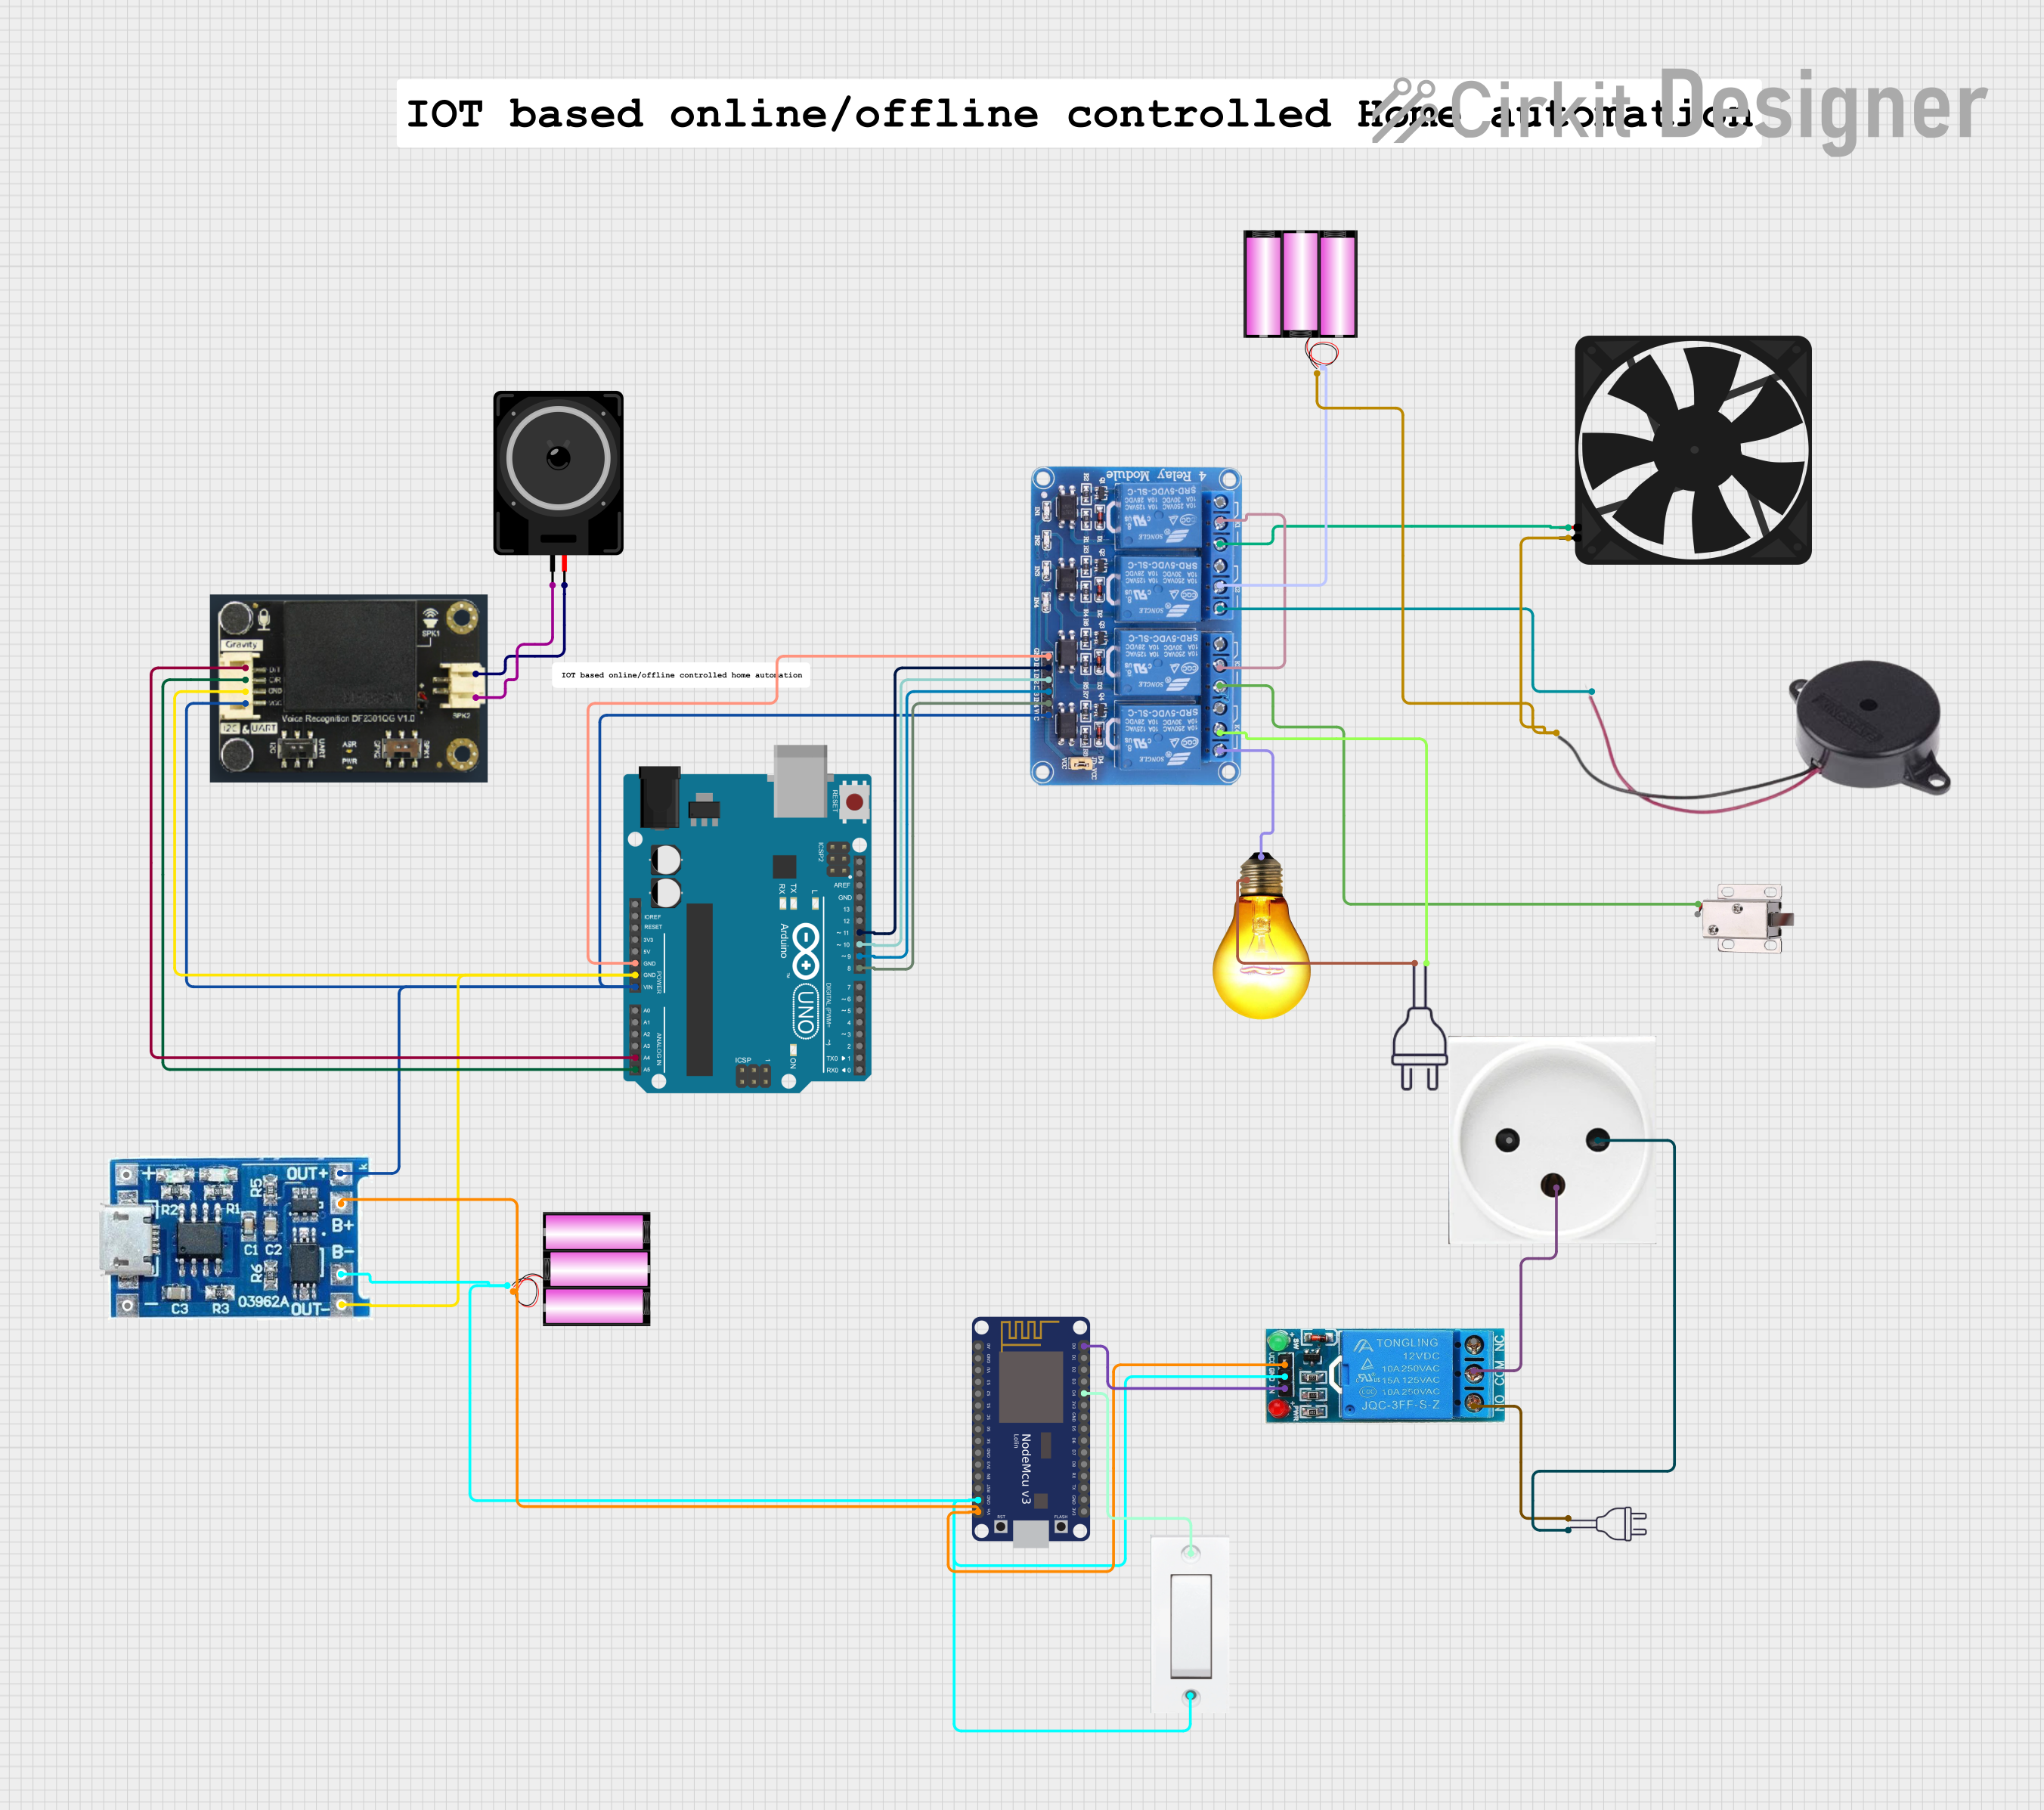
Circuit Documentation
Summary
This circuit integrates various components to perform a set of functions that likely involve voice recognition, control of power devices, and signal indication. The core of the circuit is an Arduino UNO microcontroller, which interfaces with a DF Robot Gravity Voice Recognition Module for voice input. The circuit also includes a relay module for controlling power to devices such as a fan, a buzzer, a solenoid lock, and an AC bulb. A NodeMCU V3 ESP8266 is also present, which suggests potential WiFi connectivity and remote control capabilities. Power management is handled by solar input and battery storage. The circuit is designed to interact with high-voltage AC power as well as DC components.
Component List
- DF Robot Gravity Voice Recognition Module: A module that can recognize voice commands and convert them into digital signals.
- Loudspeaker: An electroacoustic transducer used to produce sound in response to an electrical audio signal input.
- Arduino UNO: A microcontroller board based on the ATmega328P, with digital and analog I/O pins.
- Relay 4 Channel 5v: A module with four relays that can control the high power/current load.
- Fan: An electric device that creates airflow.
- Buzzer: An audio signaling device.
- 12V Solenoid Lock: An electrically-controlled lock mechanism.
- AC Bulb: A standard light bulb that operates on AC voltage.
- Power 220V: Represents the main AC power supply.
- Battery 12V: A DC power source.
- Do Solara: Likely a solar power controller or solar panel with battery charging capability.
- NodeMCU V3 ESP8266: A WiFi module that can be used for Internet connectivity and remote control.
- 12V Single Channel Relay: A relay module for controlling one high power/current load.
- Flush Switch: A switch that likely controls the power state of a device.
- Power Outlet (IL): A standard power outlet.
Wiring Details
DF Robot Gravity Voice Recognition Module
- D/T connected to Arduino UNO A4
- C/R connected to Arduino UNO A5
- GND connected to common ground
- VCC connected to Arduino UNO Vin and Do Solara out+
- Loudspeaker connected to "-" and "+"
Arduino UNO
- A4 and A5 used for voice module communication
- GND connected to common ground
- Vin connected to Do Solara out+ and Relay 4 Channel 5v VCC
- Digital pins D11, D10, D9, D8 connected to Relay 4 Channel 5v IN1, IN2, IN3, IN4 respectively
Relay 4 Channel 5v
- GND connected to common ground
- VCC connected to Arduino UNO Vin
- IN1, IN2, IN3, IN4 controlled by Arduino UNO
- COM1, COM3 interconnected
- COM2 connected to Battery 12V +
- COM4 connected to Power 220V hot wire
- NO1 connected to Fan 5V
- NO2 connected to Buzzer POSITIVE
- NO3 connected to 12V Solenoid Lock VCC
- NO4 connected to AC Bulb P
Fan
- 5V connected to Relay 4 Channel 5v NO1
- GND connected to common ground
Buzzer
- POSITIVE connected to Relay 4 Channel 5v NO2
- NEGATIVE connected to common ground
12V Solenoid Lock
- VCC connected to Relay 4 Channel 5v NO3
- GND connected to common ground
AC Bulb
- P connected to Relay 4 Channel 5v NO4
- N connected to Power 220V neutral wire
Power 220V
- Hot wire connected to Relay 4 Channel 5v COM4 and 12V Single Channel Relay NO
- Neutral wire connected to AC Bulb N and Power Outlet (IL) L
Battery 12V
- "+" connected to Relay 4 Channel 5v COM2 and Do Solara b+
- "-" connected to common ground
Do Solara
- Out+ connected to Arduino UNO Vin and DF Robot Gravity Voice Recognition Module VCC
- Out- connected to common ground
- B+ connected to NodeMCU V3 ESP8266 Vin and 12V Single Channel Relay VCC
- B- connected to common ground
NodeMCU V3 ESP8266
- Vin connected to Do Solara b+
- GND connected to common ground
- D0 connected to 12V Single Channel Relay IN
- D4 connected to Flush Switch VCC
12V Single Channel Relay
- VCC connected to Do Solara b+
- GND connected to common ground
- IN controlled by NodeMCU V3 ESP8266 D0
- COM connected to Power Outlet (IL) GND
- NO connected to Power 220V hot wire
Flush Switch
- GND connected to common ground
- VCC controlled by NodeMCU V3 ESP8266 D4
Power Outlet (IL)
- GND connected to 12V Single Channel Relay COM
- L connected to Power 220V neutral wire
Documented Code
Arduino UNO Code (sketch.ino)
void setup() {
  // put your setup code here, to run once:

}

void loop() {
  // put your main code here, to run repeatedly:

}
Note: The provided code for the Arduino UNO is a template with no specific functionality. It needs to be populated with the logic to control the Relay 4 Channel 5v based on the input from the DF Robot Gravity Voice Recognition Module and potentially other sensors or inputs.
NodeMCU V3 ESP8266 Code
No code was provided for the NodeMCU V3 ESP8266. It would typically be programmed to handle WiFi communication and control the 12V Single Channel Relay based on external commands or sensor data.