
Arduino UNO and L298N Motor Driver Controlled Robotic Car with Bluetooth and IR Sensors
View and Edit Project In Cirkit Designer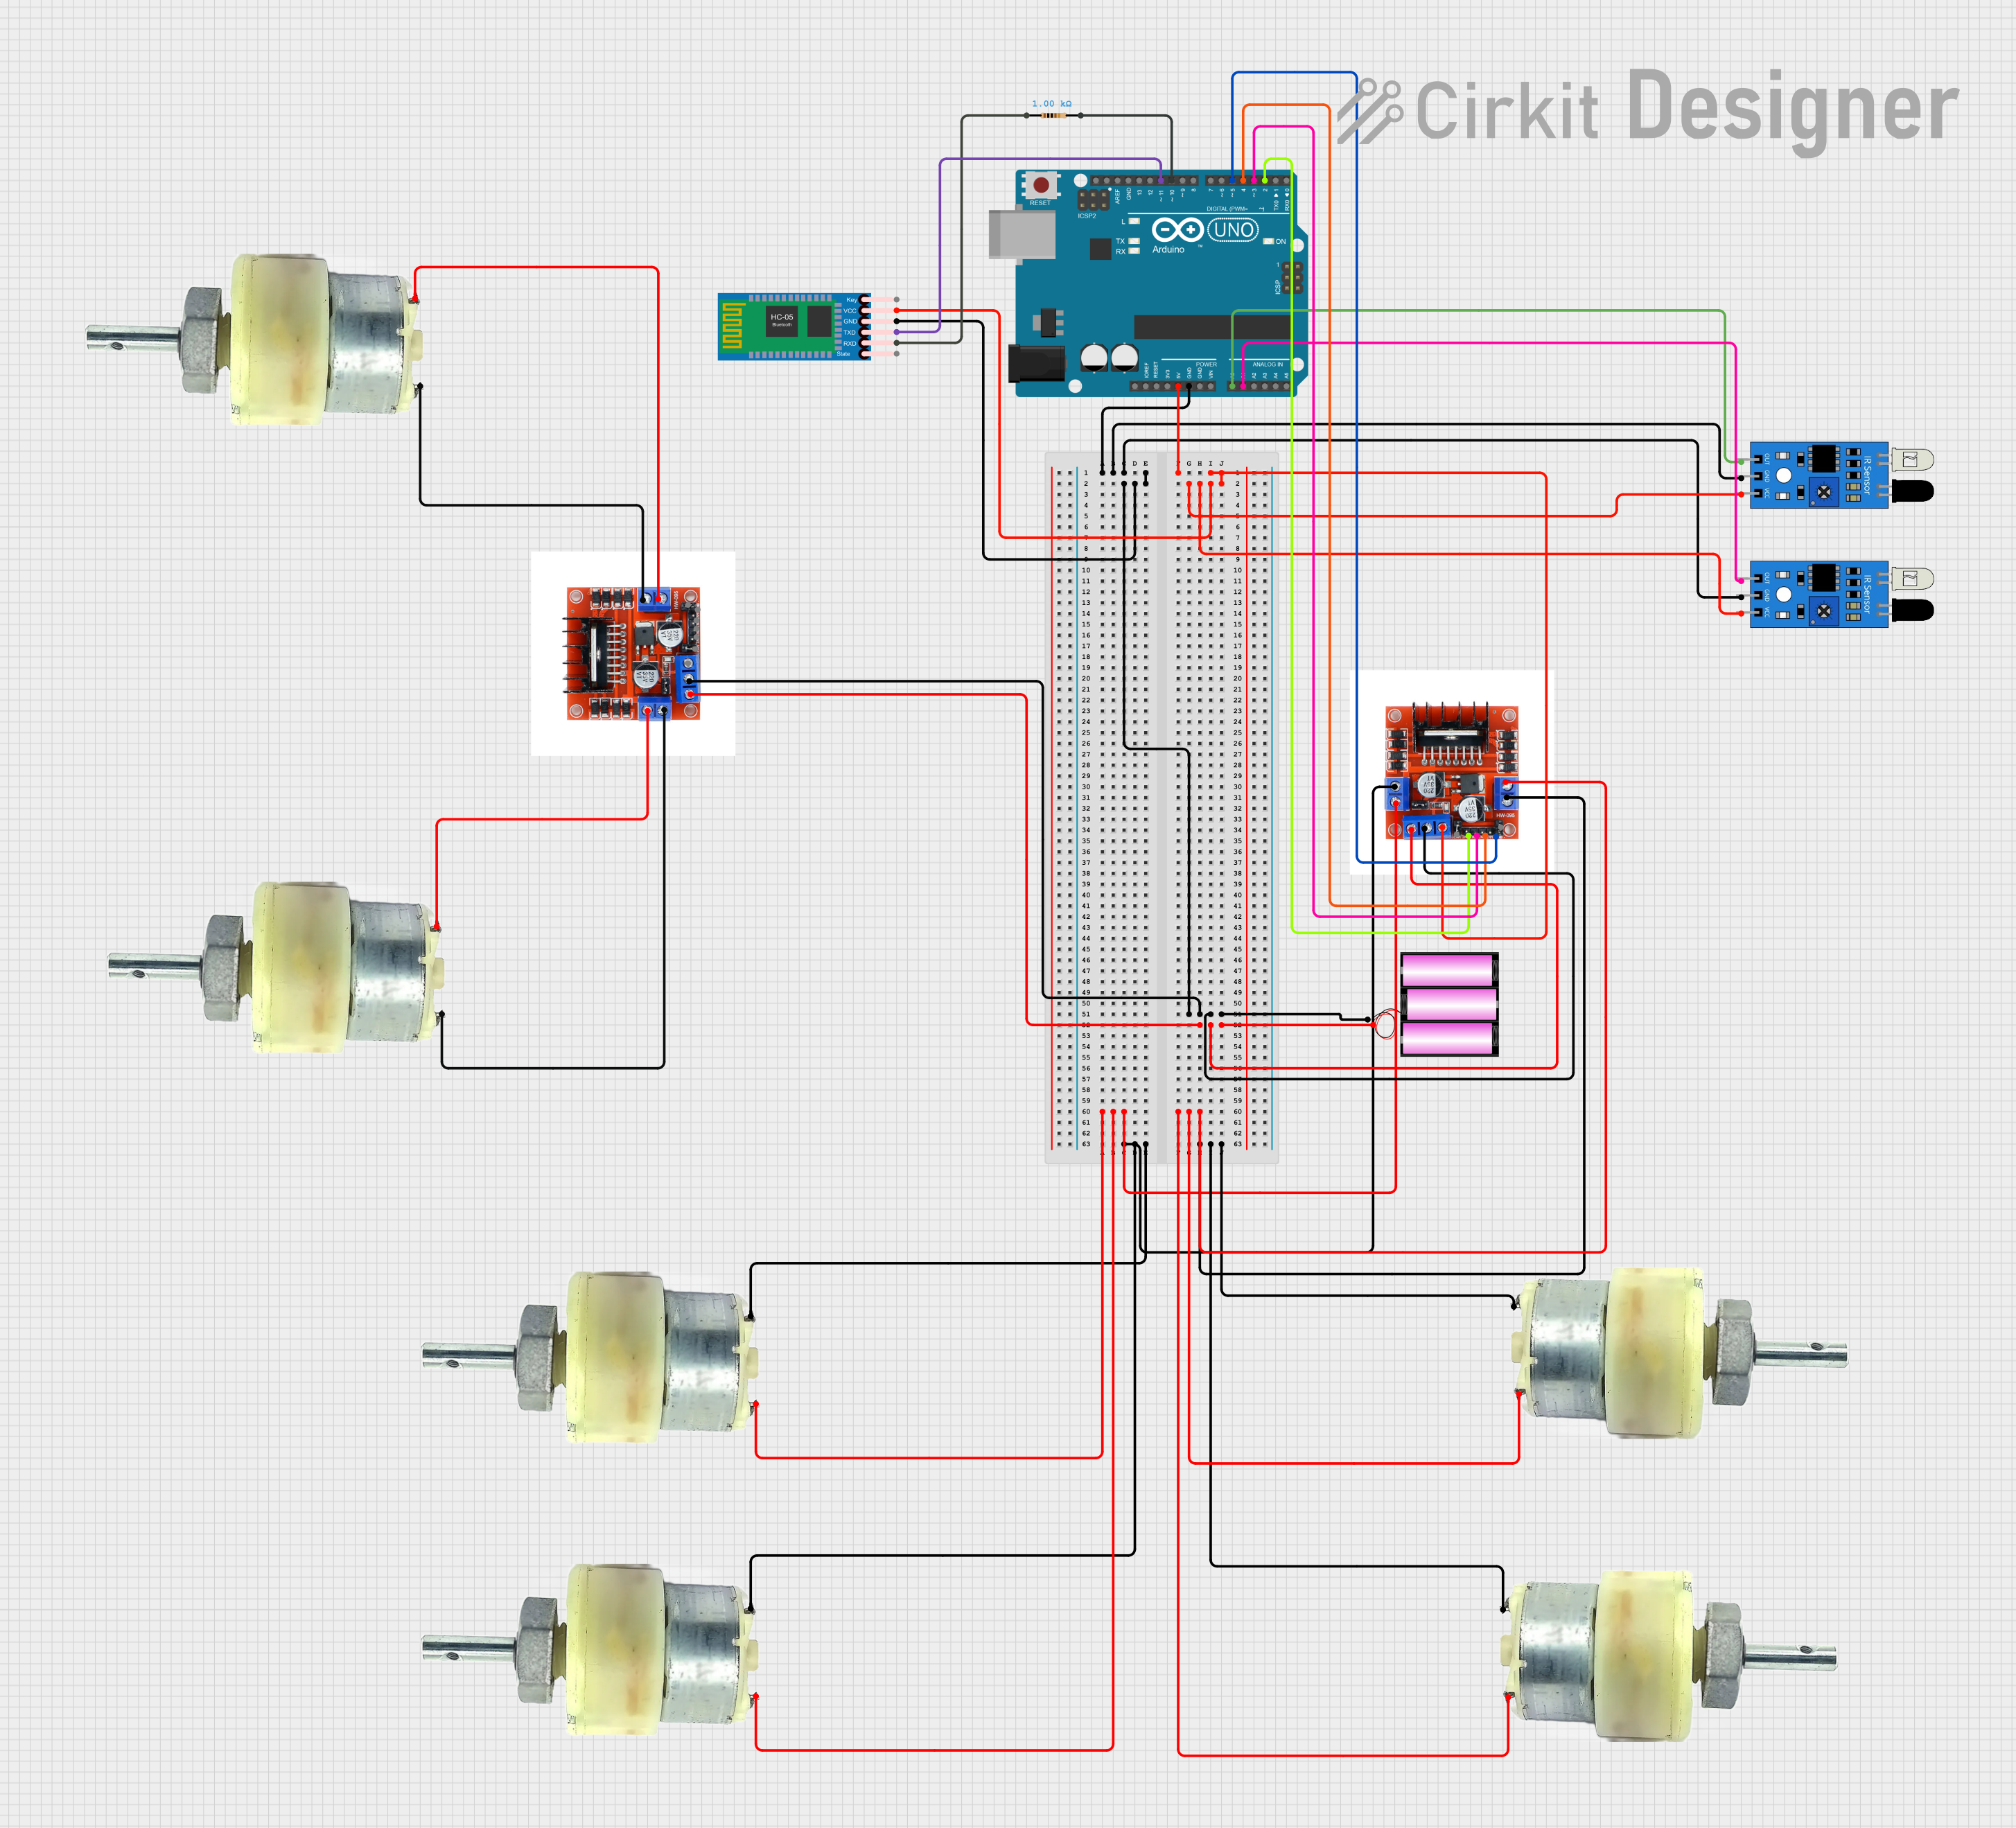
Circuit Documentation
Summary
This document provides a detailed overview of a circuit designed to control multiple 12V geared motors using L298N motor driver modules, an Arduino UNO microcontroller, IR sensors, and an HC-05 Bluetooth module. The circuit is powered by a 12V battery and includes various connections to ensure proper functionality.
Component List
12V Geared Motor
- Description: A motor designed to operate at 12V with a built-in gearbox to provide higher torque.
- Pins: Terminal 1, Terminal 2
L298N 2A Dual Motor Driver Module with PWM Control
- Description: A motor driver module capable of controlling two motors with PWM (Pulse Width Modulation) control.
- Pins: OUT1, OUT2, 12V, GND, 5V, OUT4, OUT3, ENA, IN1, IN2, IN3, ENB, IN4
Arduino UNO
- Description: A microcontroller board based on the ATmega328P, used for various control and automation tasks.
- Pins: UNUSED, IOREF, Reset, 3.3V, 5V, GND, Vin, A0, A1, A2, A3, A4, A5, SCL, SDA, AREF, D13, D12, D11, D10, D9, D8, D7, D6, D5, D4, D3, D2, D1, D0
Battery 12V
- Description: A 12V battery used to power the circuit.
- Pins: +, -
IR Sensor
- Description: An infrared sensor used for detecting objects or obstacles.
- Pins: out, gnd, vcc
HC-05 Bluetooth Module
- Description: A Bluetooth module used for wireless communication.
- Pins: Key, VCC, GND, TXD, RXD, State
Resistor
- Description: A resistor with a resistance of 1000 Ohms.
- Pins: pin1, pin2
Wiring Details
12V Geared Motor
Motor 1:
- Terminal 1 connected to OUT3 of L298N Motor Driver Module 1
- Terminal 2 connected to OUT4 of L298N Motor Driver Module 1
Motor 2:
- Terminal 1 connected to OUT2 of L298N Motor Driver Module 1
- Terminal 2 connected to OUT1 of L298N Motor Driver Module 1
Motor 3:
- Terminal 1 connected to OUT3 of L298N Motor Driver Module 2
- Terminal 2 connected to OUT4 of L298N Motor Driver Module 2
Motor 4:
- Terminal 1 connected to OUT2 of L298N Motor Driver Module 2
- Terminal 2 connected to OUT1 of L298N Motor Driver Module 2
L298N 2A Dual Motor Driver Module with PWM Control
Module 1:
- OUT3 connected to Terminal 1 of Motor 1
- OUT4 connected to Terminal 2 of Motor 1
- OUT2 connected to Terminal 1 of Motor 2
- OUT1 connected to Terminal 2 of Motor 2
- GND connected to GND of Arduino UNO, GND of HC-05 Bluetooth Module, GND of IR Sensors, and - of Battery 12V
- 5V connected to 5V of Arduino UNO, VCC of HC-05 Bluetooth Module, and VCC of IR Sensors
- 12V connected to + of Battery 12V
Module 2:
- OUT3 connected to Terminal 1 of Motor 3
- OUT4 connected to Terminal 2 of Motor 3
- OUT2 connected to Terminal 1 of Motor 4
- OUT1 connected to Terminal 2 of Motor 4
- GND connected to GND of Arduino UNO, GND of HC-05 Bluetooth Module, GND of IR Sensors, and - of Battery 12V
- 5V connected to 5V of Arduino UNO, VCC of HC-05 Bluetooth Module, and VCC of IR Sensors
- 12V connected to + of Battery 12V
Arduino UNO
- GND connected to GND of L298N Motor Driver Modules, GND of HC-05 Bluetooth Module, GND of IR Sensors, and - of Battery 12V
- 5V connected to 5V of L298N Motor Driver Modules, VCC of HC-05 Bluetooth Module, and VCC of IR Sensors
- D2 connected to IN1 of L298N Motor Driver Module 1
- D3 connected to IN2 of L298N Motor Driver Module 1
- D4 connected to IN3 of L298N Motor Driver Module 1
- D5 connected to IN4 of L298N Motor Driver Module 1
- A0 connected to out of IR Sensor 1
- A1 connected to out of IR Sensor 2
- D11 connected to TXD of HC-05 Bluetooth Module
- D10 connected to pin2 of Resistor
Battery 12V
-
- connected to 12V of L298N Motor Driver Modules
-
- connected to GND of L298N Motor Driver Modules, GND of Arduino UNO, GND of HC-05 Bluetooth Module, and GND of IR Sensors
IR Sensor
Sensor 1:
- out connected to A0 of Arduino UNO
- gnd connected to GND of Arduino UNO
- vcc connected to 5V of Arduino UNO
Sensor 2:
- out connected to A1 of Arduino UNO
- gnd connected to GND of Arduino UNO
- vcc connected to 5V of Arduino UNO
HC-05 Bluetooth Module
- TXD connected to D11 of Arduino UNO
- RXD connected to pin1 of Resistor
- GND connected to GND of Arduino UNO
- VCC connected to 5V of Arduino UNO
Resistor
- pin1 connected to RXD of HC-05 Bluetooth Module
- pin2 connected to D10 of Arduino UNO
Documented Code
Arduino UNO Code
void setup() {
  // put your setup code here, to run once:

}

void loop() {
  // put your main code here, to run repeatedly:

}
This code is a basic template for the Arduino UNO. The setup function is used to initialize any settings or configurations, and the loop function contains the main code that runs repeatedly. Additional code can be added to control the motors, read sensor data, and communicate via Bluetooth.