
Arduino UNO Controlled Bluetooth Interface for Motorized Window and Environmental Sensing
View and Edit Project In Cirkit Designer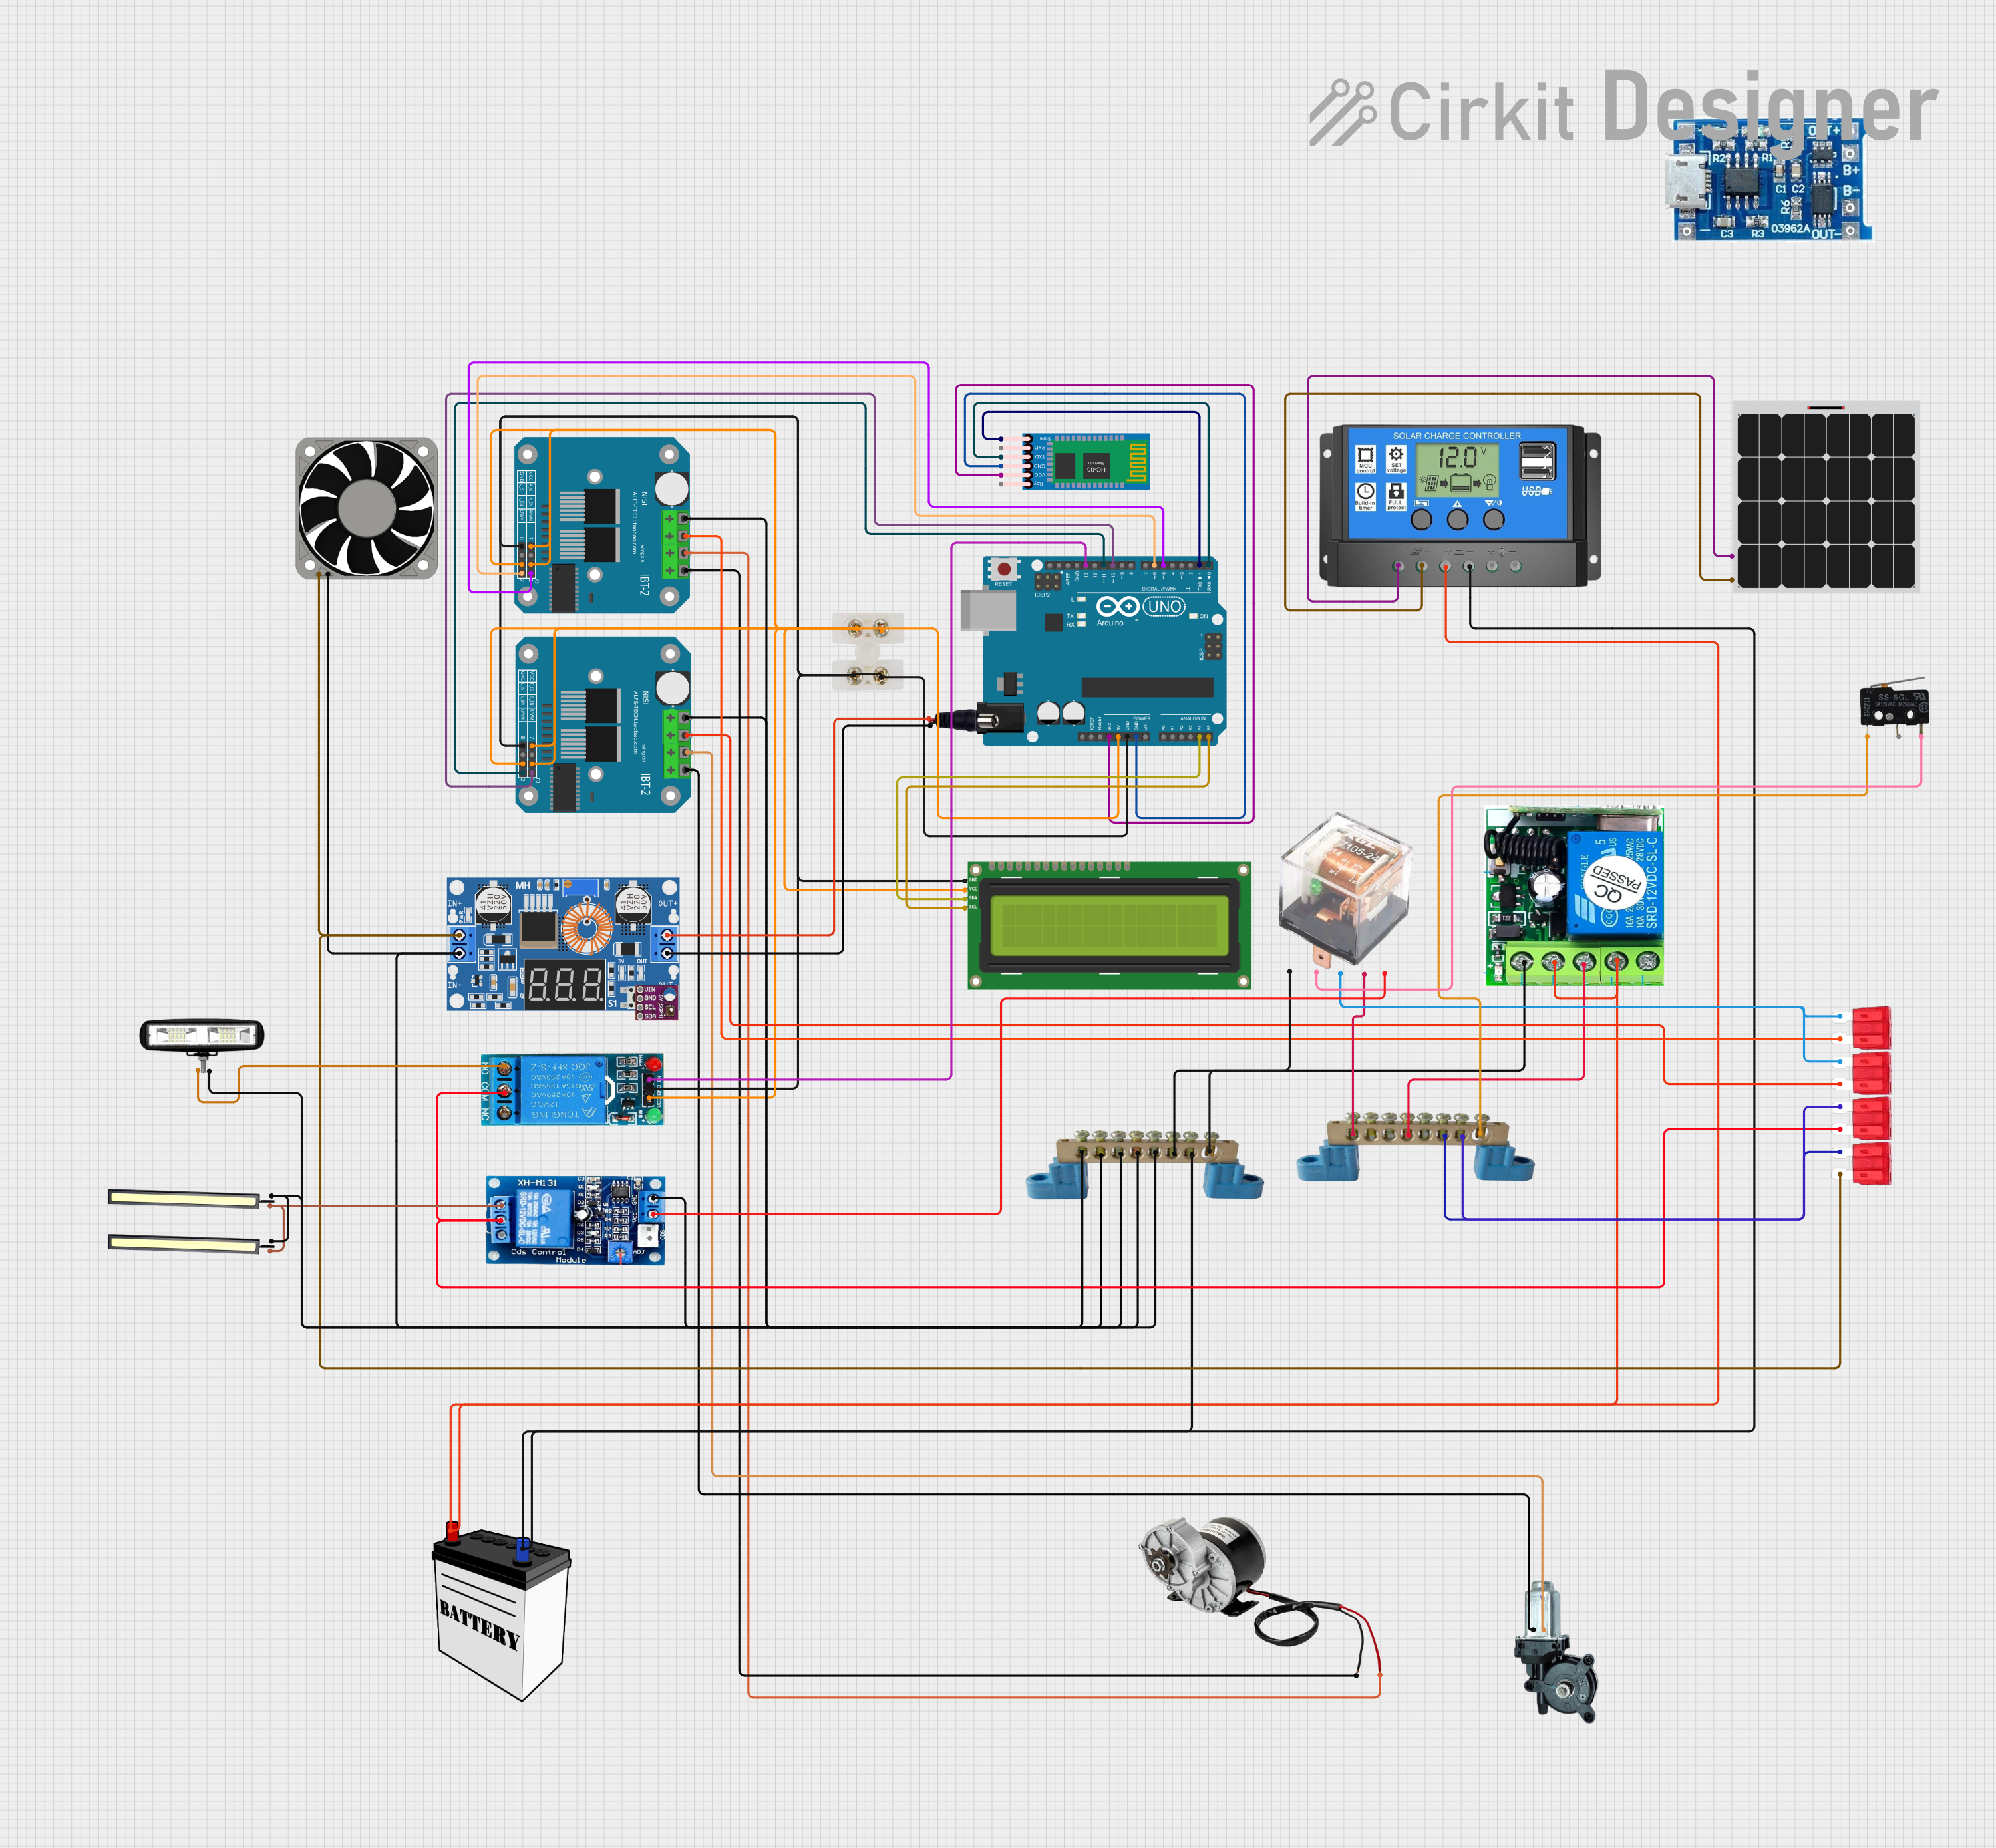
Circuit Documentation
Summary
This circuit integrates various components, including an Arduino UNO microcontroller, an HC-05 Bluetooth module, an I2C LCD screen, power supply elements, motor drivers, and other peripherals. The Arduino UNO serves as the central processing unit, interfacing with the HC-05 for Bluetooth connectivity and controlling an I2C LCD for display purposes. Motor drivers are used to control a DC motor and a car power window, with power supplied by a 12V battery and regulated by a solar charge controller and a DC buck step-down converter. Relays and switches are included for controlling power flow, and the circuit is protected by fuses. A solar panel provides an alternative power source, charging the battery through the solar charge controller.
Component List
- HC-05 Bluetooth Module: A Bluetooth module for wireless communication.
- Arduino UNO: A microcontroller board based on the ATmega328P.
- I2C LCD 16x2 Screen: A liquid crystal display that uses the I2C communication protocol.
- 12V Battery: A power source for the circuit.
- 40 Fan 12v: A 12V fan for cooling purposes.
- BTS7960 Motor Driver: A high-power motor driver for controlling motors.
- 250W 12V ELECTRIC MOTOR BRUSH MOTOR DC: A DC motor for mechanical movement.
- Car Power Window: A mechanism from a car used for raising and lowering a window.
- Solar Charge Controller: A device that controls the charging of a battery from solar panels.
- Contactor: An electrically-controlled switch used for switching power circuits.
- Neutral Link Bar: A bar used for connecting neutral wires.
- XL4015 5A DC Buck Step-down: A DC-DC converter for stepping down voltage.
- 12V Single Channel Relay: A relay for controlling high power devices.
- 12V Relay Sensor: A sensor relay for detecting voltage and controlling a load.
- Car Fuse: A safety device that protects electrical circuits from overcurrent.
- 12V Wireless Relay: A relay that can be controlled wirelessly.
- 5 Pin 12V Relay: A standard relay with 5 pins for switching electrical circuits.
- Micro Switch: A small switch that is actuated by very little physical force.
- LED 12V: A light-emitting diode that operates at 12V.
- Front Light: A light typically used on the front of a vehicle.
- Power Jack: A connector for supplying power to the circuit.
- SGP41 VOC and NOx Sensor: A sensor for detecting volatile organic compounds and nitrogen oxides.
- Solar Panel: A panel that converts solar energy into electrical energy.
- Do Solara: A solar-related component with unspecified functionality.
Wiring Details
HC-05 Bluetooth Module
- VCC connected to Arduino UNO 3.3V
- GND connected to Arduino UNO GND
- TXD connected to Arduino UNO D0
- State connected to Arduino UNO D1
Arduino UNO
- 3.3V connected to HC-05 Bluetooth Module VCC
- 5V connected to I2C LCD Screen VCC (5V)
- GND connected to multiple components including HC-05 Bluetooth Module GND, I2C LCD Screen GND, and BTS7960 Motor Driver Pin 1
- A4 (SDA) connected to I2C LCD Screen SDA
- A5 (SCL) connected to I2C LCD Screen SCL
- D0 connected to HC-05 Bluetooth Module TXD
- D1 connected to HC-05 Bluetooth Module State
- D5, D6, D10, D11 connected to BTS7960 Motor Driver control pins
- D13 connected to 12V Single Channel Relay IN
I2C LCD 16x2 Screen
- SDA connected to Arduino UNO A4
- SCL connected to Arduino UNO A5
- VCC (5V) connected to Arduino UNO 5V
- GND connected to Arduino UNO GND
12V Battery
- VCC connected to Solar Charge Controller Battery +
- GND connected to Solar Charge Controller Battery -
BTS7960 Motor Driver (Two Instances)
- Control pins connected to Arduino UNO D5, D6, D10, D11
- Power pins connected to motors and power sources
250W 12V ELECTRIC MOTOR BRUSH MOTOR DC
- Connected to BTS7960 Motor Driver
Car Power Window
- Connected to BTS7960 Motor Driver
Solar Charge Controller
- Solar Cell + connected to Solar Panel +
- Solar Cell - connected to Solar Panel -
- Battery + connected to 12V Battery VCC
- Battery - connected to 12V Battery GND
12V Single Channel Relay
- VCC connected to Arduino UNO 5V
- GND connected to Arduino UNO GND
- IN connected to Arduino UNO D13
- NO connected to Front Light POSITIF
- COM connected to Car Fuse
12V Relay Sensor
- POSITIF connected to Car Fuse
- NEGATIF connected to Neutral Link Bar
- NO connected to LED 12V POSITIF
Neutral Link Bar
- Connected to various GND and NEGATIF pins of components
XL4015 5A DC Buck Step-down
- Input + connected to 40 Fan 12v +12V
- Input - connected to Neutral Link Bar
- Output + connected to Power Jack POSITIF
- Output - connected to Power Jack NEGATIF
5 Pin 12V Relay
- 30 connected to Neutral Link Bar
- 85 connected to Micro Switch NC
- 86 connected to Neutral Link Bar
- 87a(NO) connected to 12V Relay Sensor POSITIF
- 87a(NC) connected to Car Fuse
Micro Switch
- COM connected to Neutral Link Bar
- NC connected to 5 Pin 12V Relay 85
LED 12V (Two Instances)
- POSITIF connected to 12V Relay Sensor NO
- NEGATIF connected to Neutral Link Bar
Front Light
- POSITIF connected to 12V Single Channel Relay NO
- NEGATIF connected to Neutral Link Bar
Power Jack
- POSITIF connected to XL4015 5A DC Buck Step-down Output +
- NEGATIF connected to XL4015 5A DC Buck Step-down Output -
Documented Code
Arduino UNO Code (sketch.ino)
void setup() {
  // put your setup code here, to run once:

}

void loop() {
  // put your main code here, to run repeatedly:

}
Note: The provided code is a template and does not contain any functional code specific to the circuit's operation. It will need to be populated with the appropriate setup and loop functions to control the connected components.