
Circuit Documentation
Summary
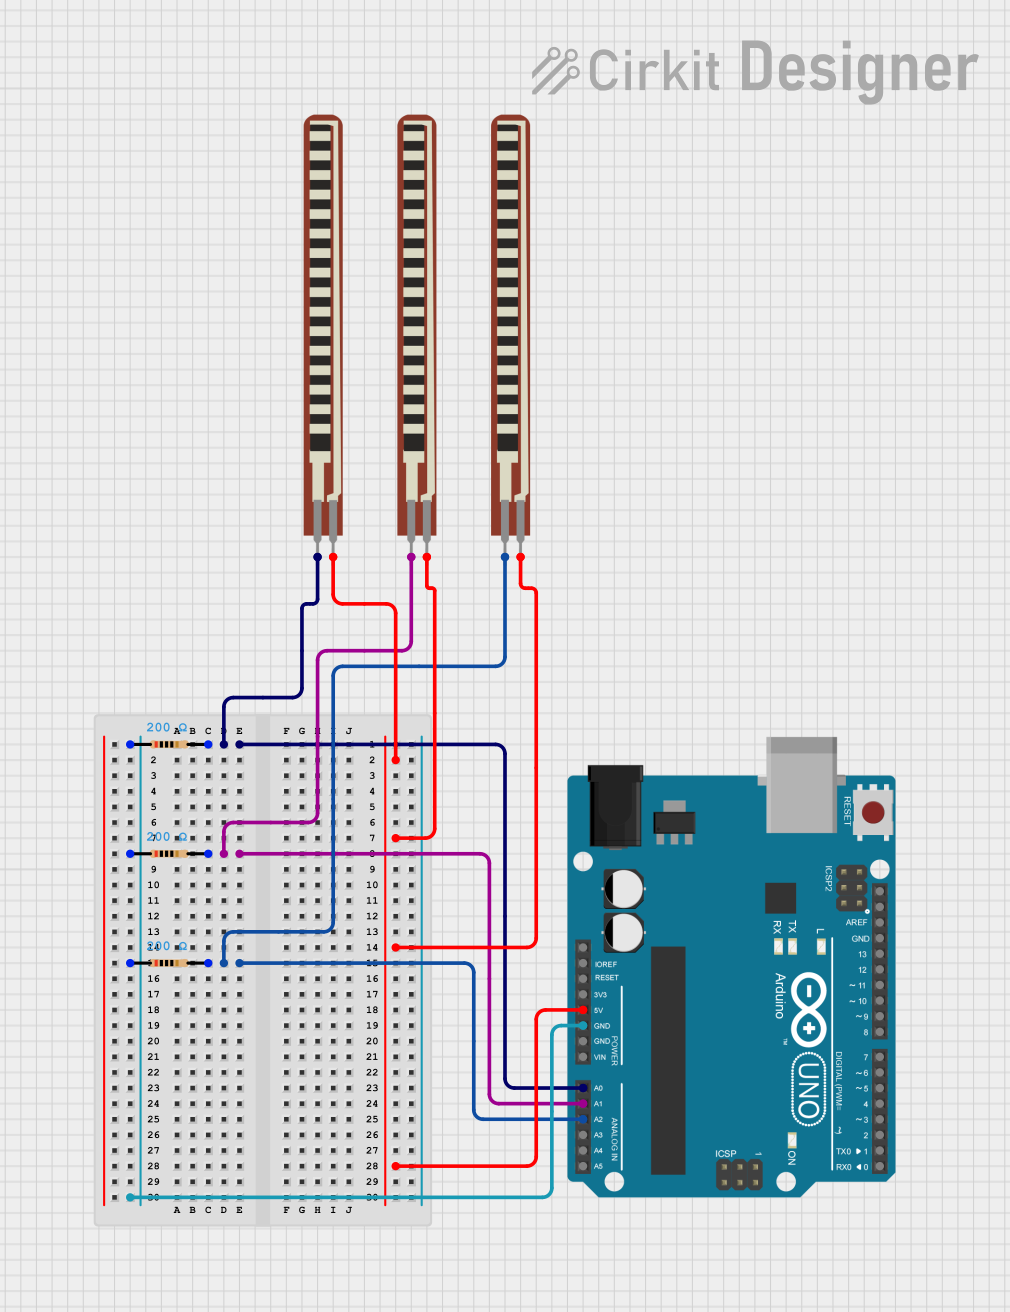
This circuit consists of an Arduino UNO microcontroller, three resistors, and three 2.2 inch Basic Flex Resistors. The resistors are connected to the analog input pins of the Arduino UNO, and the flex resistors are used to measure varying resistance values. The circuit is powered by the 5V output of the Arduino UNO.
Component List
Arduino UNO
- Description: A microcontroller board based on the ATmega328P.
- Pins: UNUSED, IOREF, Reset, 3.3V, 5V, GND, Vin, A0, A1, A2, A3, A4, A5, SCL, SDA, AREF, D13, D12, D11, D10, D9, D8, D7, D6, D5, D4, D3, D2, D1, D0
Resistor
- Description: A passive electrical component that implements electrical resistance as a circuit element.
- Pins: pin1, pin2
- Properties:
- Resistance: 200 Ohms
2.2 inch Basic Flex Resistor
- Description: A flexible resistor that changes resistance when bent.
- Pins: Pin 2, pin 1
Wiring Details
Arduino UNO
- A0: Connected to pin2 of Resistor and Pin 2 of 2.2 inch Basic Flex Resistor
- A1: Connected to pin2 of Resistor and Pin 2 of 2.2 inch Basic Flex Resistor
- A2: Connected to pin2 of Resistor and Pin 2 of 2.2 inch Basic Flex Resistor
- 5V: Connected to pin 1 of 2.2 inch Basic Flex Resistor, pin 1 of 2.2 inch Basic Flex Resistor, and pin 1 of 2.2 inch Basic Flex Resistor
- GND: Connected to pin1 of Resistor, pin1 of Resistor, and pin1 of Resistor
Resistor
- pin1: Connected to GND of Arduino UNO
- pin2: Connected to A0 of Arduino UNO and Pin 2 of 2.2 inch Basic Flex Resistor
Resistor
- pin1: Connected to GND of Arduino UNO
- pin2: Connected to A1 of Arduino UNO and Pin 2 of 2.2 inch Basic Flex Resistor
Resistor
- pin1: Connected to GND of Arduino UNO
- pin2: Connected to A2 of Arduino UNO and Pin 2 of 2.2 inch Basic Flex Resistor
2.2 inch Basic Flex Resistor
- Pin 2: Connected to pin2 of Resistor and A0 of Arduino UNO
- pin 1: Connected to 5V of Arduino UNO
2.2 inch Basic Flex Resistor
- Pin 2: Connected to pin2 of Resistor and A1 of Arduino UNO
- pin 1: Connected to 5V of Arduino UNO
2.2 inch Basic Flex Resistor
- Pin 2: Connected to pin2 of Resistor and A2 of Arduino UNO
- pin 1: Connected to 5V of Arduino UNO
Code Documentation
Arduino UNO Code
sketch.ino
void setup() {
  // put your setup code here, to run once:

}

void loop() {
  // put your main code here, to run repeatedly:

}
documentation.txt