
Circuit Documentation
Summary of the Circuit
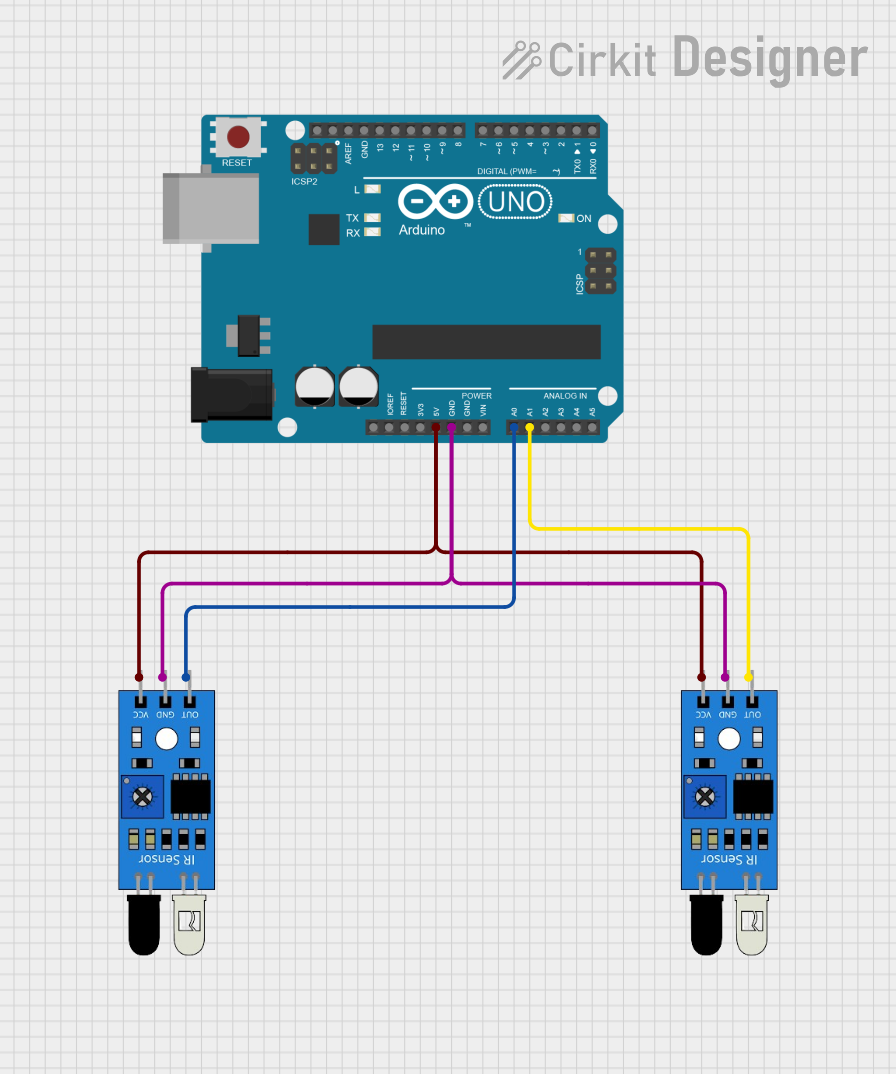
This circuit consists of an Arduino UNO microcontroller board and two infrared (IR) sensors. The Arduino UNO is used as the central processing unit to read signals from the IR sensors. The IR sensors are powered by the Arduino and are used to detect the presence of objects or motion based on the infrared light they emit and receive. The output pins of the IR sensors are connected to the analog input pins of the Arduino UNO for signal processing.
Component List
Arduino UNO
- Description: A microcontroller board based on the ATmega328P.
- Pins: UNUSED, IOREF, Reset, 3.3V, 5V, GND, Vin, A0-A5, SCL, SDA, AREF, D0-D13.
- Purpose: Acts as the central processing unit for the circuit, reading sensor data and executing embedded code.
IR Sensor 1
- Description: An infrared sensor capable of detecting infrared light.
- Pins: out, gnd, vcc.
- Purpose: To detect the presence of objects or motion and send the data to the Arduino UNO.
IR Sensor 2
- Description: An infrared sensor capable of detecting infrared light.
- Pins: out, gnd, vcc.
- Purpose: To detect the presence of objects or motion and send the data to the Arduino UNO.
Wiring Details
Arduino UNO
- 5V: Connected to the VCC pins of both IR sensors to provide power.
- GND: Connected to the GND pins of both IR sensors to complete the power circuit.
- A0: Connected to the OUT pin of IR Sensor 1 to read its output signal.
- A1: Connected to the OUT pin of IR Sensor 2 to read its output signal.
IR Sensor 1
- VCC: Connected to the 5V pin of the Arduino UNO for power.
- GND: Connected to the GND pin of the Arduino UNO to complete the power circuit.
- OUT: Connected to the A0 pin of the Arduino UNO for signal output.
IR Sensor 2
- VCC: Connected to the 5V pin of the Arduino UNO for power.
- GND: Connected to the GND pin of the Arduino UNO to complete the power circuit.
- OUT: Connected to the A1 pin of the Arduino UNO for signal output.
Documented Code
Arduino UNO Code (sketch.ino)
void setup() {
  // put your setup code here, to run once:

}

void loop() {
  // put your main code here, to run repeatedly:

}
Note: The provided code is a template and does not contain any functional code to interact with the IR sensors. The user should implement the setup and loop functions to initialize the sensor pins and read the sensor outputs, respectively.