
Arduino UNO Based Ultrasonic Security System with GSM Notification
View and Edit Project In Cirkit Designer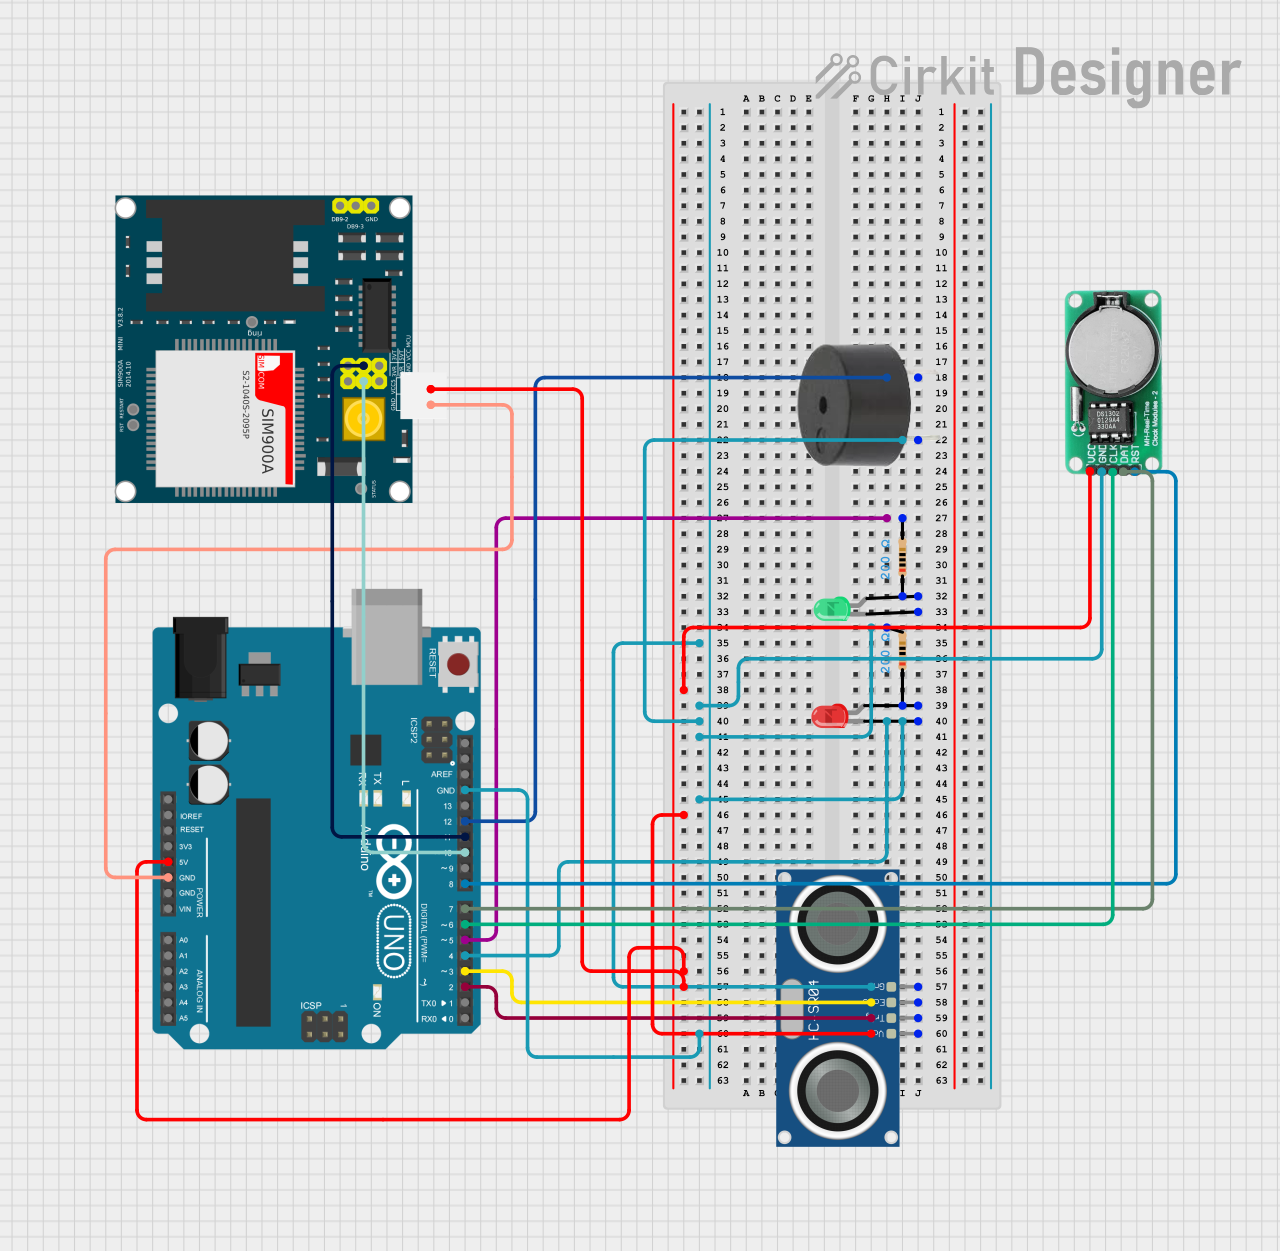
Circuit Documentation
Summary
This circuit integrates various components including an Arduino UNO, HC-SR04 Ultrasonic Sensor, SIM900A GSM module, LEDs, a buzzer, resistors, and a DS1302 Real-Time Clock (RTC) module. The Arduino UNO serves as the central microcontroller unit to interface with the sensor, GSM module, RTC, and to control the LEDs and buzzer based on the logic defined in the embedded code.
Component List
Arduino UNO
A microcontroller board based on the ATmega328P. It has 14 digital input/output pins, 6 analog inputs, a 16 MHz quartz crystal, a USB connection, a power jack, an ICSP header, and a reset button.
HC-SR04 Ultrasonic Sensor
An ultrasonic distance sensor that provides 2cm to 400cm of non-contact measurement functionality with a ranging accuracy that can reach up to 3mm.
SIM900A
A complete Dual-band GSM/GPRS module in a SMT type, designed with a very powerful single-chip processor integrating AMR926EJ-S core.
LED: Two Pin (red)
A basic red LED for indicating statuses or alerts.
LED: Two Pin (green)
A basic green LED for indicating statuses or alerts.
Buzzer
An electromechanical component that can be used to make noise or play tones.
Resistor (200 Ohms)
A resistor with a resistance of 200 Ohms, typically used to limit current or divide voltages.
DS1302 RTC
A real-time clock module that provides a complete clock calendar with full binary-coded decimal (BCD) clock/calendar plus 31 bytes of static RAM.
Wiring Details
Arduino UNO
- D12: Connected to the buzzer's GND.
- D4: Common ground for the buzzer, HC-SR04 GND, DS1302 GND, red LED cathode.
- D5: Connected to a 200 Ohm resistor leading to the green LED anode.
- 5V: Powers the HC-SR04 VCC, DS1302 VCC, and SIM900A 5V.
- GND: Common ground for the Arduino UNO, SIM900A GND.
- D3: Connected to the HC-SR04 ECHO pin.
- D2: Connected to the HC-SR04 TRIG pin.
- D11: Connected to the SIM900A 5VT.
- D10: Connected to the SIM900A 5VR.
- D8: Connected to the DS1302 RST.
- D7: Connected to the DS1302 DATA.
- D6: Connected to the DS1302 CLK.
HC-SR04 Ultrasonic Sensor
- VCC: Powered by the Arduino UNO 5V.
- TRIG: Controlled by the Arduino UNO D2.
- ECHO: Sends signal to the Arduino UNO D3.
- GND: Common ground with the Arduino UNO D4.
SIM900A
- 5V: Powered by the Arduino UNO 5V.
- GND: Common ground with the Arduino UNO GND.
- 5VT: Connected to the Arduino UNO D11.
- 5VR: Connected to the Arduino UNO D10.
LED: Two Pin (red)
- Anode: Connected to a 200 Ohm resistor.
- Cathode: Common ground with the Arduino UNO D4.
LED: Two Pin (green)
- Anode: Connected to a 200 Ohm resistor.
- Cathode: Common ground with the Arduino UNO D4.
Buzzer
- PIN: Connected to a 200 Ohm resistor.
- GND: Connected to the Arduino UNO D12.
Resistor (200 Ohms)
- One resistor is connected between the buzzer PIN and the common ground.
- Another resistor is connected between the green LED anode and the Arduino UNO D5.
DS1302 RTC
- VCC: Powered by the Arduino UNO 5V.
- GND: Common ground with the Arduino UNO D4.
- CLK: Connected to the Arduino UNO D6.
- DATA: Connected to the Arduino UNO D7.
- RST: Connected to the Arduino UNO D8.
Documented Code
Arduino UNO Code (sketch.ino)
void setup() {
  // put your setup code here, to run once:

}

void loop() {
  // put your main code here, to run repeatedly:

}
The provided code is a template with empty setup() and loop() functions. The setup() function is intended for initialization code that runs once at the start, while the loop() function contains the main logic that runs repeatedly. Actual implementation details need to be added based on the desired functionality of the circuit.