
ESP32-Based GPS Tracker with OLED Display and Telegram Integration
View and Edit Project In Cirkit Designer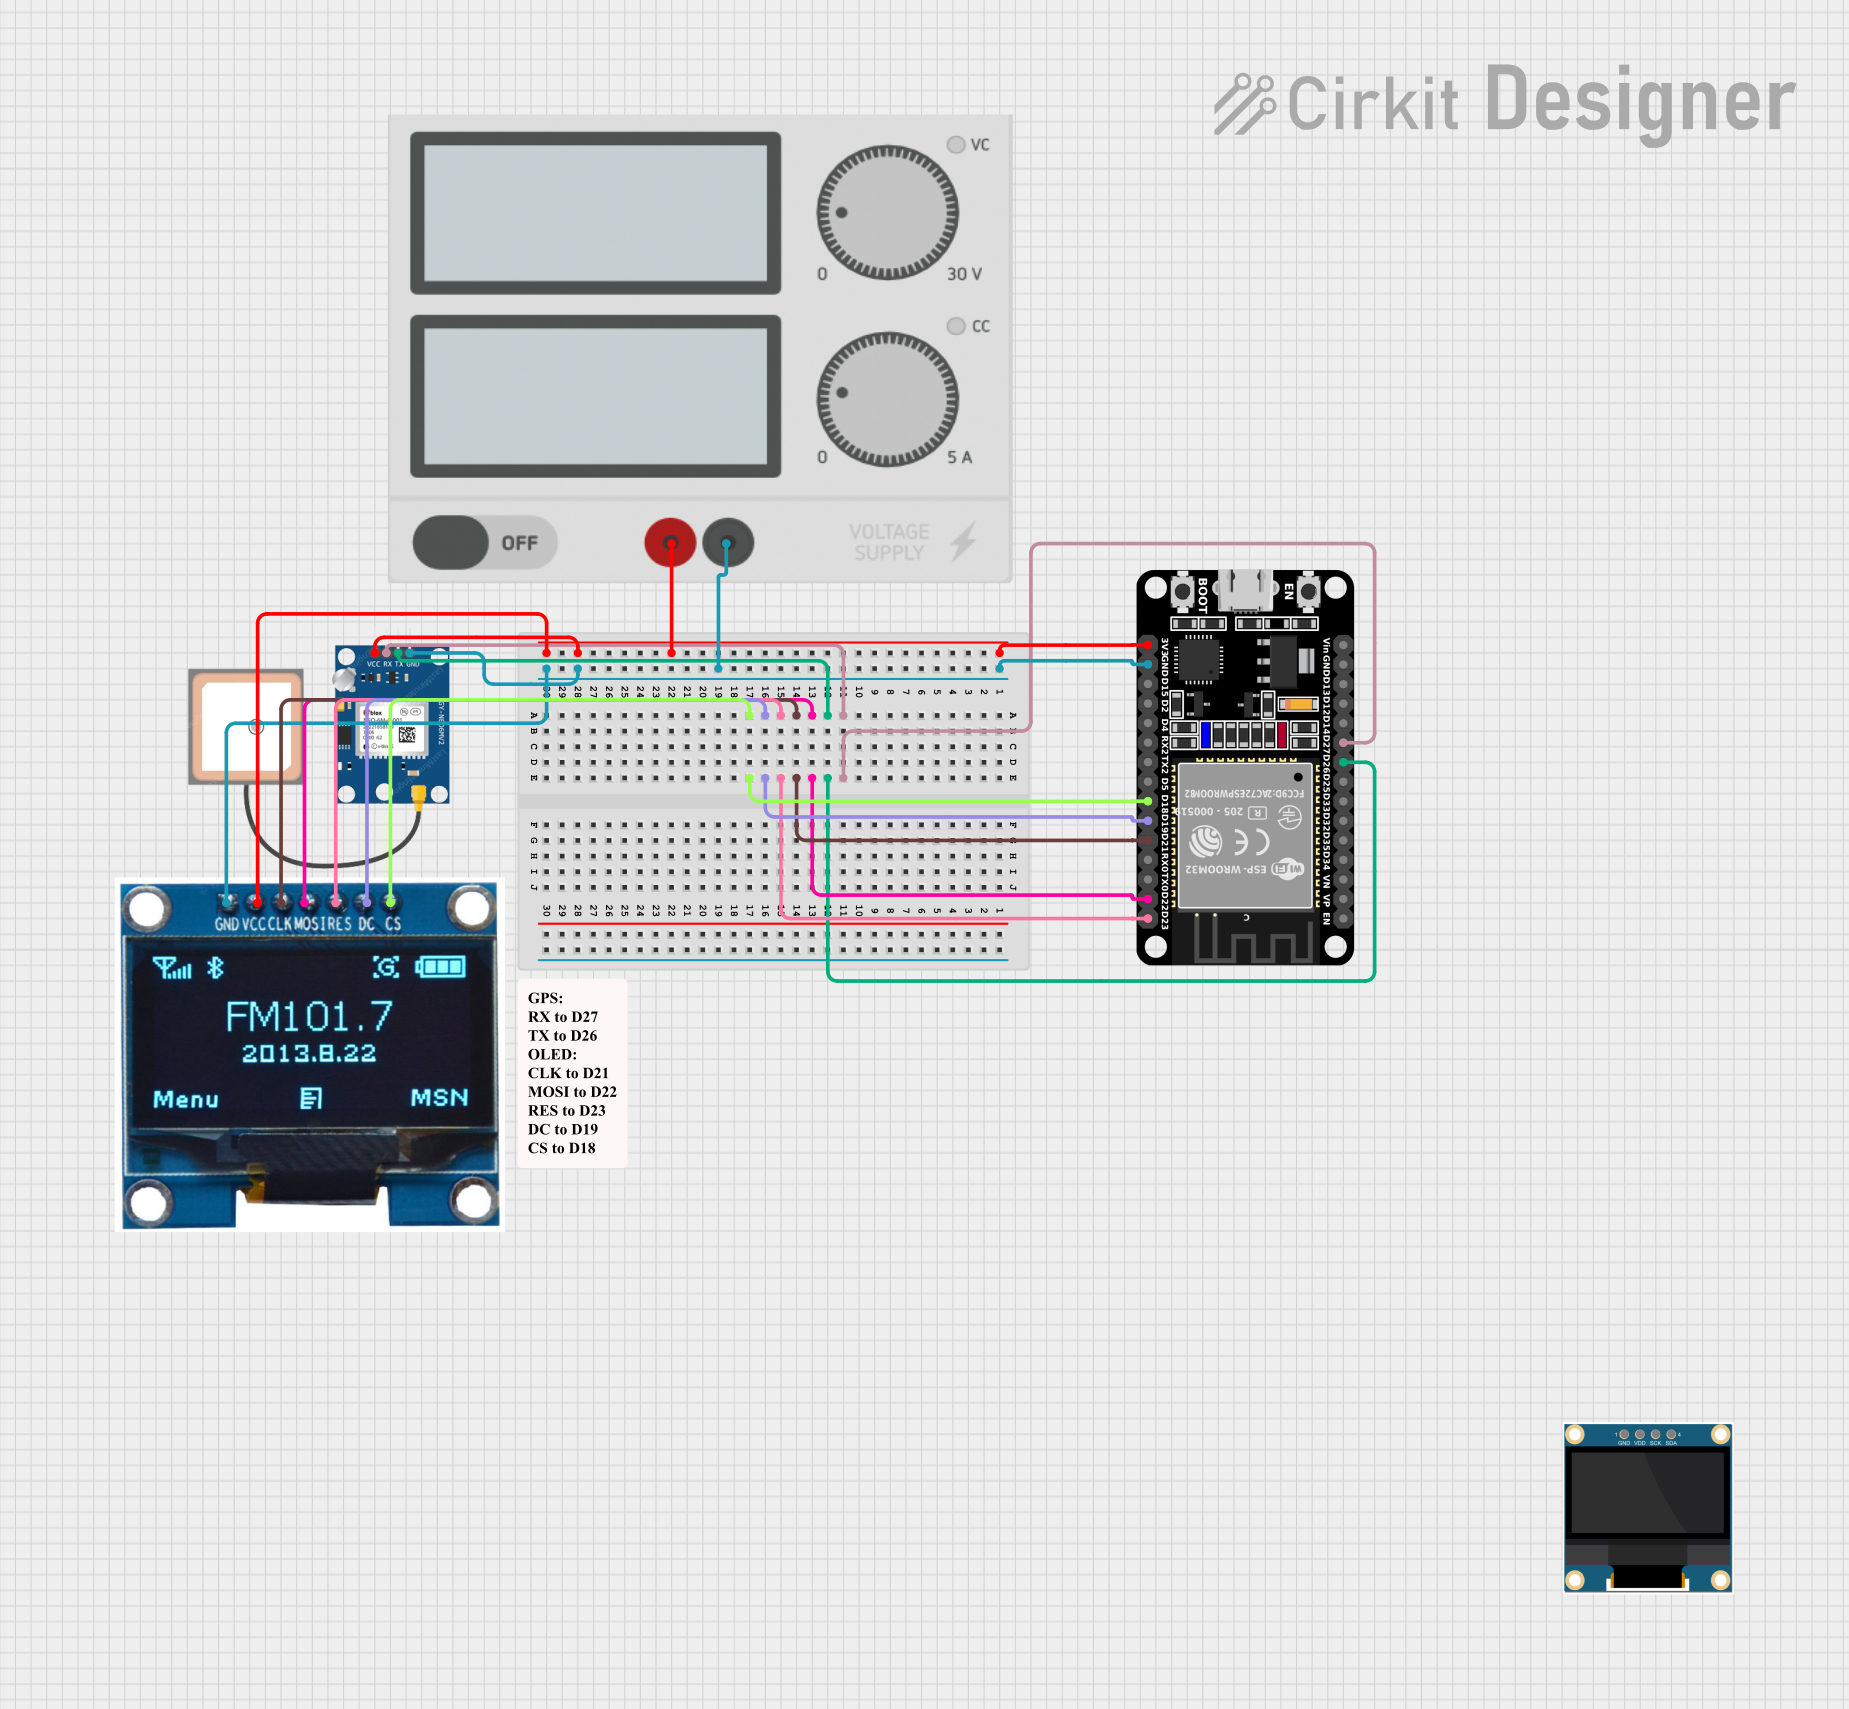
Circuit Documentation
Summary
This circuit integrates an ESP32 microcontroller with a GPS module and an OLED display to create a GPS tracking system. The ESP32 is responsible for processing GPS data received from the NEO 6M GPS module and displaying the location coordinates on the OLED display. Additionally, the ESP32 is programmed to connect to a WiFi network and send the GPS location data to a Telegram bot. The power supply module provides the necessary voltage to the components.
Component List
ESP32 (30 pin)
- Description: A microcontroller with WiFi and Bluetooth capabilities.
- Pins: EN, VP, VN, D34, D35, D32, D33, D25, D26, D27, D14, D12, D13, GND, Vin, D23, D22, TX0, RX0, D21, D19, D18, D5, TX2, RX2, D4, D2, D15, 3V3
1.3" OLED Display Module
- Description: A small OLED display for visual output.
- Pins: CS, GND, VCC, CLK, MOSI, RES, DC
GPS NEO 6M
- Description: A GPS module for location tracking.
- Pins: VCC, RX, TX, GND
Power Supply
- Description: Provides regulated voltage to the circuit.
- Pins: + (positive supply), - (ground)
Wiring Details
ESP32 (30 pin)
- D26 connected to GPS NEO 6M TX
- D27 connected to GPS NEO 6M RX
- D23 connected to 1.3" OLED Display Module RES
- D22 connected to 1.3" OLED Display Module MOSI
- D21 connected to 1.3" OLED Display Module CLK
- D19 connected to 1.3" OLED Display Module DC
- D18 connected to 1.3" OLED Display Module CS
- GND connected to 1.3" OLED Display Module GND, GPS NEO 6M GND, and Power Supply -
- 3V3 connected to 1.3" OLED Display Module VCC, GPS NEO 6M VCC, and Power Supply +
1.3" OLED Display Module
- RES connected to ESP32 D23
- MOSI connected to ESP32 D22
- CLK connected to ESP32 D21
- DC connected to ESP32 D19
- CS connected to ESP32 D18
- GND connected to ESP32 GND
- VCC connected to ESP32 3V3
GPS NEO 6M
- TX connected to ESP32 D26
- RX connected to ESP32 D27
- GND connected to ESP32 GND
- VCC connected to ESP32 3V3
Power Supply
-
- connected to ESP32 3V3, 1.3" OLED Display Module VCC, GPS NEO 6M VCC
-
- connected to ESP32 GND
Documented Code
ESP32 Microcontroller Code
#include <Wire.h>
#include <Adafruit_GFX.h>
#include <Adafruit_SSD1306.h>
#include <TinyGPS++.h>
#include <WiFi.h>
#include <HTTPClient.h>

#define SCREEN_WIDTH 128
#define SCREEN_HEIGHT 64
#define OLED_RESET -1
Adafruit_SSD1306 display(SCREEN_WIDTH, SCREEN_HEIGHT, &Wire, OLED_RESET);

TinyGPSPlus gps;
#define GPS_RX 27 // RX pin for GPS
#define GPS_TX 26 // TX pin for GPS
HardwareSerial ss(GPS_RX, GPS_TX); // Serial connection for GPS

const char* ssid = "YOUR_SSID"; // Replace with your WiFi SSID
const char* password = "YOUR_PASSWORD"; // Replace with your WiFi password
const String botToken = "YOUR_BOT_TOKEN"; // Replace with your Telegram bot token
const String chatID = "YOUR_CHAT_ID"; // Replace with your chat ID

void setup() {
  Serial.begin(9600);
  ss.begin(9600);

  display.begin(SSD1306_I2C_ADDRESS, OLED_RESET);
  display.clearDisplay();

  WiFi.begin(ssid, password);
  while (WiFi.status() != WL_CONNECTED) {
    delay(500);
    Serial.print(".");
  }
  Serial.println("Connected to WiFi");
}

void loop() {
  while (ss.available() > 0) {
    gps.encode(ss.read());

    if (gps.location.isUpdated()) {
      String location = "Lat: " + String(gps.location.lat(), 6) + " Lon: " + String(gps.location.lng(), 6);
      sendTelegramMessage(location);
      displayMessage(location);
    }
  }
}

void sendTelegramMessage(String message) {
  if (WiFi.status() == WL_CONNECTED) {
    HTTPClient http;
    String url = "https://api.telegram.org/bot" + botToken + "/sendMessage?chat_id=" + chatID + "&text=" + message;
    http.begin(url);
    int httpResponseCode = http.GET();
    if (httpResponseCode > 0) {
      String response = http.getString();
      Serial.println(response);
    }
    http.end();
  }
}

void displayMessage(String message) {
  display.clearDisplay();
  display.setCursor(0, 0);
  display.println(message);
  display.display();
}
This code initializes the ESP32 microcontroller, GPS module, and OLED display. It connects to a WiFi network and sends GPS location updates to a specified Telegram bot. The location is also displayed on the OLED screen. The code is structured with setup and loop functions, typical for Arduino sketches, and includes additional functions for sending messages via Telegram and displaying messages on the OLED.