
Arduino UNO Bluetooth-Controlled Robot with L298N Motor Driver
View and Edit Project In Cirkit Designer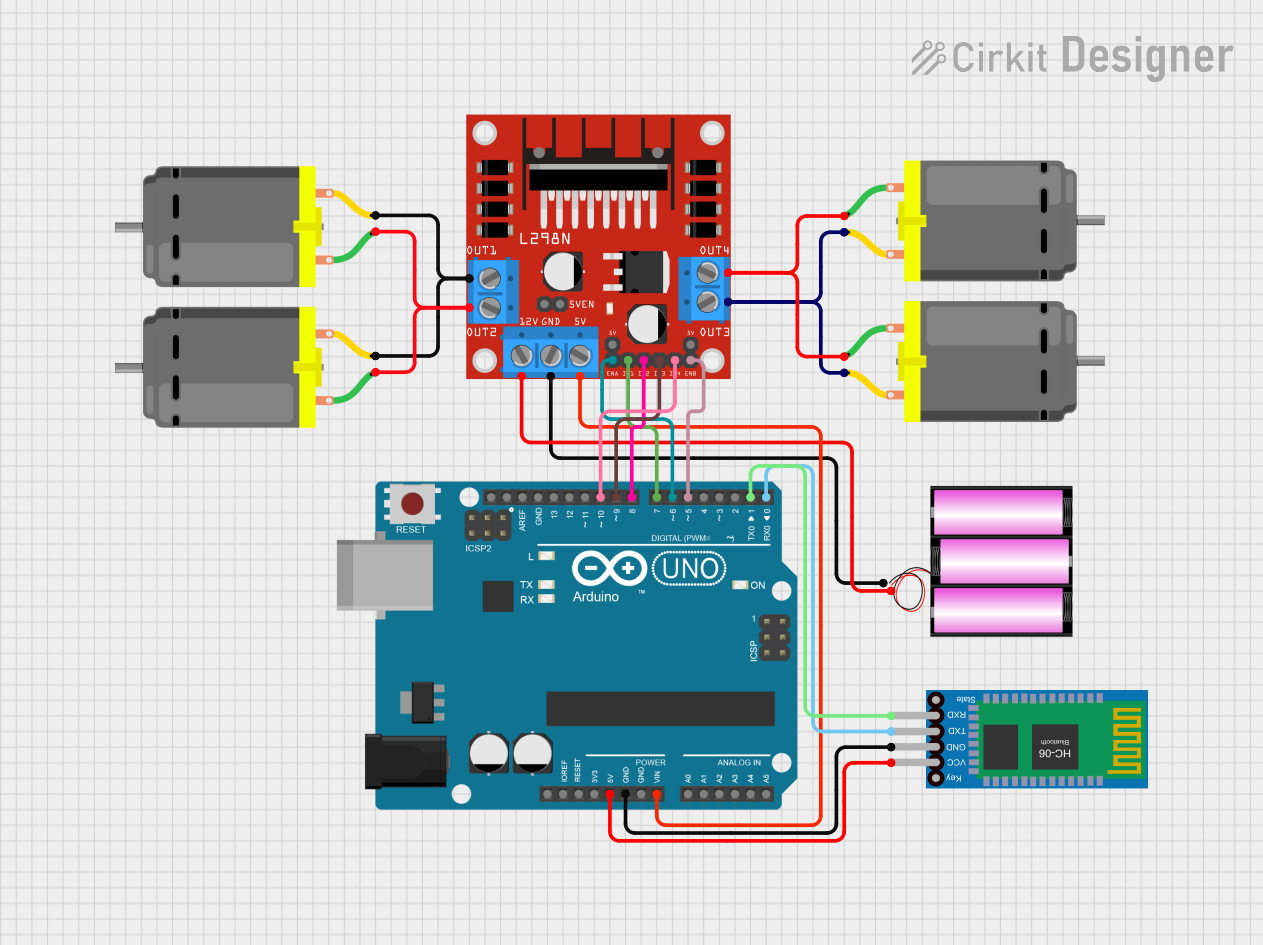
Circuit Documentation
Summary
This circuit is designed to control a robot with four DC motors using an Arduino UNO microcontroller and an L298N motor driver. The robot's movements are directed via Bluetooth communication using an HC-06 Bluetooth module. The motors are powered by a 12V battery, which also supplies power to the motor driver. The Arduino UNO controls the motor driver by sending signals to dictate the direction and speed of the motors. The Bluetooth module allows for wireless control through a paired Bluetooth device.
Component List
Arduino UNO
- Microcontroller board based on the ATmega328P
- Used for controlling the motors and handling Bluetooth communication
Bluetooth HC-06
- Bluetooth module for wireless communication
- Interfaces with the Arduino for remote control commands
Battery 12V
- Provides power to the circuit
- Supplies the motor driver with the necessary voltage for motor operation
DC Motors (4x)
- Actuators that drive the robot's movement
- Controlled by the motor driver, which receives commands from the Arduino
L298N DC Motor Driver
- Dual H-bridge motor driver
- Used to control the direction and speed of the motors
Wiring Details
Arduino UNO
5Vconnected to Bluetooth HC-06VCCGNDconnected to Bluetooth HC-06GNDVinconnected to L298N Motor Driver5VD10connected to L298N Motor DriverIN4D9connected to L298N Motor DriverIN3D8connected to L298N Motor DriverIN2D7connected to L298N Motor DriverIN1D6connected to L298N Motor DriverENAD5connected to L298N Motor DriverENBD1connected to Bluetooth HC-06RXDD0connected to Bluetooth HC-06TXD
Bluetooth HC-06
VCCconnected to Arduino UNO5VGNDconnected to Arduino UNOGNDTXDconnected to Arduino UNOD0RXDconnected to Arduino UNOD1
Battery 12V
+connected to L298N Motor Driver12V-connected to L298N Motor DriverGND
DC Motors
- Two motors connected in parallel to L298N Motor Driver
OUT4andOUT3 - Two motors connected in parallel to L298N Motor Driver
OUT2andOUT1
L298N DC Motor Driver
5Vconnected to Arduino UNOVin12Vconnected to Battery 12V+GNDconnected to Battery 12V-ENAconnected to Arduino UNOD6IN1connected to Arduino UNOD7IN2connected to Arduino UNOD8IN3connected to Arduino UNOD9IN4connected to Arduino UNOD10ENBconnected to Arduino UNOD5OUT1andOUT2connected to two DC MotorsOUT3andOUT4connected to two other DC Motors
Documented Code
// Define motor driver pins
const int ENA = 5;  // Enable pin for motor A (front-left & front-right wheels)
const int IN1 = 7;  // Input pin 1 for motor A
const int IN2 = 8;  // Input pin 2 for motor A
const int ENB = 6;  // Enable pin for motor B (back-left & back-right wheels)
const int IN3 = 9;  // Input pin 1 for motor B
const int IN4 = 10; // Input pin 2 for motor B

// Define Bluetooth module pins
#include <SoftwareSerial.h>
SoftwareSerial BT(10, 11);  // RX, TX

void setup() {
  // Set all motor driver pins as output
  pinMode(ENA, OUTPUT);
  pinMode(IN1, OUTPUT);
  pinMode(IN2, OUTPUT);
  pinMode(ENB, OUTPUT);
  pinMode(IN3, OUTPUT);
  pinMode(IN4, OUTPUT);

  // Start Bluetooth communication
  BT.begin(9600);  // Start Bluetooth at 9600 baud rate
  Serial.begin(9600);  // Start Serial for debugging
}

void loop() {
  if (BT.available()) {
    char data = BT.read();  // Read the command from the Bluetooth app

    if (data == 'F') {
      moveForward();  // Move the robot forward
    }
    else if (data == 'B') {
      moveBackward();  // Move the robot backward
    }
    else if (data == 'L') {
      turnLeft();  // Turn the robot left
    }
    else if (data == 'R') {
      turnRight();  // Turn the robot right
    }
    else if (data == 'S') {
      stopRobot();  // Stop the robot
    }

    // Debugging: Print the command received via Bluetooth
    Serial.println(data);
  }
}

// Function to move the robot forward
void moveForward() {
  digitalWrite(IN1, HIGH);
  digitalWrite(IN2, LOW);
  digitalWrite(IN3, HIGH);
  digitalWrite(IN4, LOW);
  analogWrite(ENA, 255);  // Set speed of motor A
  analogWrite(ENB, 255);  // Set speed of motor B
}

// Function to move the robot backward
void moveBackward() {
  digitalWrite(IN1, LOW);
  digitalWrite(IN2, HIGH);
  digitalWrite(IN3, LOW);
  digitalWrite(IN4, HIGH);
  analogWrite(ENA, 255);
  analogWrite(ENB, 255);
}

// Function to turn the robot left
void turnLeft() {
  digitalWrite(IN1, LOW);
  digitalWrite(IN2, HIGH);
  digitalWrite(IN3, HIGH);
  digitalWrite(IN4, LOW);
  analogWrite(ENA, 255);
  analogWrite(ENB, 255);
}

// Function to turn the robot right
void turnRight() {
  digitalWrite(IN1, HIGH);
  digitalWrite(IN2, LOW);
  digitalWrite(IN3, LOW);
  digitalWrite(IN4, HIGH);
  analogWrite(ENA, 255);
  analogWrite(ENB, 255);
}

// Function to stop the robot
void stopRobot() {
  digitalWrite(IN1, LOW);
  digitalWrite(IN2, LOW);
  digitalWrite(IN3, LOW);
  digitalWrite(IN4, LOW);
  analogWrite(ENA, 0);
  analogWrite(ENB, 0);
}
The code provided is for the Arduino UNO microcontroller. It includes the setup and loop functions, which are standard in Arduino programming. The setup function initializes the motor driver pins and starts the Bluetooth and Serial communication. The loop function listens for Bluetooth commands to control the robot's movements. There are also functions defined for moving the robot forward, backward, turning left, turning right, and stopping the robot.