
Arduino Mega 2560 Controlled Ghostbuster Trap Prop with MP3 Player and Haptic Feedback
View and Edit Project In Cirkit Designer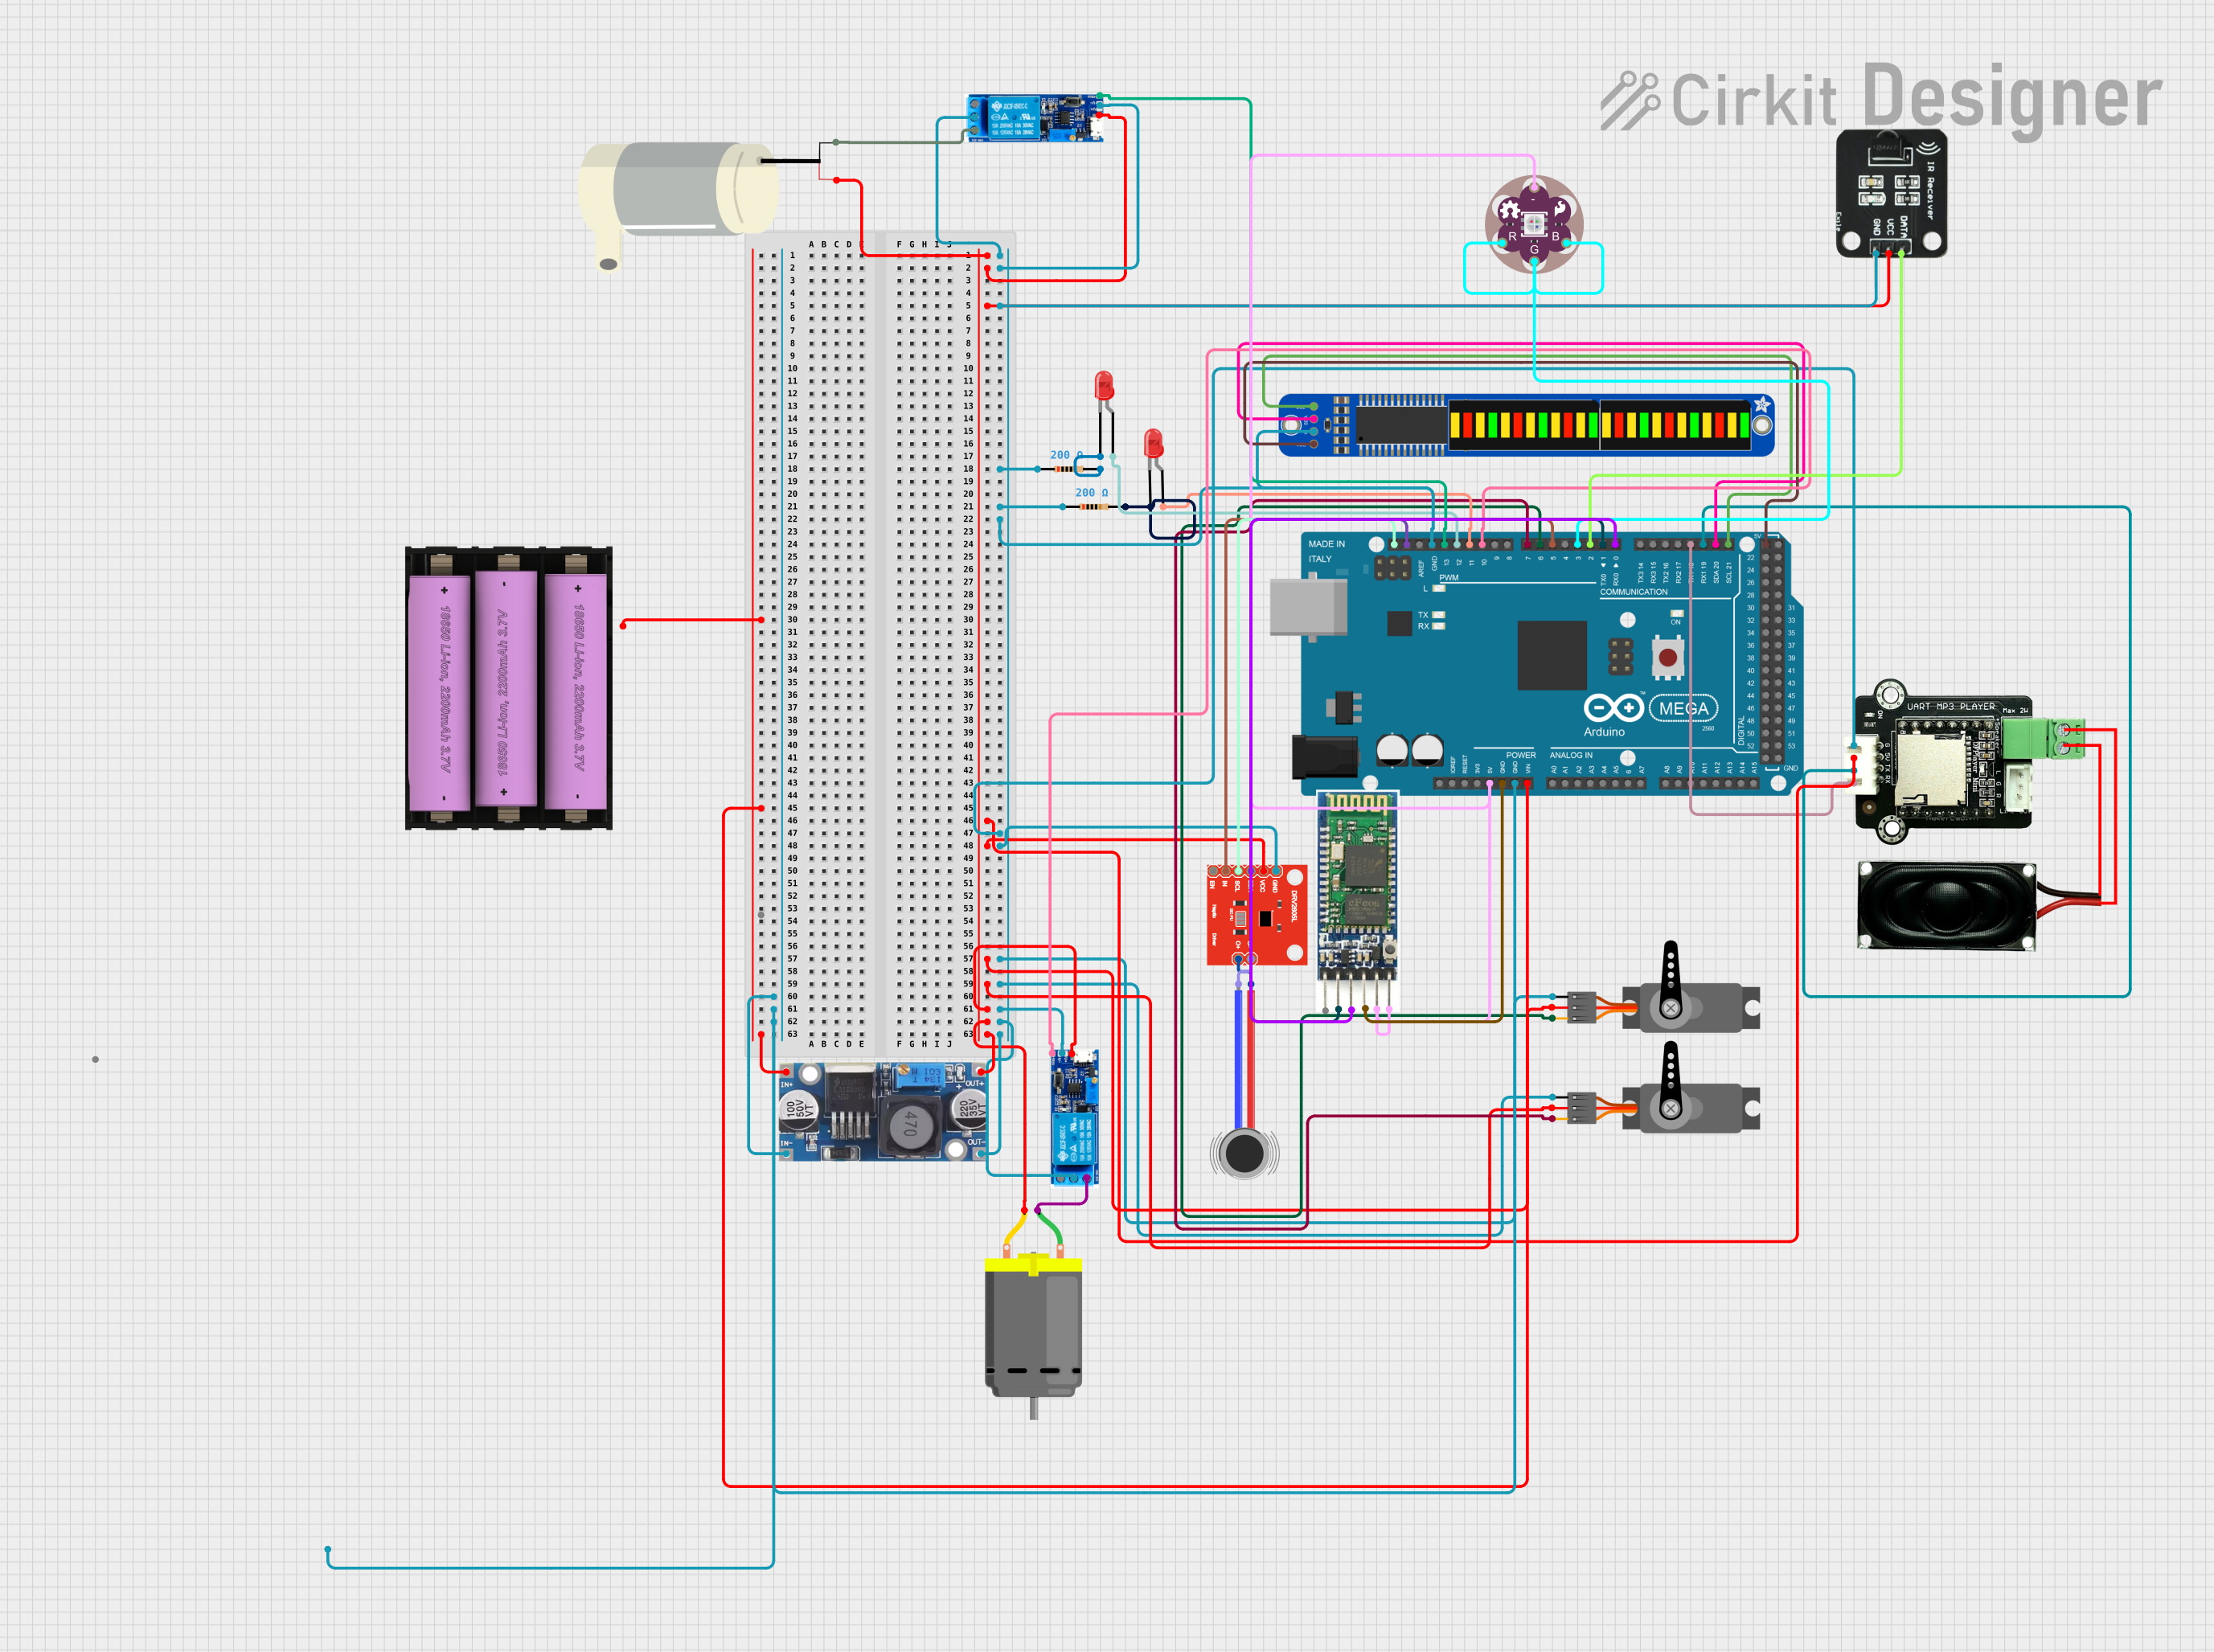
Circuit Documentation
Summary
The circuit is designed to simulate a ghost trapped in a Ghostbuster trap trying to escape, with a sequence of events triggered by an RF remote. The sequence includes audio playback, vibration effects, LED flickering and stabilization, bargraph display animations, servo movements, and a relay-controlled pump motor. The circuit is powered by a 7V battery and uses an Arduino Mega 2560 as the main controller, interfacing with various components to create the desired effects.
Component List
Arduino Mega 2560
- Microcontroller board based on the ATmega2560
- Provides a large number of I/O pins, including PWM, digital, and analog inputs
- Features I2C communication pins and serial communication capabilities
Adafruit Bi-Color 24-Bar Bargraph w/ I2C Backpack
- A 24-segment LED bargraph display that can show red or green or a mix of both colors
- Controlled via I2C interface
LED: Two Pin (red)
- A simple red LED with an anode and cathode for basic light-emitting functionality
MKE-M11 UART Control MP3 Player Module
- An MP3 player module that can be controlled via UART to play audio tracks
Set battery (7v)
- A battery set providing a 7V power source for the circuit
LilyPad RGB LED
- An RGB LED module that can display a variety of colors by mixing red, green, and blue
Servo
- A motor capable of precise position control, typically used for steering mechanisms in RC vehicles or for controlling movement in robotics
Vibration Motor
- A small motor that provides haptic feedback or vibration effects
SparkFun Haptic Motor Driver - DRV2605L
- A driver for controlling haptic motors, providing a variety of vibration effects
DC Motor
- A simple motor that converts electrical energy into mechanical rotation
Relay module 5v-30v
- An electrically operated switch that allows controlling high power devices with low power signals
Mini bomba de Agua (Mini Water Pump)
- A small pump used for moving water, typically used in small fountains or aquariums
Resistor (200 Ohms)
- A passive two-terminal electrical component that implements electrical resistance as a circuit element
IR Receiver
- A component that receives IR signals from a remote control
Step down Buck converter
- A DC-DC converter that steps down voltage from a higher level to a lower level
Bluetooth Module
- A wireless communication module that allows for Bluetooth connectivity
Wiring Details
Arduino Mega 2560
VINconnected to the positive terminal of the 7V batteryGNDconnected to the negative terminal of the 7V battery and common ground5Vpowers the Bluetooth module and the Adafruit Bi-Color 24-Bar BargraphD21/SCLandD20/SDAfor I2C communication with the Adafruit Bi-Color 24-Bar BargraphD19/RX1andD18/TX1for UART communication with the MKE-M11 UART Control MP3 Player ModuleD0 RX0andD1 TX0for serial communication with the Bluetooth moduleD2 PWMconnected to the IR Receiver's data pinD3 PWMconnected to the LilyPad RGB LED's red, blue, and green pinsD5 PWMconnected to the SparkFun Haptic Motor Driver's pin 2D6 PWMandD7 PWMconnected to the Servo's PWM pinsD10 PWMconnected to the Relay module's trigger pinD11 PWMandD12 PWMconnected to the anodes of the red LEDsD13 PWMconnected to the Relay module's trigger pinSDAandSCLconnected to the SparkFun Haptic Motor Driver's pins 4 and 3, respectively
Adafruit Bi-Color 24-Bar Bargraph w/ I2C Backpack
VDDconnected to the Arduino's 5VGNDconnected to common groundSDAandSCLconnected to the Arduino's I2C pins
LED: Two Pin (red)
Anodeconnected to the Arduino's PWM pins (D11 and D12)Cathodeconnected to the 200 Ohm resistors
MKE-M11 UART Control MP3 Player Module
5VandGNDconnected to the power rail and common ground, respectivelyTXandRXconnected to the Arduino's RX1 and TX1 pins
Set battery (7v)
+connected to the Arduino's VIN and the Step down Buck converter's IN +-connected to common ground
LilyPad RGB LED
R,B,Gconnected to the Arduino's D3 PWM pin+connected to the Arduino's 5V
Servo
VCCconnected to the power railGNDconnected to common groundPWMconnected to the Arduino's PWM pins (D6 and D7)
Vibration Motor
POSandNEGconnected to the SparkFun Haptic Motor Driver's pins 2 and 1, respectively
SparkFun Haptic Motor Driver - DRV2605L
VCCandGNDconnected to the power rail and common ground, respectively1and2connected to the Vibration Motor's NEG and POS pins3and4connected to the Arduino's SCL and SDA pins
DC Motor
Pin 1connected to the normally closed pin of the Relay modulePin 2connected to the power rail
Relay module 5v-30v
V+andV-connected to the power rail and common ground, respectivelyTriggerconnected to the Arduino's PWM pins (D10 and D13)Common contactconnected to the power railNormally closedconnected to the DC Motor's pin 1 and the Mini Water Pump's GND
Mini bomba de Agua (Mini Water Pump)
5Vconnected to the power railGNDconnected to the normally closed pin of the Relay module
Resistor (200 Ohms)
Pin1connected to common groundPin2connected to the cathodes of the red LEDs
IR Receiver
DATAconnected to the Arduino's D2 PWM pinVCCconnected to the power railGNDconnected to common ground
Step down Buck converter
IN +andIN - GNDconnected to the positive and negative terminals of the 7V battery, respectivelyOUT +andOUT - GNDconnected to the power rail and common ground, respectively
Bluetooth Module
ENandVCCconnected to the Arduino's 5VGNDconnected to common groundTXDandRXDconnected to the Arduino's RX0 and TX0 pins
Documented Code
/*
 * Ghostbuster Trap Prop Simulation
 * This code simulates a ghost trapped in a Ghostbuster trap trying to escape
 * and power failure and then stabilization at the end.
 * The sequence is triggered by an RF remote and includes the following:
 * - MP3 player tracks
 * - Vibration with haptic driver and DC motors
 * - Flickering LEDs, that then one turns solid and the other blinks at 1 per second
 * - Bargraph display
 * - Servo movements
 * - Relay-controlled pump motor
 */

#include <SoftWire.h>
#include <Wire.h>
#include <Adafruit_GFX.h>
#include <Adafruit_LEDBackpack.h>
#include <Servo.h>
#include <DFPlayer_Mini_Mp3.h>

// Pin definitions
SoftWire I2cbus1(44,45);
SoftWire I2cbus2(46,47);
#define VIBRATION_MOTOR_PIN 5
#define DC_MOTOR_PIN 10
#define LED1_PIN 11
#define LED2_PIN 12
#define RELAY_PIN 13
#define SERVO1_PIN 6
#define SERVO2_PIN 7
#define RF_REMOTE_PIN 2

// Components
Adafruit_24bargraph bargraph = Adafruit_24bargraph();
Servo servo1;
Servo servo2;

void setup() {
  // Initialize components
  I2cbus1.begin();
  I2cbus2.begin();
  pinMode(VIBRATION_MOTOR_PIN, OUTPUT);
  pinMode(DC_MOTOR_PIN, OUTPUT);
  pinMode(LED1_PIN, OUTPUT);
  pinMode(LED2_PIN, OUTPUT);
  pinMode(RELAY_PIN, OUTPUT);
  pinMode(RF_REMOTE_PIN, INPUT);
  servo1.attach(SERVO1_PIN);
  servo2.attach(SERVO2_PIN);
  bargraph.begin(0x70);
  mp3_set_serial(Serial1);
  mp3_set_volume(20);
}

void loop() {
  if (digitalRead(RF_REMOTE_PIN) == HIGH)