
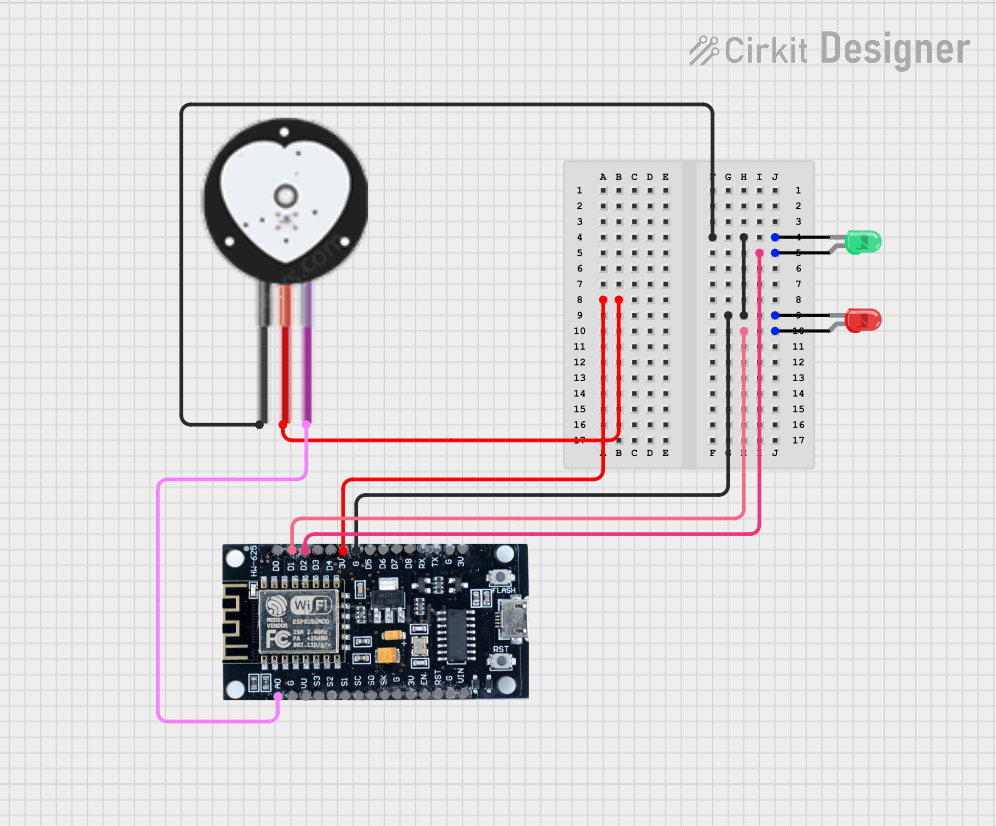
Heartbeat Monitor Circuit Documentation
Summary
This document provides a detailed overview of a heartbeat monitor circuit. The circuit uses an ESP8266 microcontroller to read data from a heart pulse sensor and control two LEDs (red and green) to indicate the heartbeat rate. The ESP8266 also serves a web page to display the heartbeat rate in real-time.
Component List
Heart Pulse Sensor
- Description: A sensor used to detect the heartbeat rate.
- Pins: GND, VCC, SIGNAL
ESP8266
- Description: A Wi-Fi enabled microcontroller used to process sensor data and control LEDs.
- Pins: 3V, G, D8, D7, D6, D5, D4, D3, D2, D1, D0, A0, S3, S2, S1, SC, S0, SK, EN, VIN, RST, VU
LED: Two Pin (red)
- Description: A red LED used to indicate a high heartbeat rate.
- Pins: cathode, anode
LED: Two Pin (green)
- Description: A green LED used to indicate a normal heartbeat rate.
- Pins: cathode, anode
Wiring Details
Heart Pulse Sensor
- GND is connected to the common ground.
- VCC is connected to the 3V pin of the ESP8266.
- SIGNAL is connected to the A0 pin of the ESP8266.
ESP8266
- 3V is connected to the VCC pin of the Heart Pulse Sensor.
- G is connected to the common ground.
- A0 is connected to the SIGNAL pin of the Heart Pulse Sensor.
- D1 is connected to the anode of the red LED.
- D2 is connected to the anode of the green LED.
LED: Two Pin (red)
- cathode is connected to the common ground.
- anode is connected to the D1 pin of the ESP8266.
LED: Two Pin (green)
- cathode is connected to the common ground.
- anode is connected to the D2 pin of the ESP8266.
Code Documentation
#include <ESP8266WiFi.h>
#include <ESPAsyncWebServer.h>

// WiFi AP credentials
const char* ssid = "HeartbeatMonitor";
const char* password = "12345678";

// GPIO Pins
#define PULSE_SENSOR_PIN A0
#define RED_LED_PIN 5
#define GREEN_LED_PIN 4

// Variables
int heartbeat = 0; // Heartbeat rate
bool isHighRate = false;

// Web Server
AsyncWebServer server(80);

// Function to read heartbeat and update LED states
void readHeartbeat() {
  // Simulate sensor reading (0-1023 mapped to a heart rate range)
  int sensorValue = analogRead(PULSE_SENSOR_PIN);
  heartbeat = map(sensorValue, 0, 1023, 60, 180); // Example mapping

  // Update LED states
  if (heartbeat > 100) { // Assuming 100 BPM as threshold for abnormal rate
    isHighRate = true;
    digitalWrite(RED_LED_PIN, HIGH);
    digitalWrite(GREEN_LED_PIN, LOW);
  } else {
    isHighRate = false;
    digitalWrite(RED_LED_PIN, LOW);
    digitalWrite(GREEN_LED_PIN, HIGH);
  }
}

void setup() {
  // Set LED pins as output
  pinMode(RED_LED_PIN, OUTPUT);
  pinMode(GREEN_LED_PIN, OUTPUT);

  // Start Serial for debugging
  Serial.begin(115200);

  // Start AP mode
  WiFi.softAP(ssid, password);
  Serial.println("Access Point Started");
  Serial.print("Connect to WiFi: ");
  Serial.println(ssid);
  Serial.println("Access the webpage at: http://192.168.4.1");

  // Serve the webpage
  server.on("/", HTTP_GET, [](AsyncWebServerRequest *request) {
    String html = "<!DOCTYPE html><html lang='en'>";
    html += "<head>";
    html += "<meta charset='UTF-8'>";
    html += "<meta name='viewport' content='width=device-width, initial-scale=1.0'>";
    html += "<title>Heartbeat Monitor</title>";
    html += "<style>";
    html += "body, h1, p { margin: 0; padding: 0; }";
    html += "body { font-family: 'Arial', sans-serif; background: linear-gradient(135deg, #1d3557, #457b9d); color: #f1faee; display: flex; justify-content: center; align-items: center; min-height: 100vh; margin: 0; }";
    html += ".container { background: rgba(255, 255, 255, 0.1); backdrop-filter: blur(10px); border-radius: 15px; box-shadow: 0 8px 20px rgba(0, 0, 0, 0.2); padding: 20px 30px; text-align: center; width: 90%; max-width: 400px; animation: fadeIn 1.5s ease-in-out; }";
    html += "@keyframes fadeIn { from { opacity: 0; transform: scale(0.8); } to { opacity: 1; transform: scale(1); } }";
    html += "h1 { font-size: 2rem; color: #e63946; text-shadow: 0 4px 6px rgba(0, 0, 0, 0.2); margin-bottom: 20px; }";
    html += "p { font-size: 1.2rem; margin-bottom: 10px; }";
    html += ".status { font-size: 1.5rem; font-weight: bold; padding: 10px; border-radius: 8px; margin-top: 20px; display: inline-block; text-transform: uppercase; letter-spacing: 1.5px; }";
    html += ".normal { background-color: #2a9d8f; color: #f1faee; }";
    html += ".high { background-color: #e63946; color: #f1faee; }";
    html += "footer { margin-top: 20px; font-size: 0.8rem; color: #f1faee; opacity: 0.7; }";
    html += "</style>";
    html += "</head>";
    html += "<body>";
    html += "<div class='container'>";
    html += "<h1>Heartbeat Monitor</h1>";
    html += "<p>Current Heartbeat: <span id='heartbeat'>" + String(heartbeat) + "</span> BPM</p>";
    html += "<p class='status " + String(isHighRate ? "high" : "normal") + "' id='status'>" + String(isHighRate ? "High" : "Normal") + "</p>";
    html += "<footer>Powered by ESP8266</footer>";
    html += "</div>";
    html += "<script>";
    html += "setInterval(() => { fetch('/data').then(res => res.json()).then(data => {";
    html += "document.getElementById('heartbeat').textContent = data.heartbeat;";
    html += "document.getElementById('status').textContent = data.isHighRate ? 'High' : 'Normal';";
    html += "document.getElementById('status').className = 'status ' + (data.isHighRate ? 'high' : 'normal');";
    html += "}); }, 1000);";
    html += "</script>";
    html += "</body></html>";
    request->send(200, "text/html", html);
  });

  // Serve JSON data for live updates
  server.on("/data", HTTP_GET, [](AsyncWebServerRequest *request) {
    String json = "{\"heartbeat\":" + String(heartbeat) + ",\"isHighRate\":" + String(isHighRate ? "true" : "false") + "}";
    request->send(200, "application/json", json);
  });

  // Start server
  server.begin();
}

void loop() {
  // Update heartbeat reading
  readHeartbeat();
  delay(1000); // Update every second
}
This code initializes the ESP8266 to read data from the heart pulse sensor and control the LEDs based on the heartbeat rate. It also sets up a web server to display the heartbeat rate in real-time.