
Arduino-Based Smart Gate System with Ultrasonic Sensor, RFID, and Servo Motor
View and Edit Project In Cirkit Designer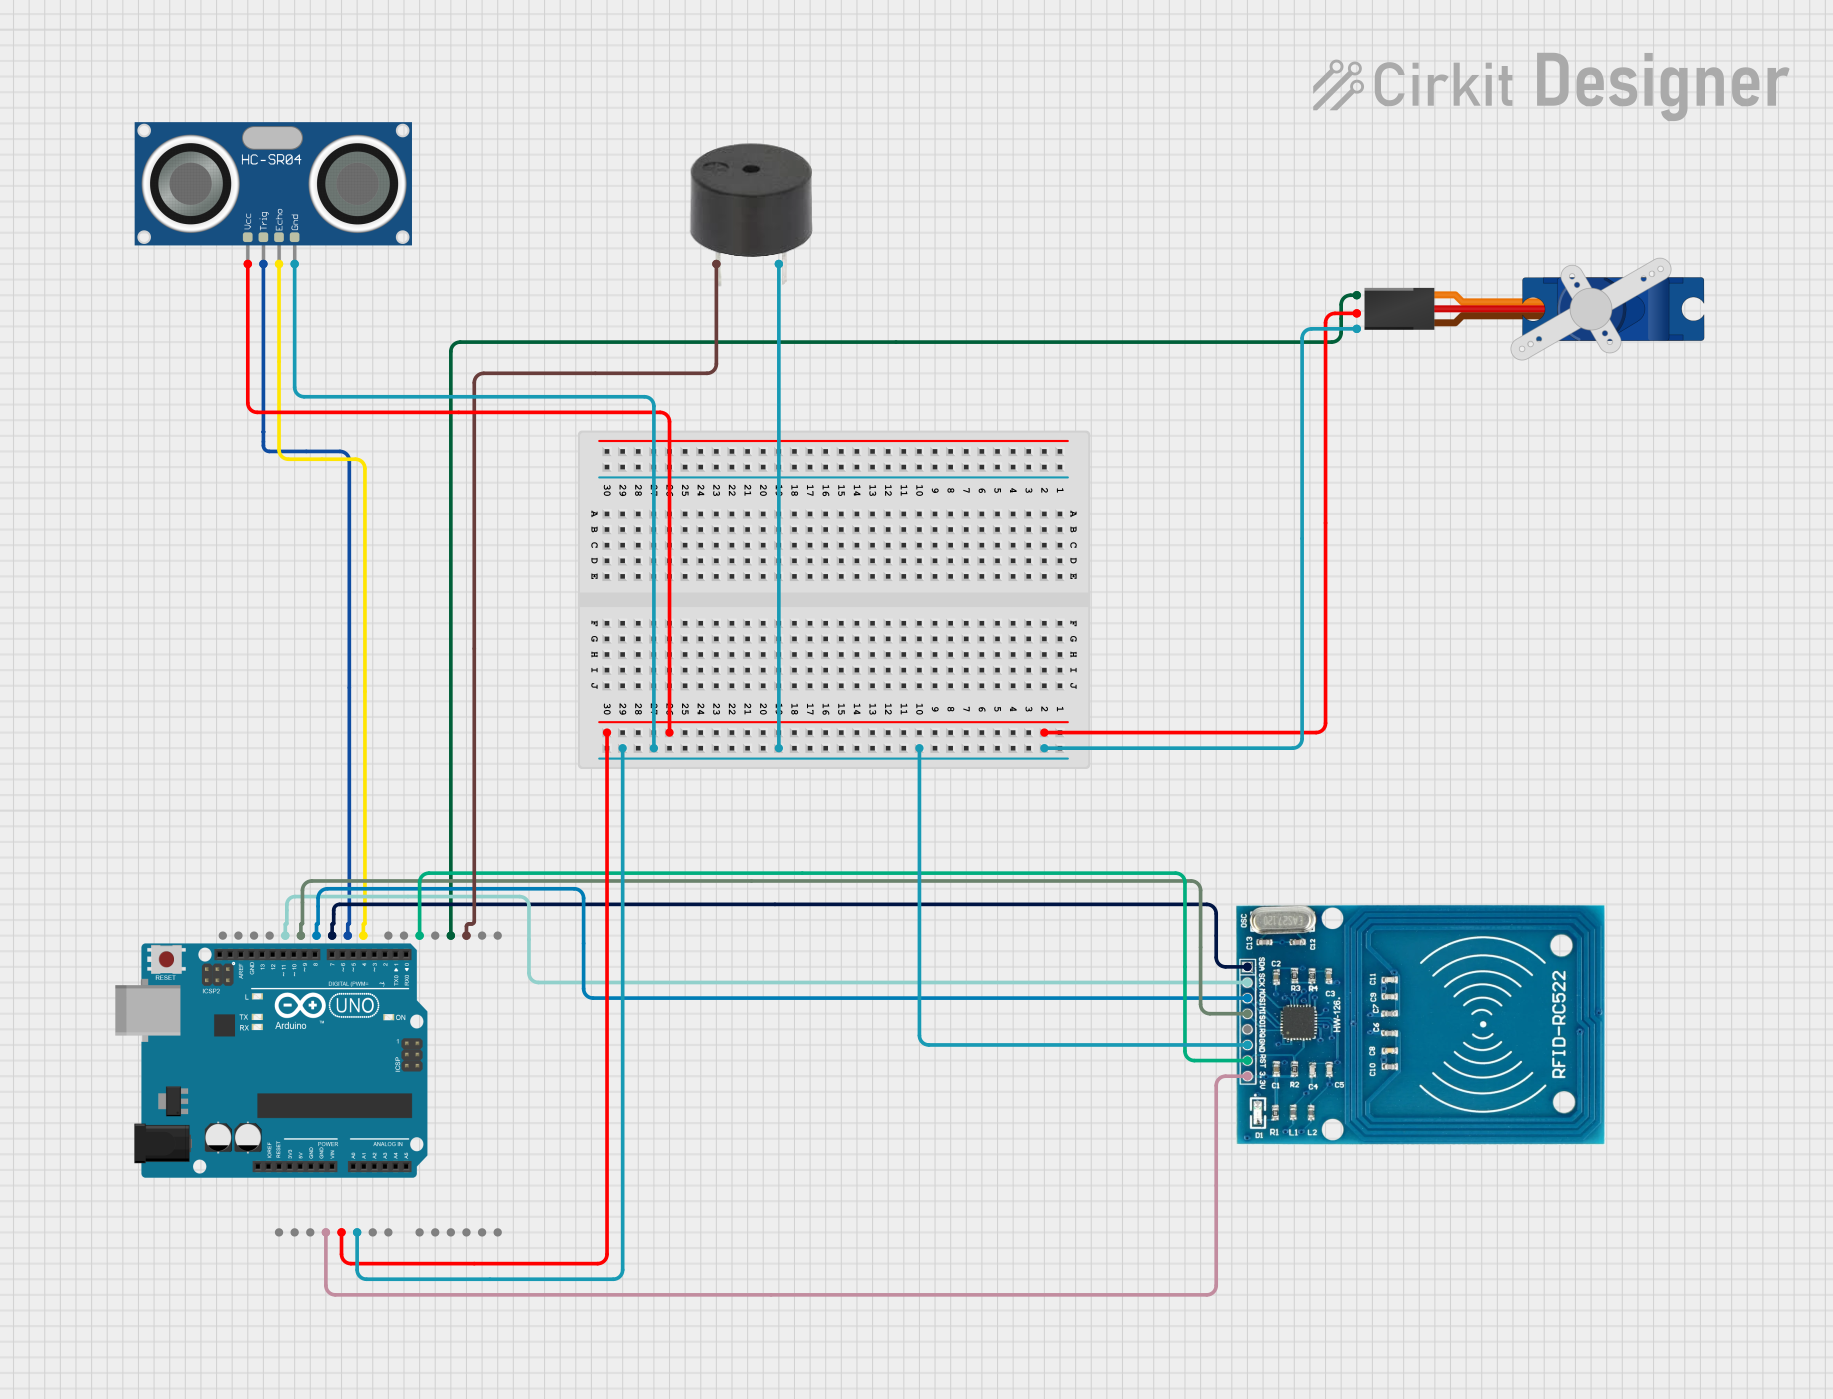
Circuit Documentation
Summary
This circuit integrates an Arduino UNO microcontroller with an HC-SR04 Ultrasonic Sensor, a Tower Pro SG90 servo motor, an RFID-RC522 module, and a buzzer. The system is designed to detect the presence of a car using the ultrasonic sensor, verify the car's RFID tag, and then operate a servo motor to open a gate. The buzzer provides an audible alert when a car is detected.
Component List
HC-SR04 Ultrasonic Sensor
- Description: Ultrasonic distance sensor used to measure the distance to an object.
- Pins: VCC, TRIG, ECHO, GND
Tower Pro SG90 Servo
- Description: Small servo motor used for precise control of angular position.
- Pins: Signal, +5V, GND
RFID-RC522
- Description: RFID reader module used to read RFID tags.
- Pins: VCC (3.3V), RST, GND, IRQ, MISO, MOSI, SCK, SDA
Arduino UNO
- Description: Microcontroller board based on the ATmega328P.
- Pins: UNUSED, IOREF, Reset, 3.3V, 5V, GND, Vin, A0, A1, A2, A3, A4, A5, SCL, SDA, AREF, D13, D12, D11, D10, D9, D8, D7, D6, D5, D4, D3, D2, D1, D0
Buzzer
- Description: Simple buzzer used to provide audible alerts.
- Pins: PIN, GND
Wiring Details
HC-SR04 Ultrasonic Sensor
- VCC connected to 5V on Arduino UNO
- TRIG connected to D9 on Arduino UNO
- ECHO connected to D8 on Arduino UNO
- GND connected to GND on Arduino UNO
Tower Pro SG90 Servo
- Signal connected to D3 on Arduino UNO
- +5V connected to 5V on Arduino UNO
- GND connected to GND on Arduino UNO
RFID-RC522
- VCC (3.3V) connected to 3.3V on Arduino UNO
- RST connected to D5 on Arduino UNO
- GND connected to GND on Arduino UNO
- MISO connected to D12 on Arduino UNO
- MOSI connected to D11 on Arduino UNO
- SCK connected to D13 on Arduino UNO
- SDA connected to D10 on Arduino UNO
Buzzer
- PIN connected to D2 on Arduino UNO
- GND connected to GND on Arduino UNO
Documented Code
/*
 * Arduino - Ultrasonic Sensor HC-SR04 with Buzzer, RFID, and Servo
 */
#include <MFRC522.h>
#include <SPI.h>
#include <Servo.h>

#define SS_PIN 10
#define RST_PIN 7

int trigPin = 9;    // TRIG pin
int echoPin = 8;    // ECHO pin
int buzzerPin = 2;  // Buzzer pin
int servoPin = 3;

float duration_us, distance_cm;

// Create a servo object
Servo Servo1;

MFRC522 rfid(SS_PIN, RST_PIN); // Instance of the RFID class
MFRC522::MIFARE_Key key;

bool carDetected = false;
bool rfidVerified = false;

void setup() {
  // Begin serial port
  Serial.begin(9600);

  // Configure pins
  pinMode(trigPin, OUTPUT); // Trigger pin as output
  pinMode(echoPin, INPUT);  // Echo pin as input
  pinMode(buzzerPin, OUTPUT); // Buzzer pin as output
  Servo1.attach(servoPin);
  Servo1.write(0);

  // Initialize RFID
  SPI.begin();       // Init SPI bus
  rfid.PCD_Init();   // Init RC522 module

  // Turn off the buzzer initially
  digitalWrite(buzzerPin, LOW);
}

void loop() {
  // Step 1: Ultrasonic sensor to detect a car
  digitalWrite(trigPin, HIGH);
  delayMicroseconds(10);
  digitalWrite(trigPin, LOW);

  // Measure duration of pulse from ECHO pin
  duration_us = pulseIn(echoPin, HIGH);

  // Calculate the distance
  distance_cm = 0.017 * duration_us;

  // Print the value to Serial Monitor
  Serial.print("Distance: ");
  Serial.print(distance_cm);
  Serial.println(" cm");

  // Check if a car is detected
  if (distance_cm < 5) {
    carDetected = true;

    // Activate the buzzer
    digitalWrite(buzzerPin, HIGH);
    delay(500);
    digitalWrite(buzzerPin, LOW);
  }

  // Step 2: RFID verification
  if (carDetected && !rfidVerified) {
    // Check for a new card
    if (rfid.PICC_IsNewCardPresent()) {
      // Verify if the UID has been read
      if (rfid.PICC_ReadCardSerial()) {
        Serial.print("RFID Tag UID: ");
        printHex(rfid.uid.uidByte, rfid.uid.size);
        Serial.println("");
        rfidVerified = true;

        // Halt the RFID reader
        rfid.PICC_HaltA();
      }
    }
  }

  // Step 3: Servo motor operates when both conditions are met
  if (carDetected && rfidVerified) {
    // Open the gate (servo up)
    Servo1.write(90);
    delay(7000);

    // Close the gate (servo down)
    Servo1.write(0);
    delay(500);

    // Reset flags for the next vehicle
    carDetected = false;
    rfidVerified = false;
  }

  delay(100); // Brief delay for stability
}

// Routine to dump a byte array as hex values to Serial
void printHex(byte *buffer, byte bufferSize) {
  for (byte i = 0; i < bufferSize; i++) {
    Serial.print(buffer[i] < 0x10 ? " 0" : " ");
    Serial.print(buffer[i], HEX);
  }
}
This code initializes the components and continuously checks for the presence of a car using the ultrasonic sensor. If a car is detected, the buzzer is activated, and the system waits for RFID verification. Once the RFID tag is verified, the servo motor operates to open and close the gate.